Module 4 Field Activity: Electronics, Programming, IoT and Multidisciplinary Learning
Assignments
- Choose a collaborator and content
- Set learning objectives.
- Develop and test the electronics / programming part of the lesson
- Develop the Assessment protocol for the lesson plan
- Develop the lesson plan using the SCOPES template
- Test the lesson plan to receive feedback.
- Reflection Questions.
1. Choose a collaborator and content
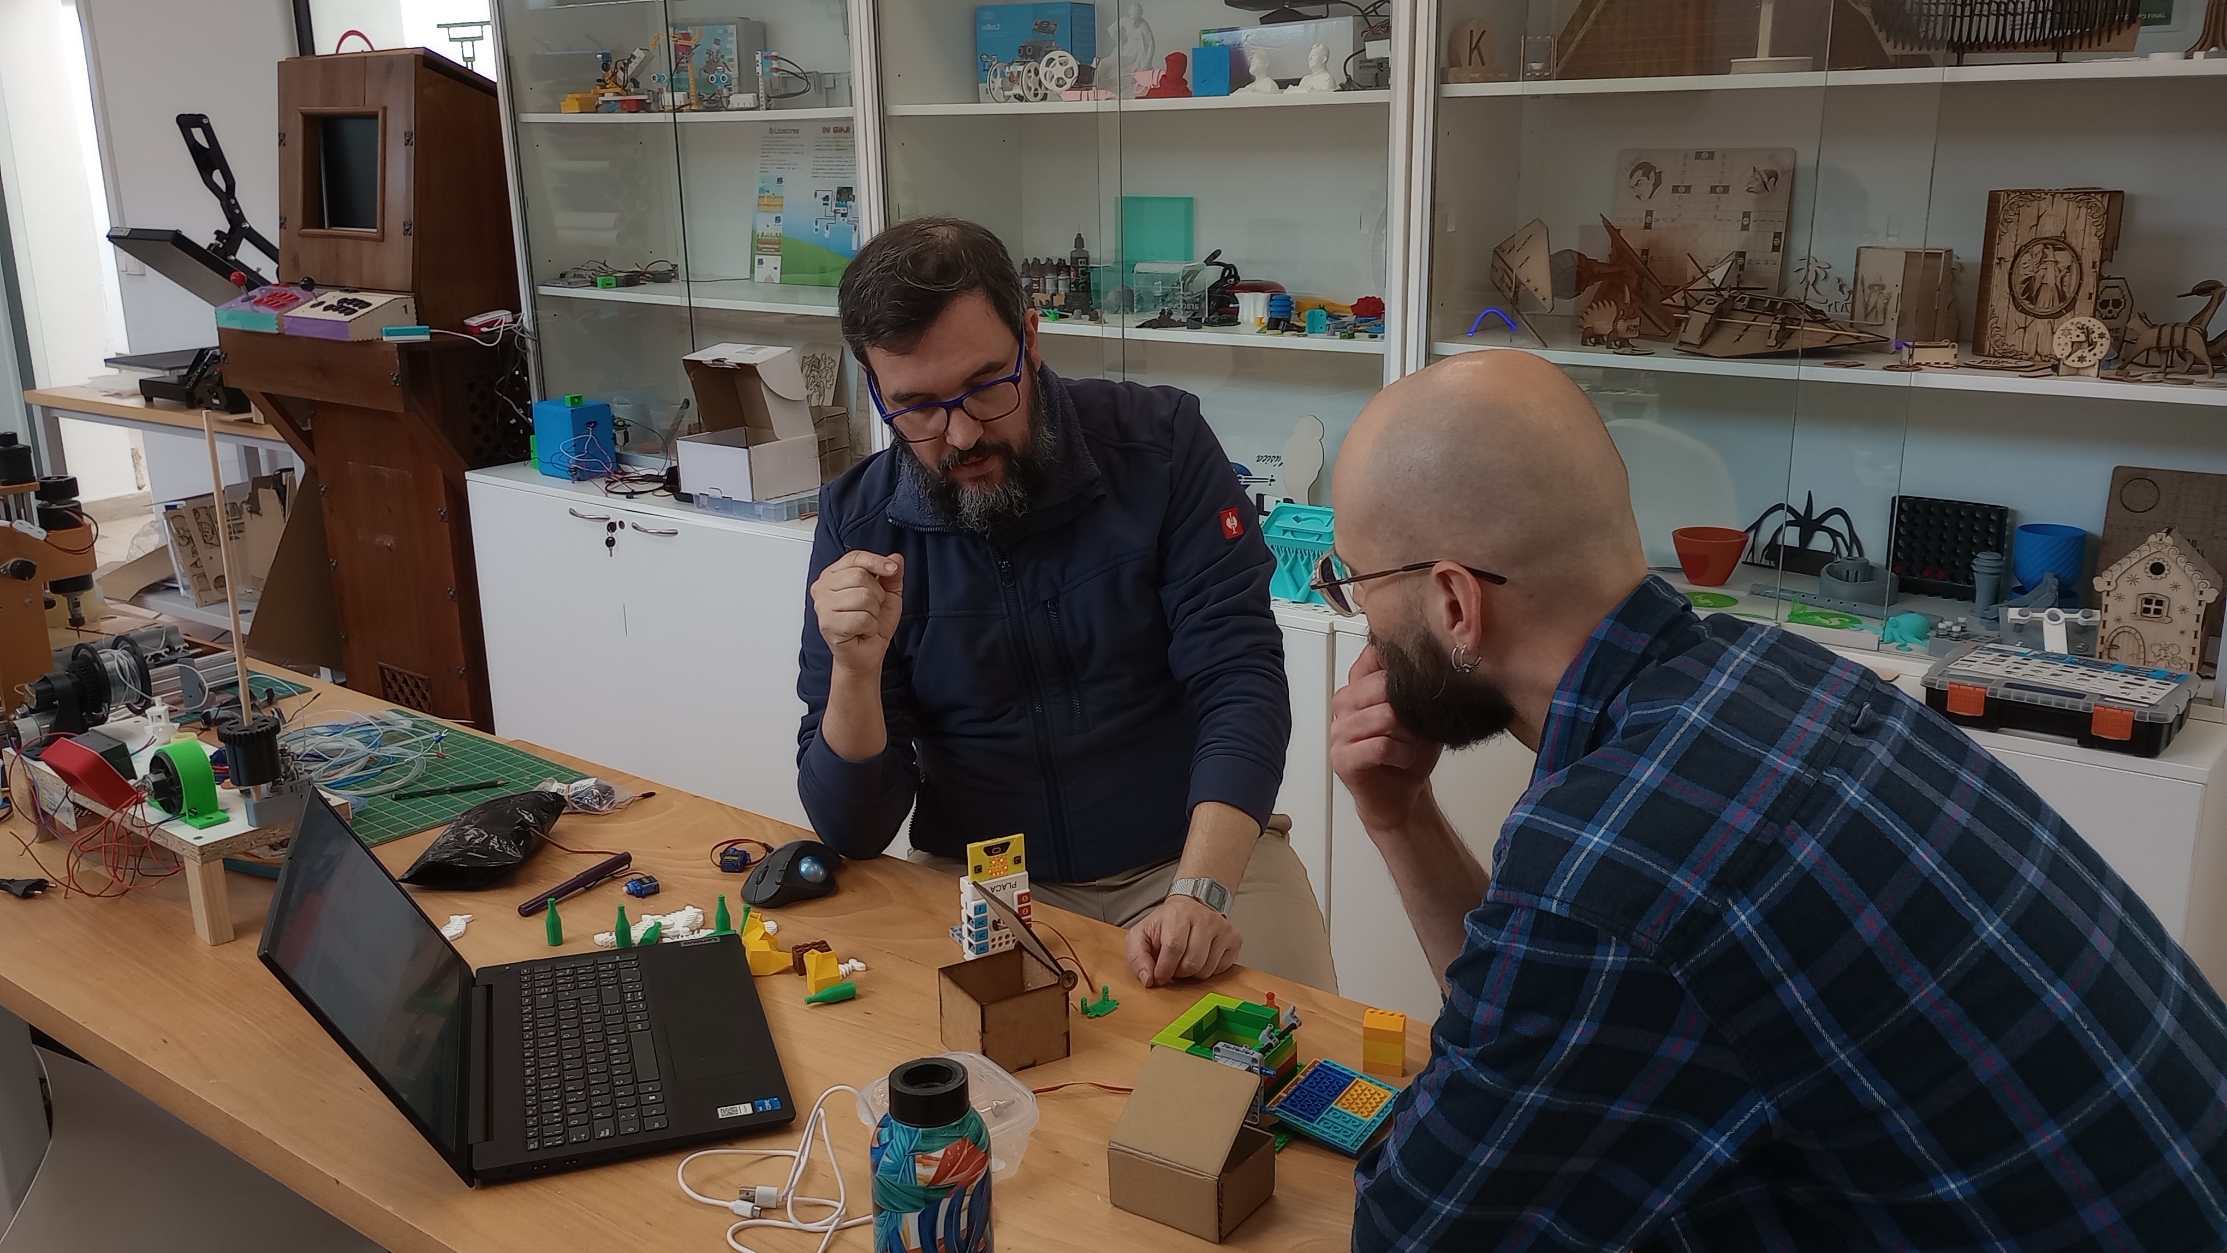
For this lesson plan, I have chosen to collaborate with Kris, a colleague from the lab. Although we both work in the same lab and share a common professional environment, we bring different perspectives and experiences to the project. My approach is more focused on the educational design and implementation of the activity, while Kris contributes extensive experience in fab labs and in a wide variety of projects involving both digital fabrication and traditional making skills. His contribution to this lesson plan will be to support the design and construction of the physical kit needed for the activity, suggesting practical ways to build its different parts.
Lesson idea
For this Field Activity, I will develop an interdisciplinary lesson based on the subjects Technology and Civic Values and Ethics from the Spanish curriculum established in Royal Decree 217/2022, of 29 March, establishing the organisation and minimum curriculum of Compulsory Secondary Education.
In this lesson, students will design and build a smart recycling system. They will create a prototype of a smart bin that uses a servo motor to open automatically when the correct type of waste item is presented. To do this, students will train a machine learning model to recognise different categories of waste, such as plastic, cardboard, or glass. They will then connect this model to a physical computing system controlled by a Micro:bit using tools such as Teachable Machine and Make:AI Robots.
This lesson integrates technological design, programming, electronics, and artificial intelligence with ethical reflection on waste prevention, sustainability, and responsible resource management.
Content from both disciplines
- Technology
Products and materials
- Strategies for selecting materials based on their properties and design requirements.
Computational thinking, automation and robotics
- Components of programmed control systems: controllers, sensors, and actuators.
- The computer and mobile devices as programming and control tools.
- Introduction to artificial intelligence and big data: applications.
- Civic Values and Ethics
- Sustainable lifestyles: waste prevention and the sustainable management of resources.
- The Sustainable Development Goals (SDG 2030), with special emphasis on those related to climate sustainability.
2. Set learning objectives.
- Assemble a functional electromechanical prototype
- Program a microcontroller using variables, conditionals, and event-based logic
- Train and evaluate an image classification model
- Integrate a machine learning model with a physical computing system
- Reflect on how technology can support sustainable practices
3. Develop and test the electronics / programming part of the lesson
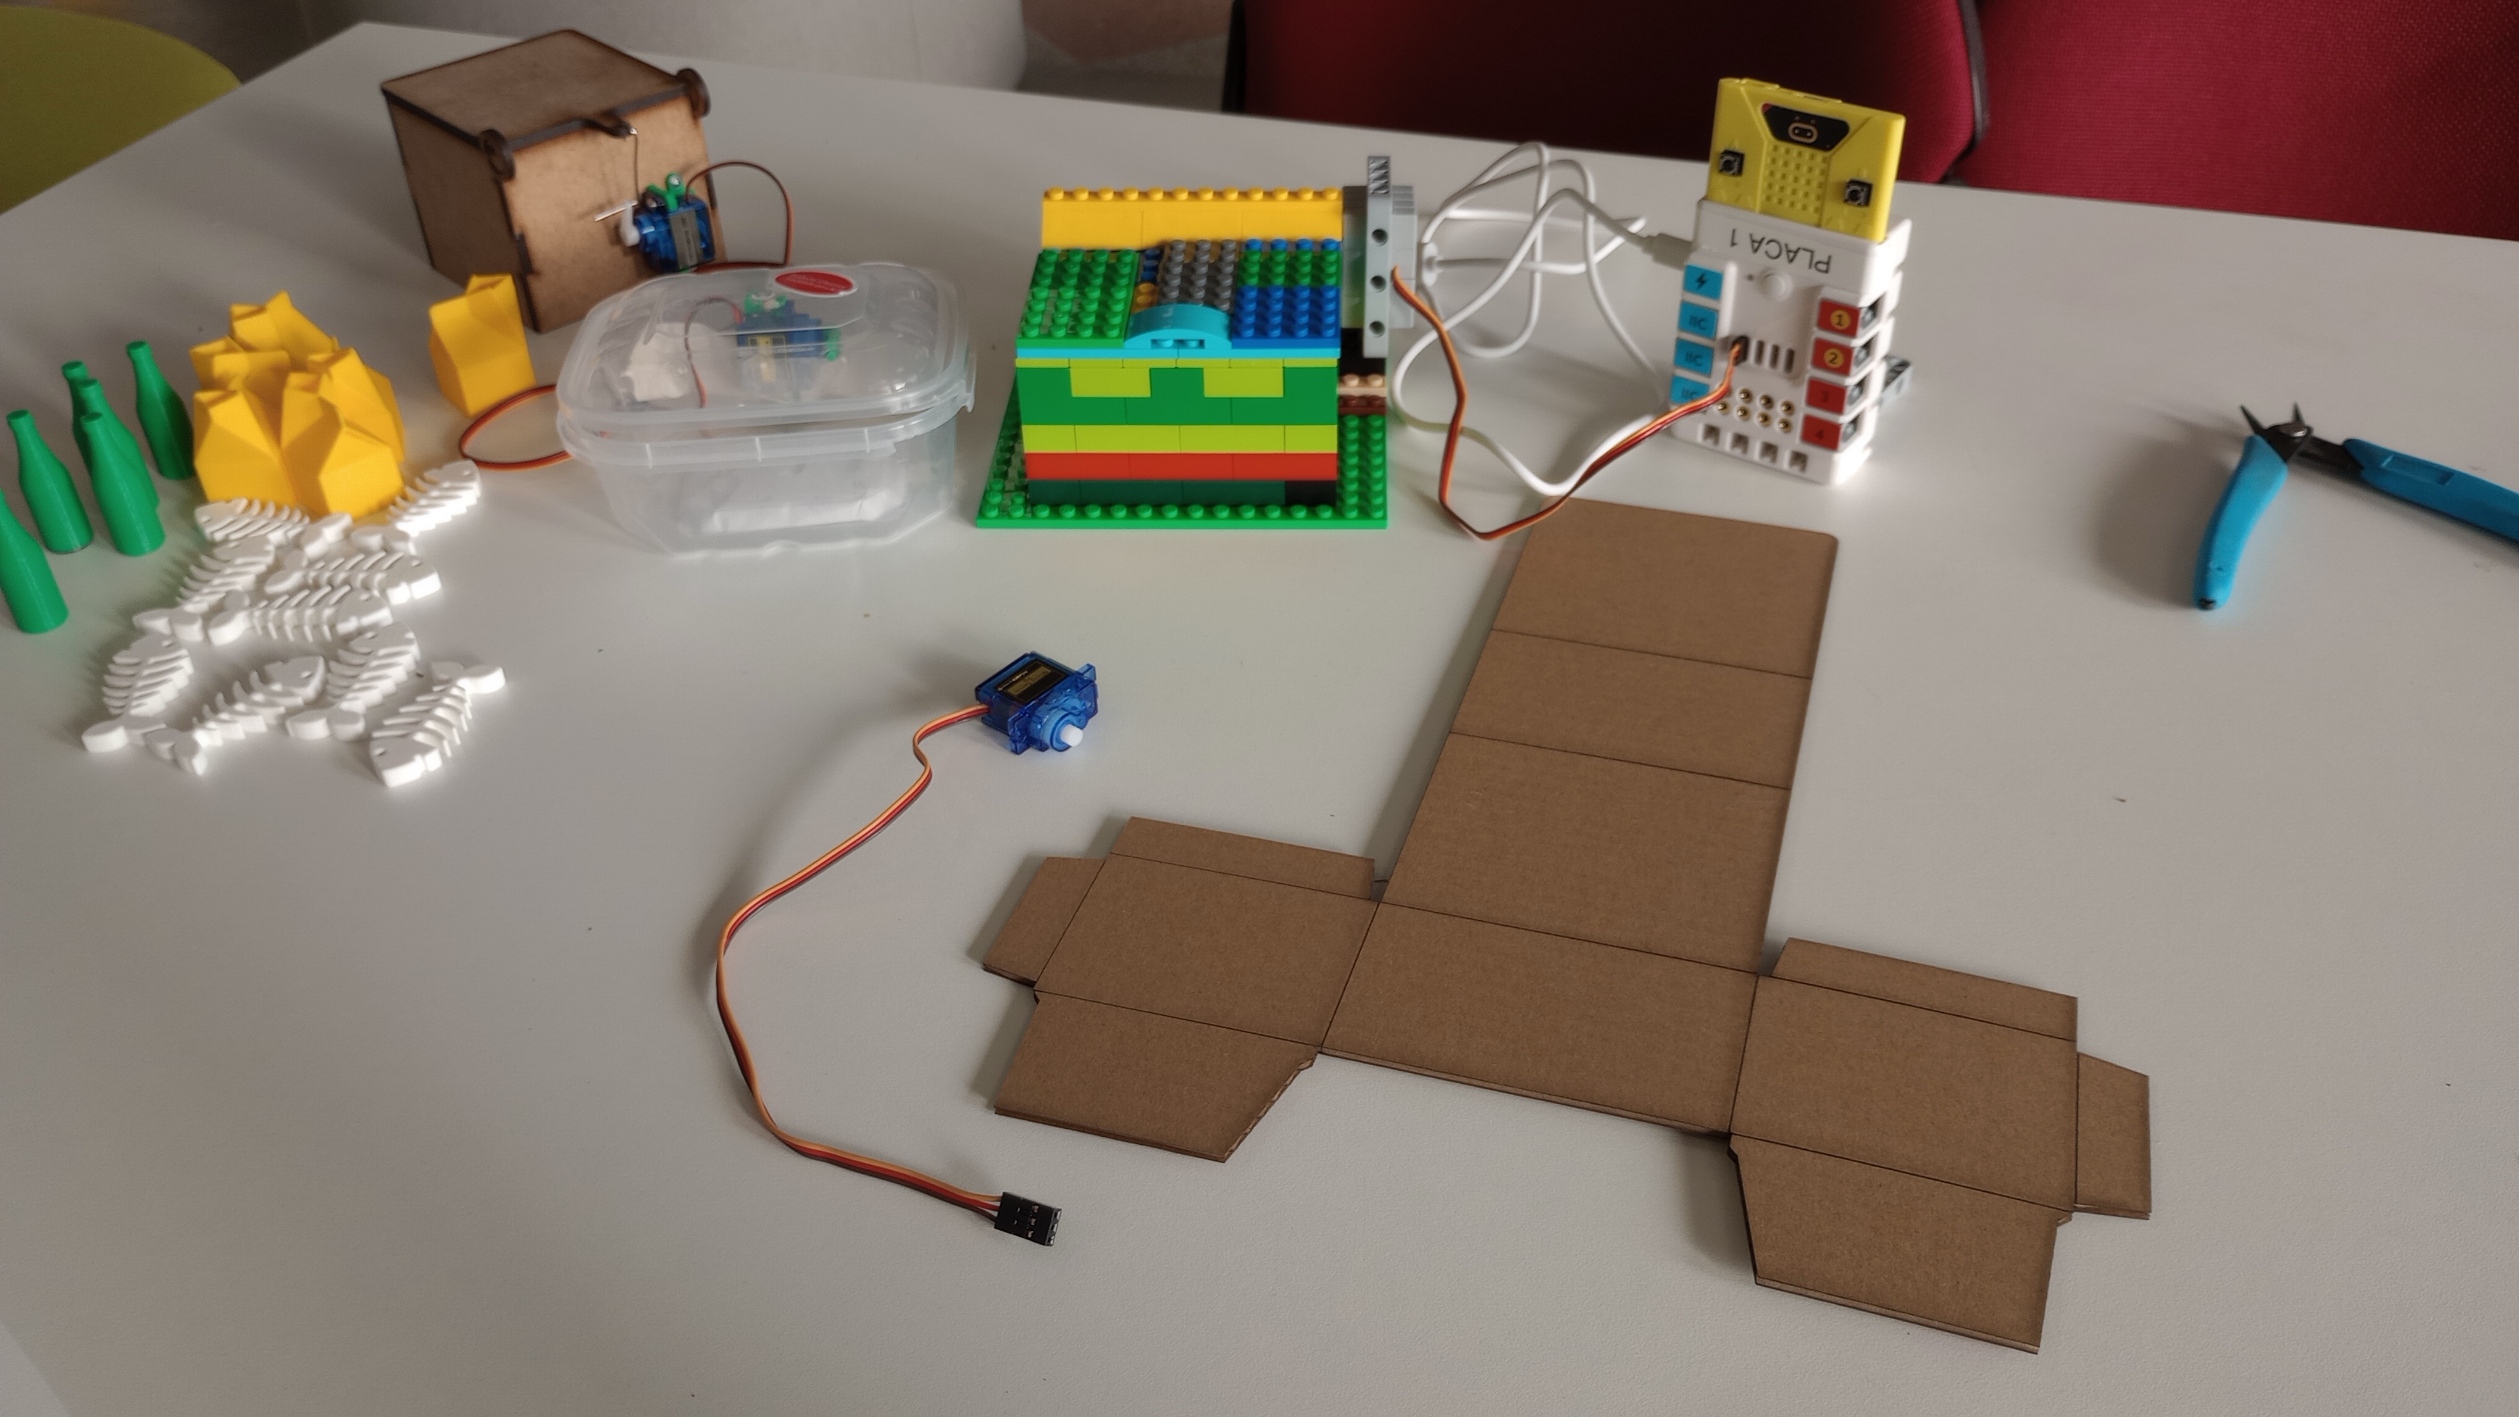
It is time to test the idea for the project: to design and build a recycling system that uses machine-learning models to ensure that only the correct items are placed in the corresponding recycling bin.
To build and test the prototype, I am using the following resources:
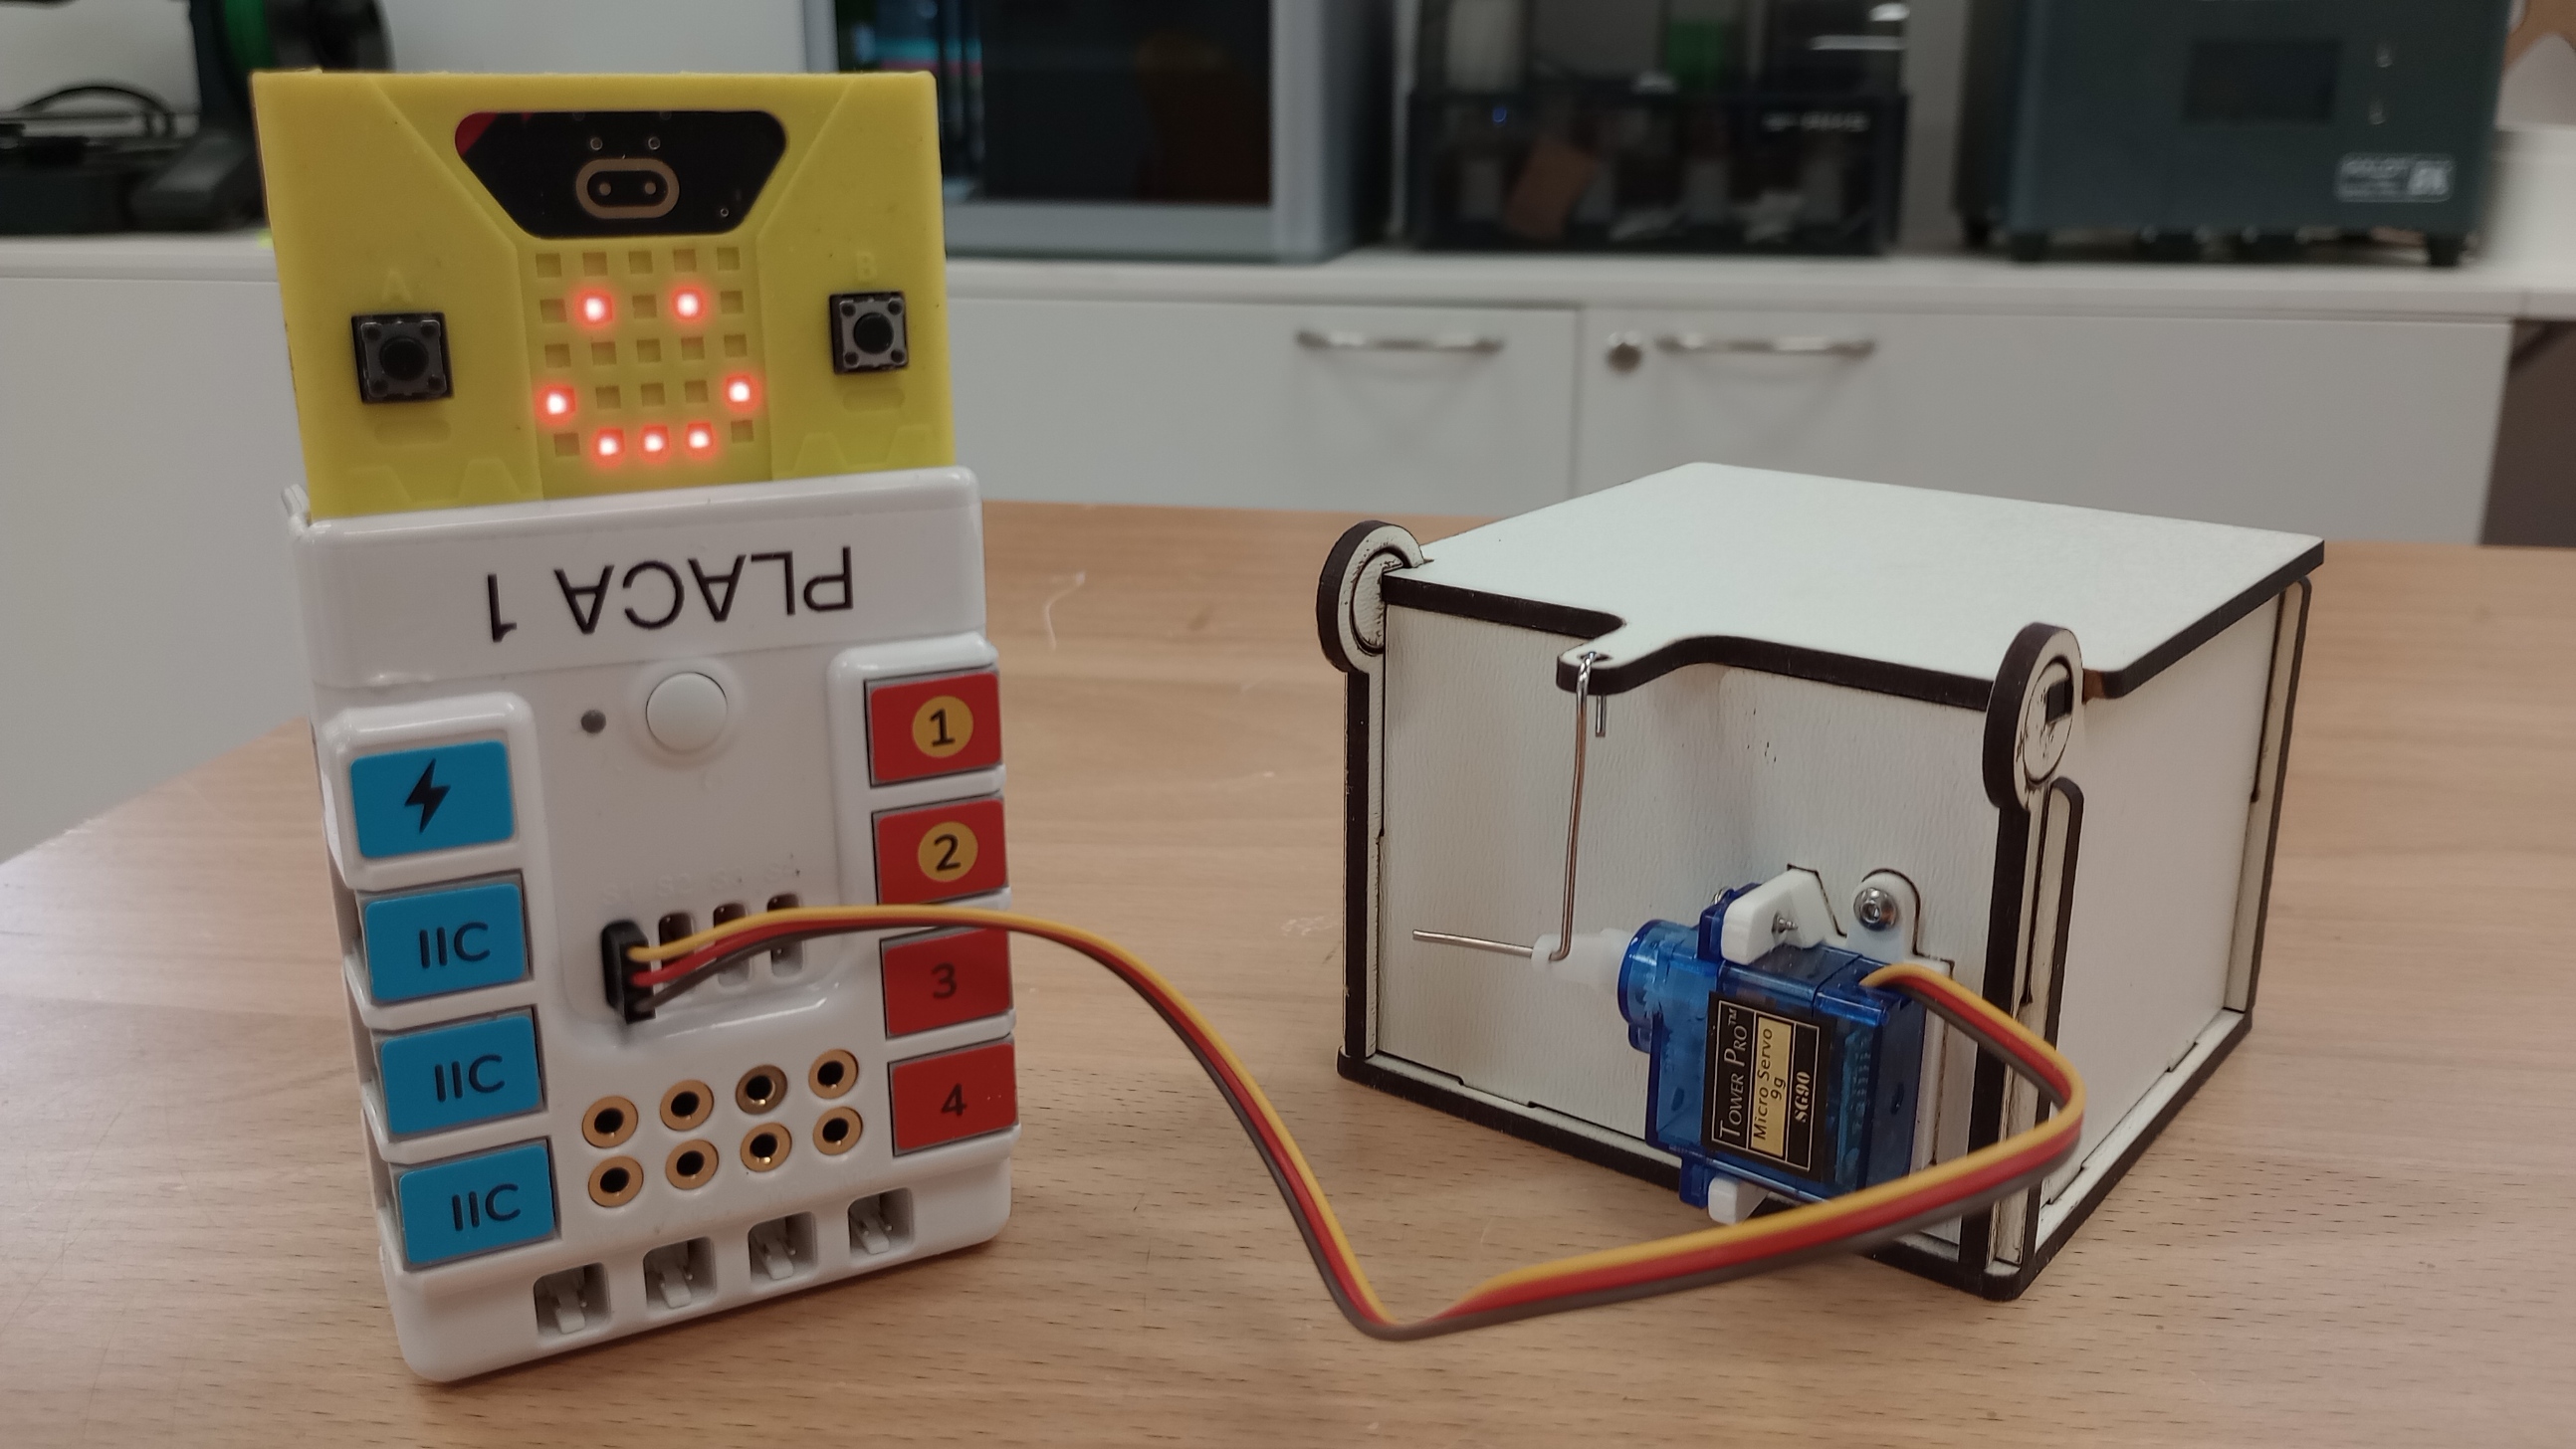
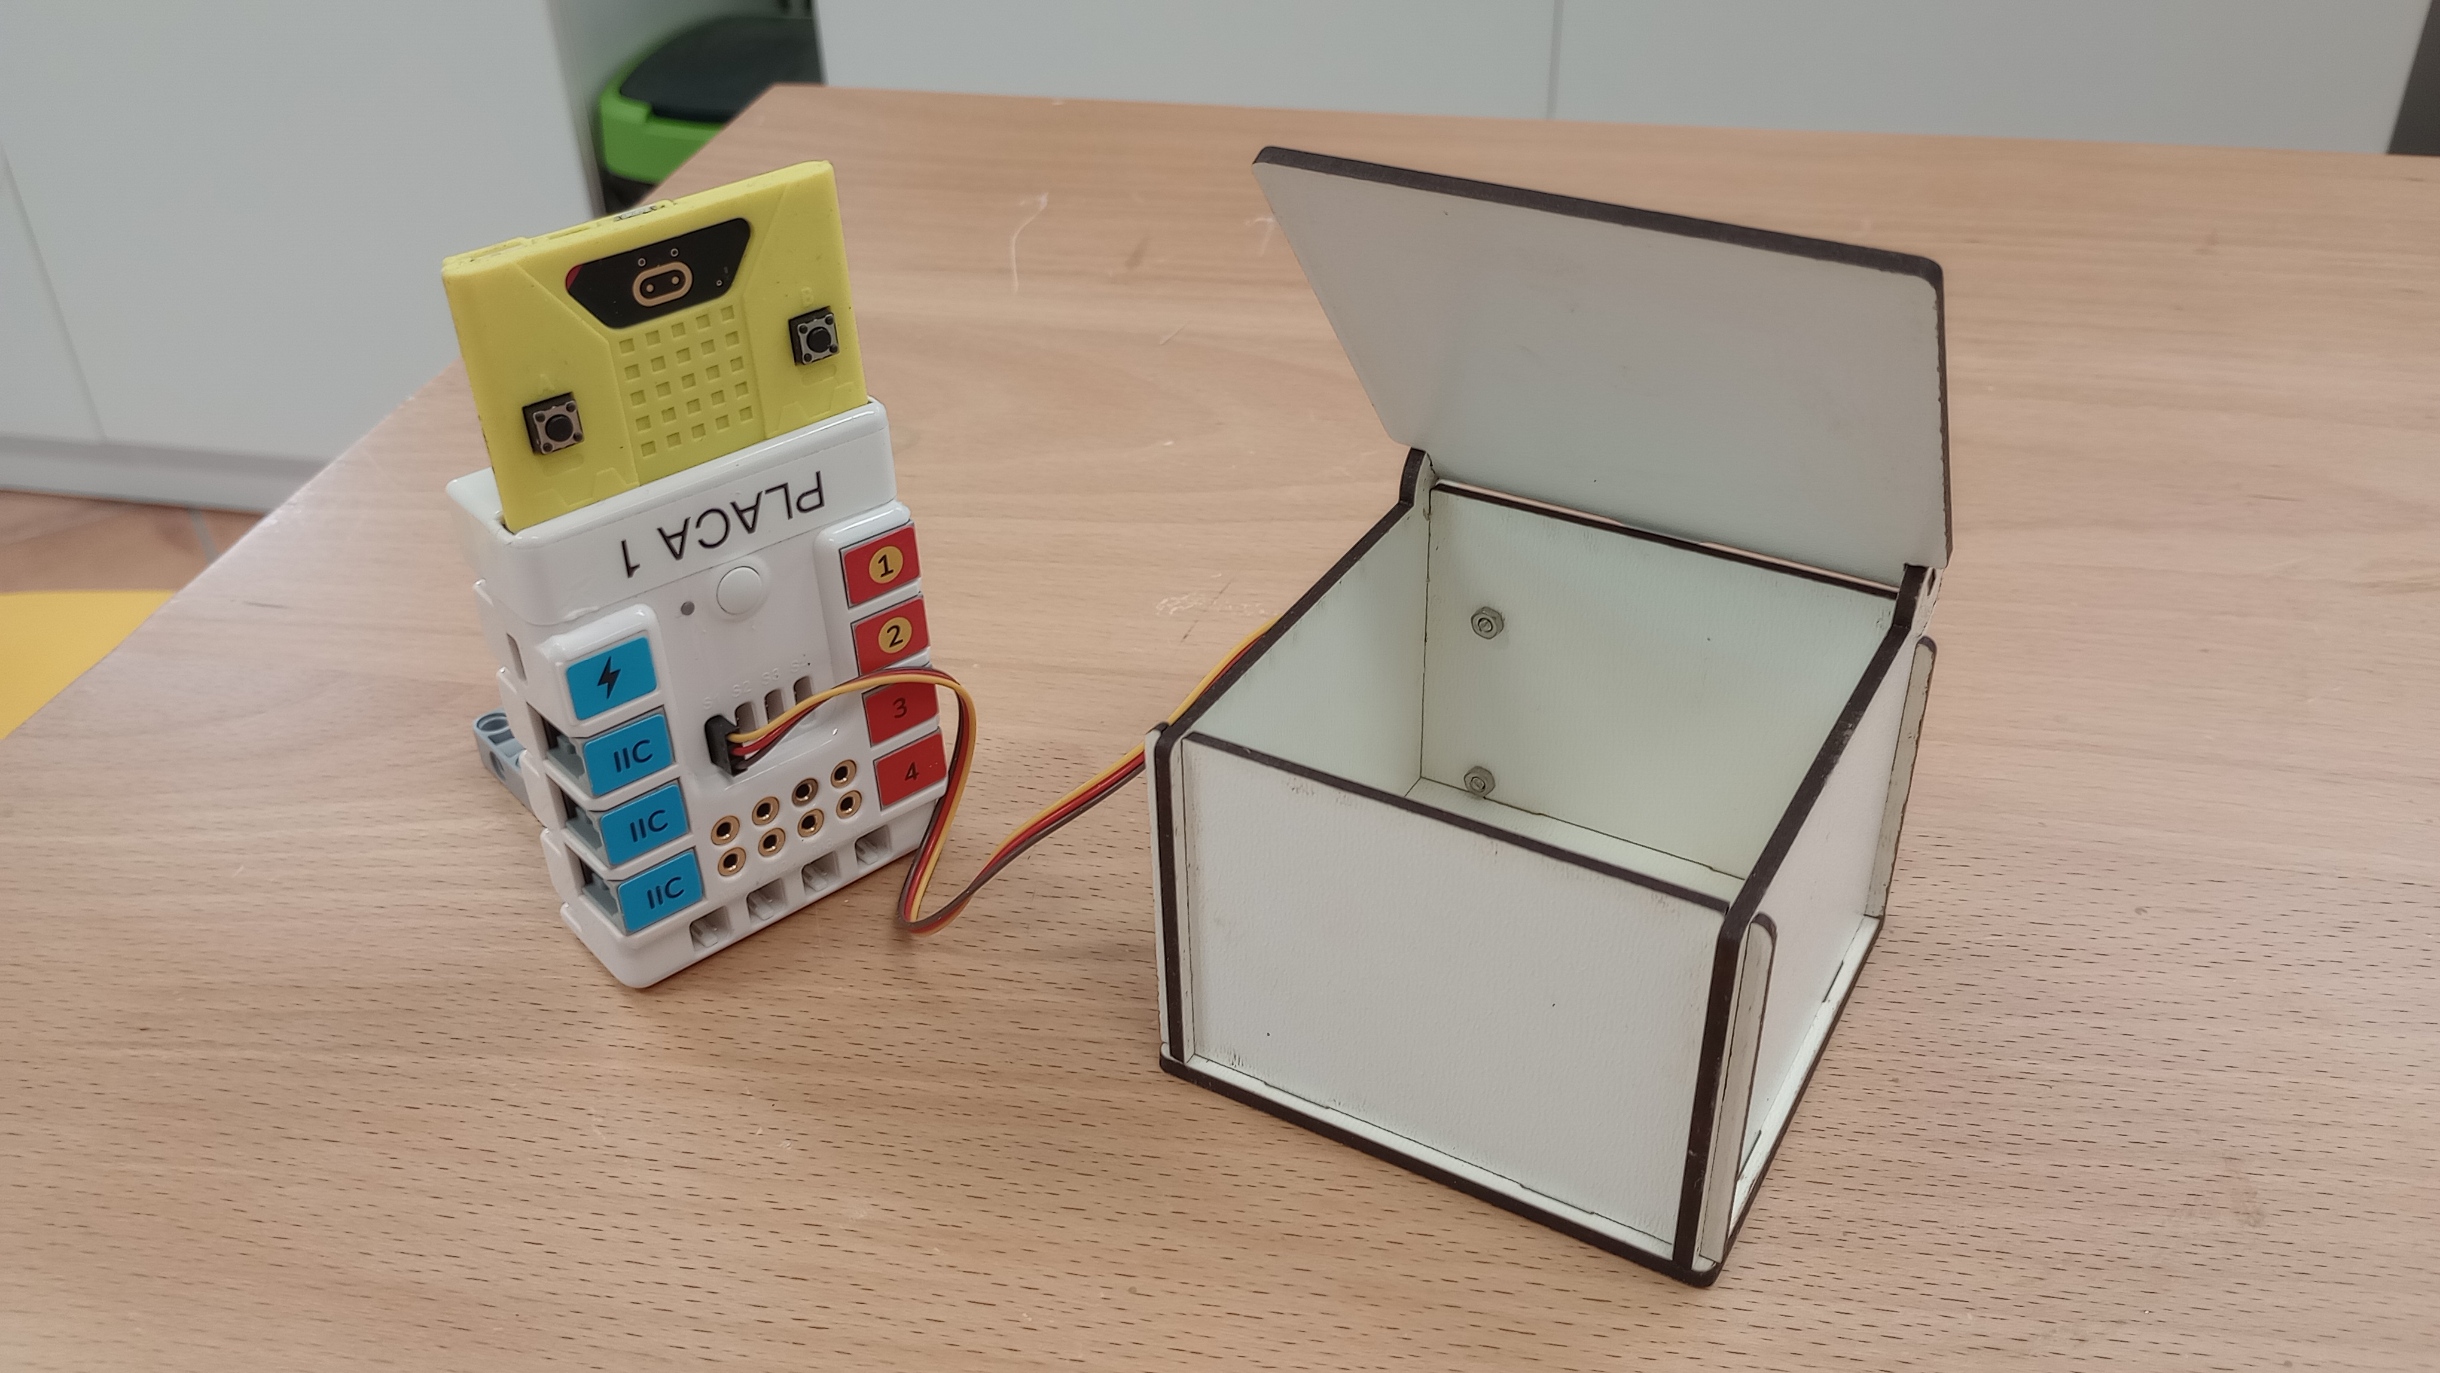
- Micro:bit
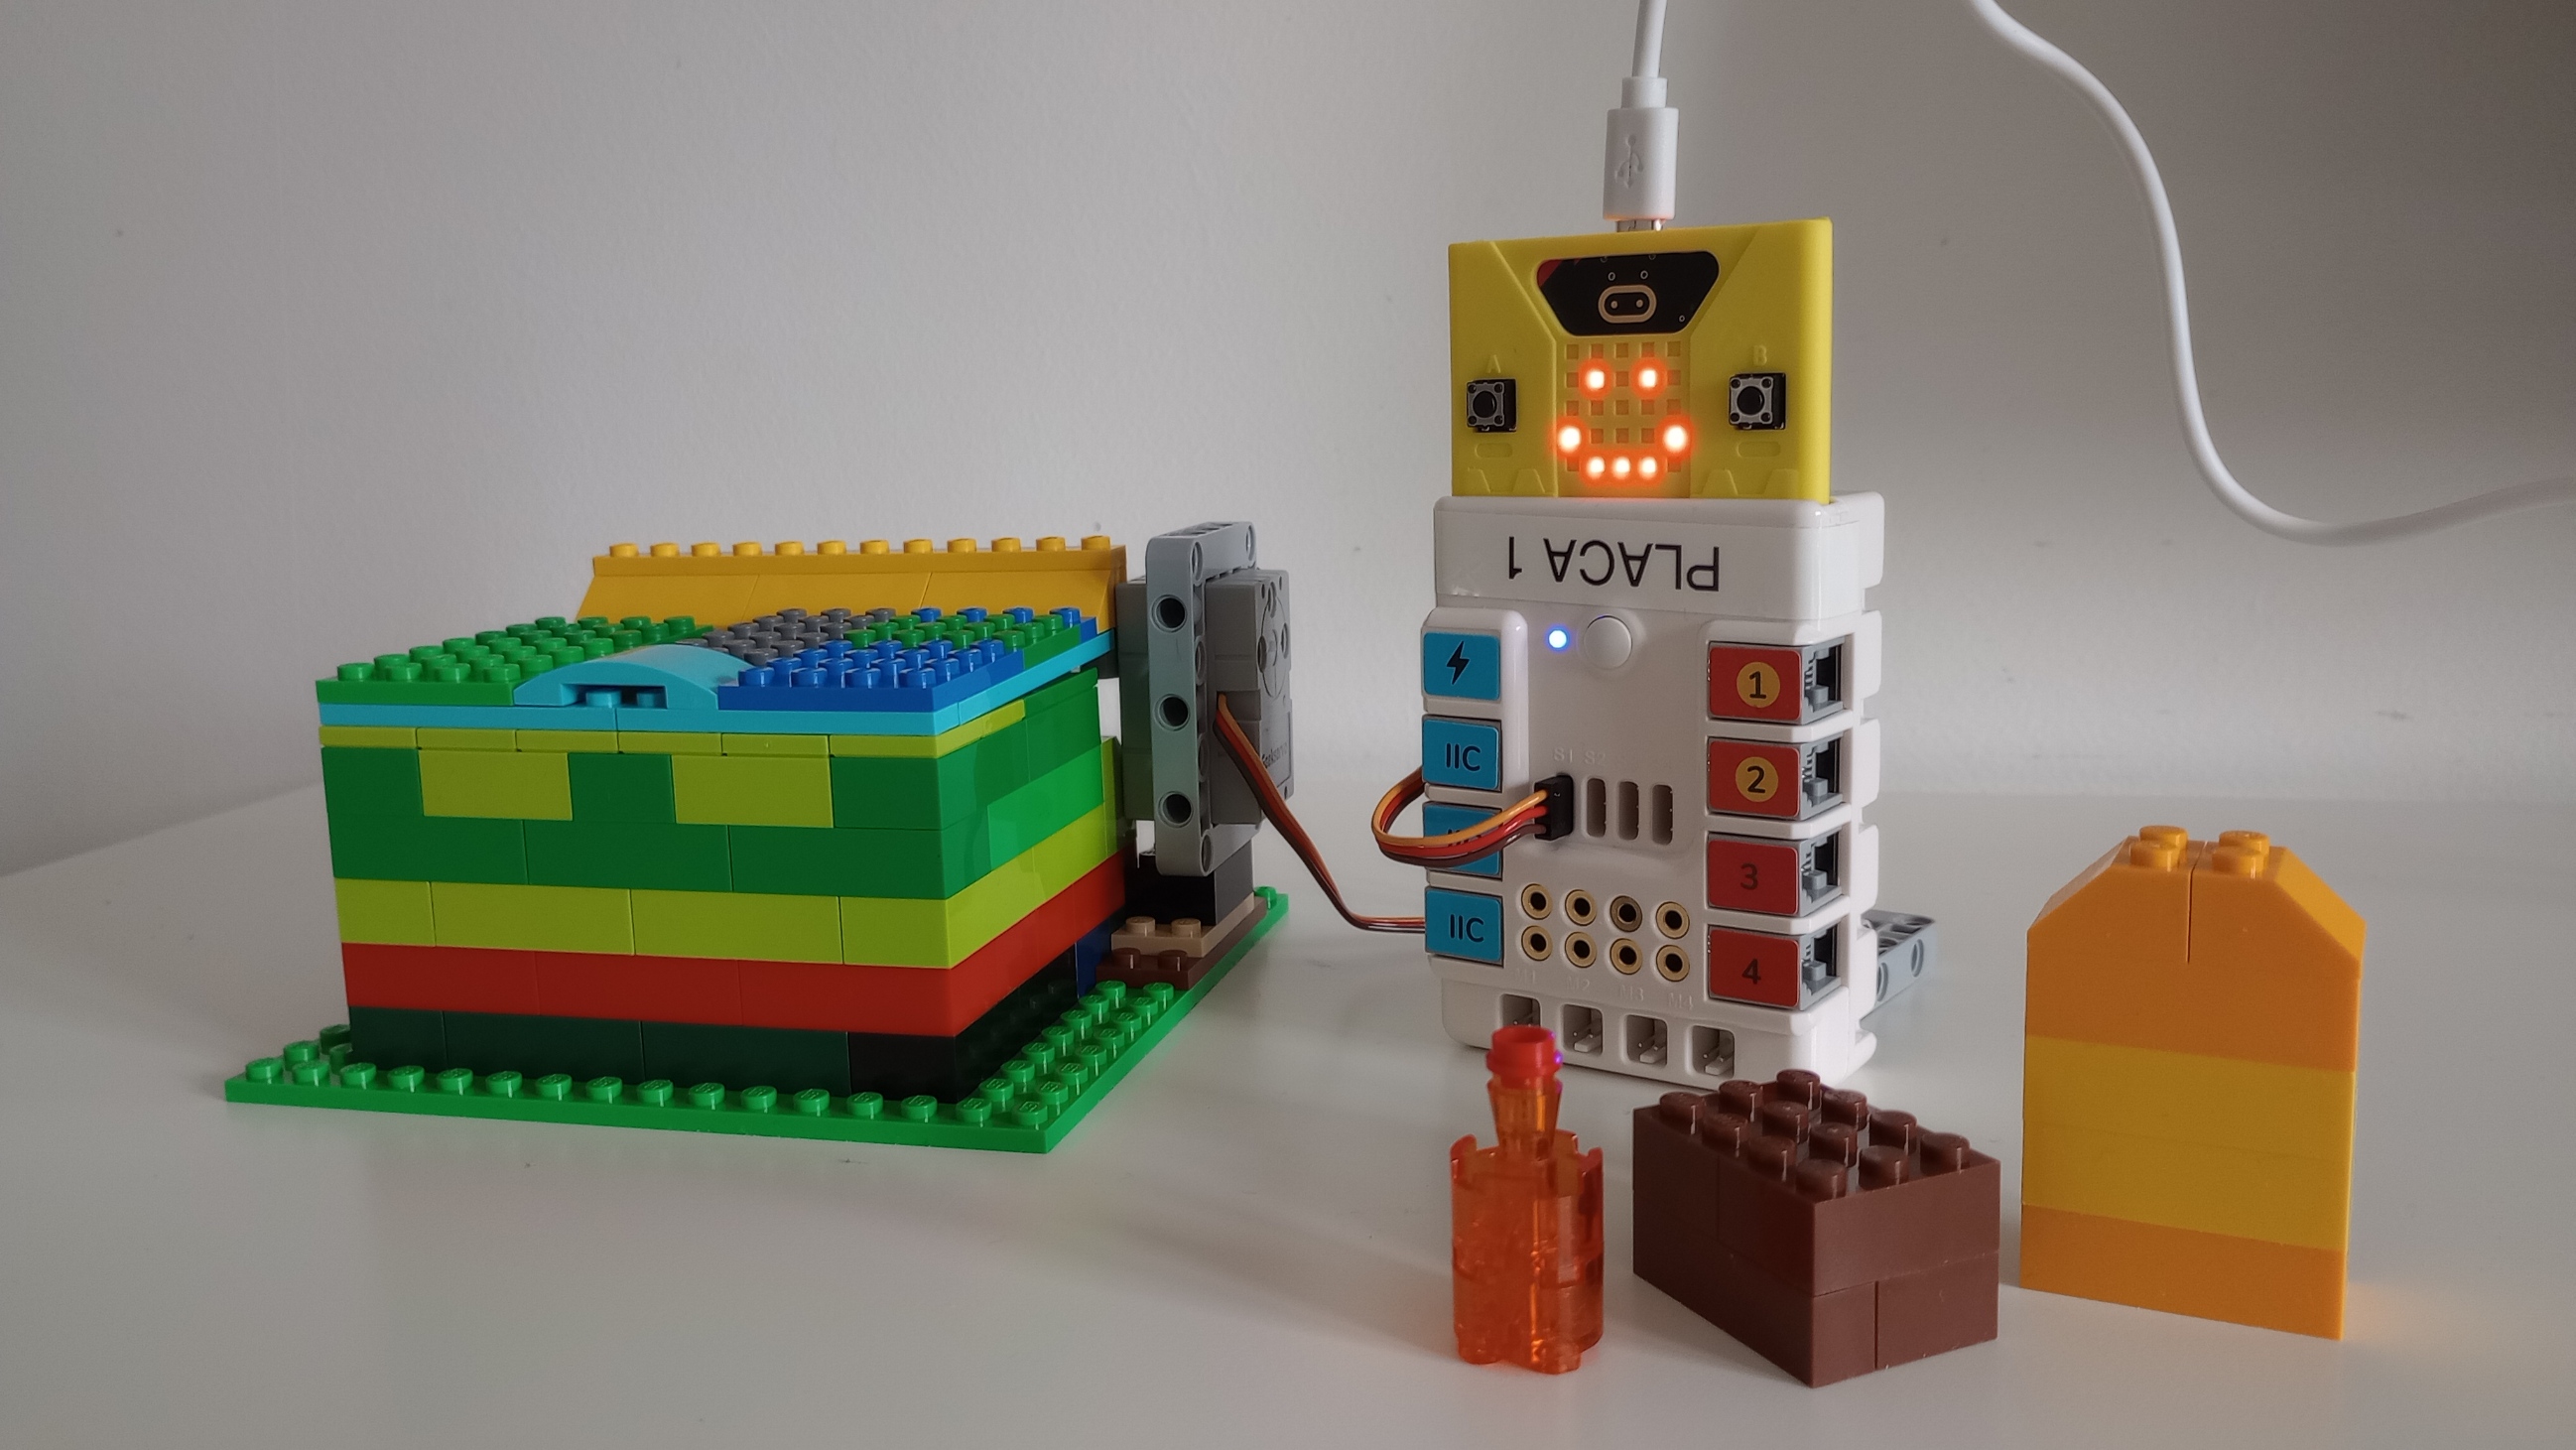
- Nezha expansion board
- Servo motor
- Bin or container with a hinged lid
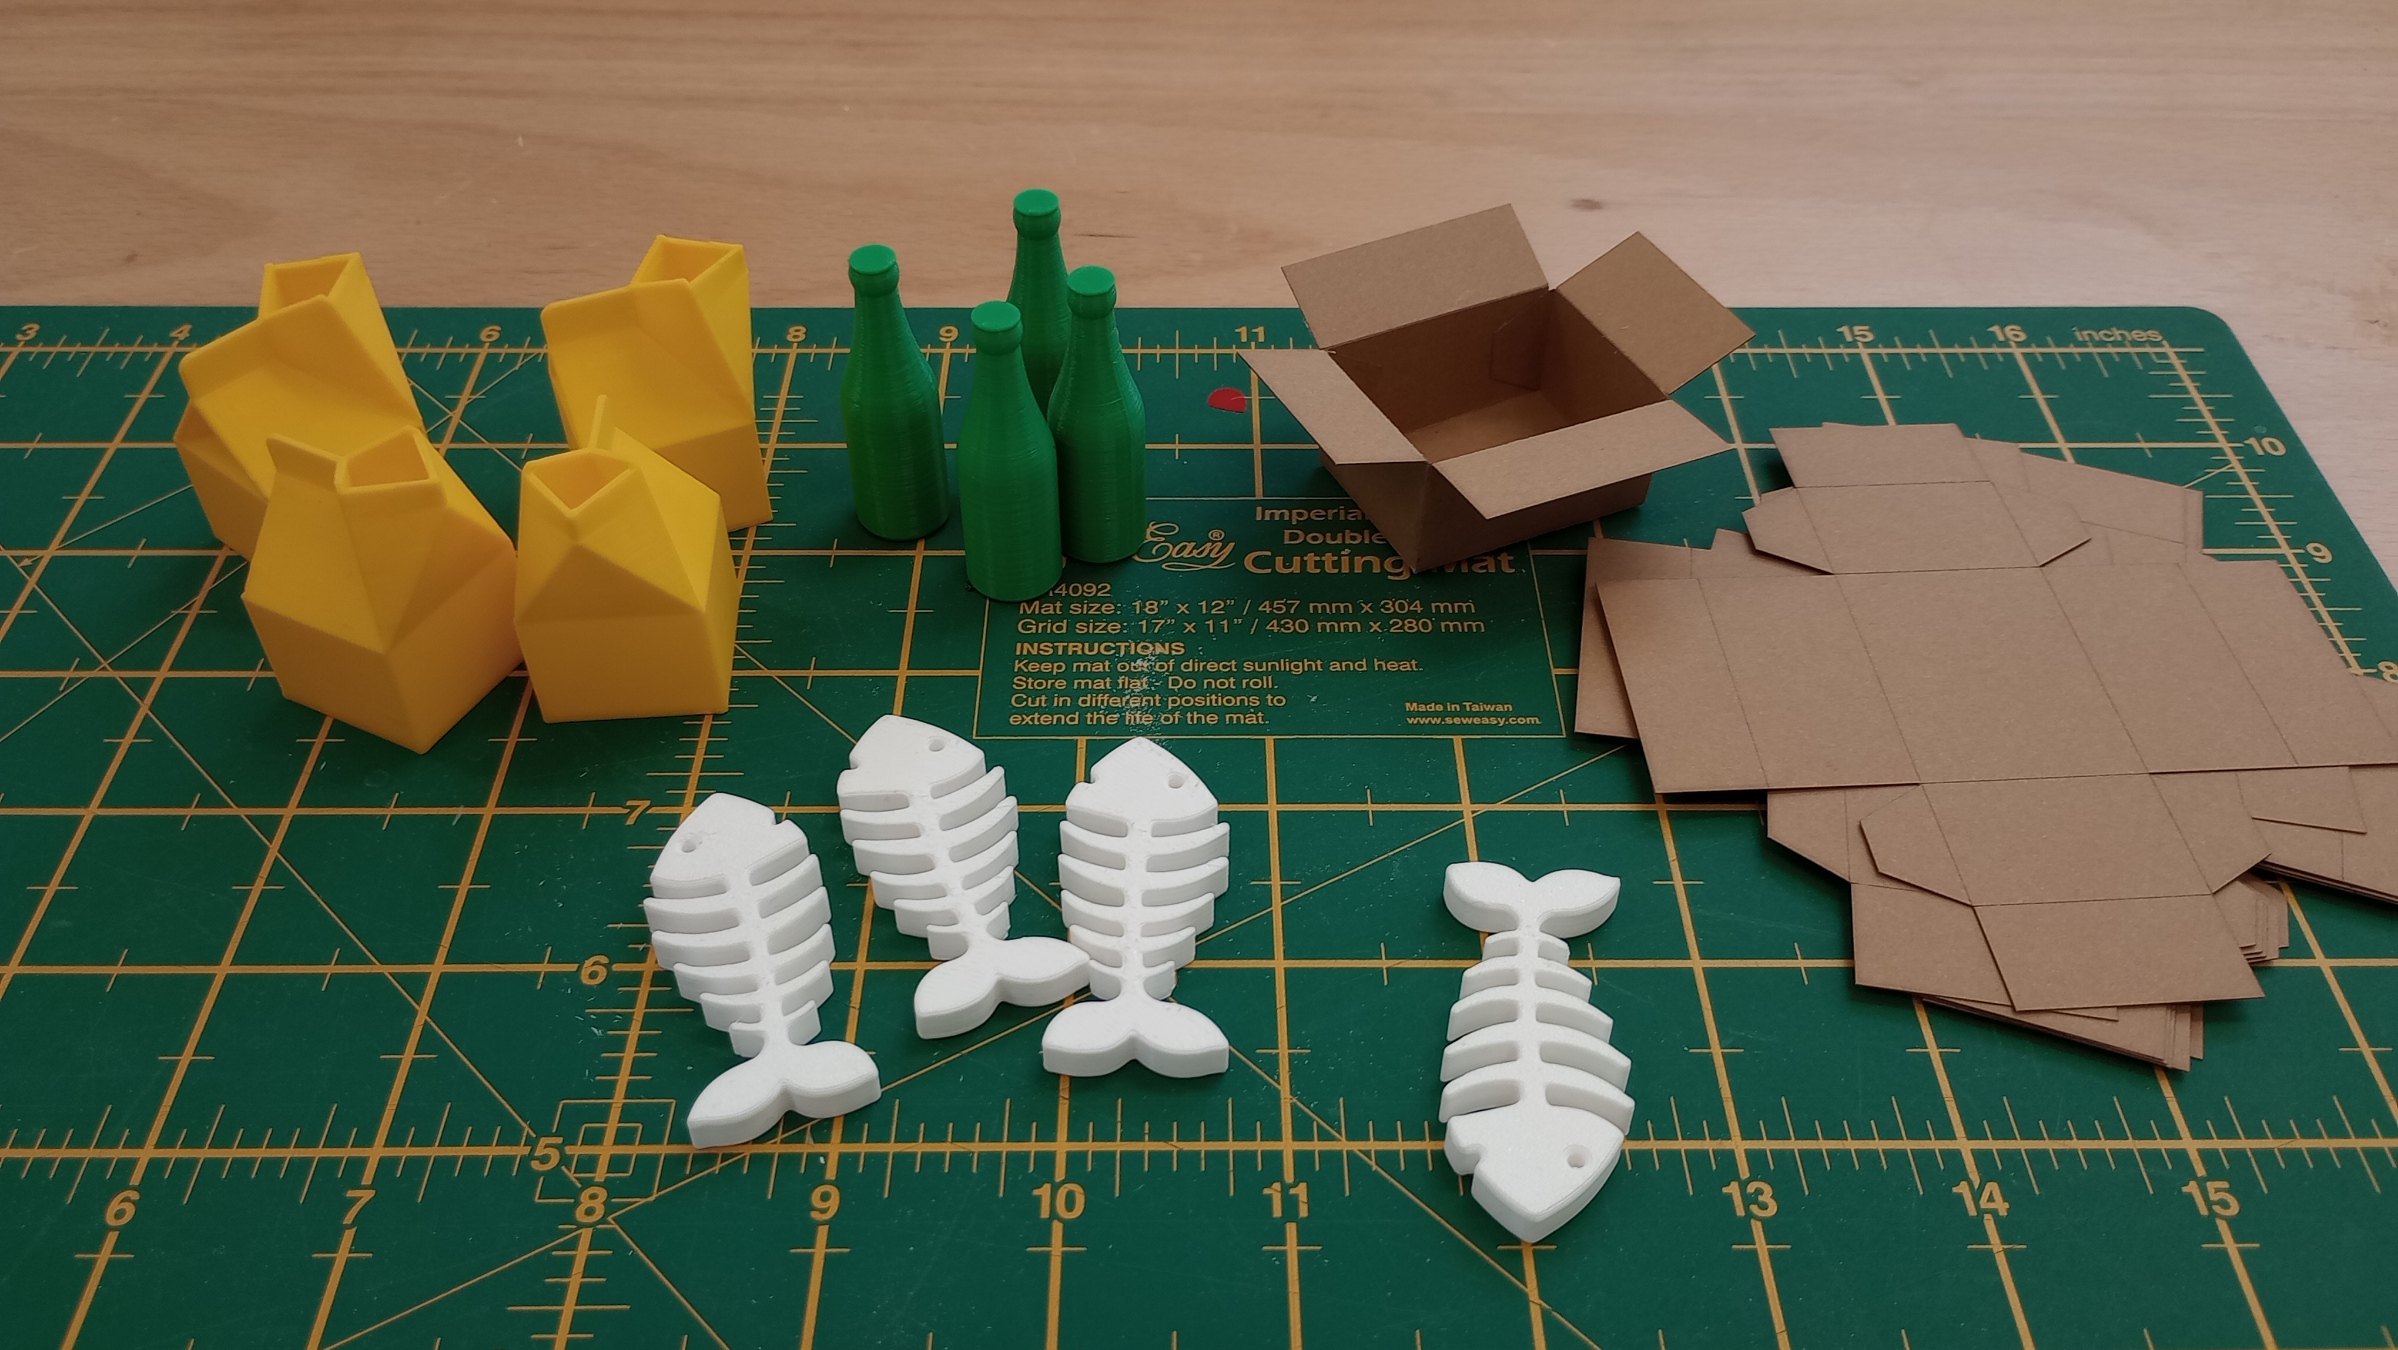
- Items representing different types of recyclable materials to test the smart system, such as glass, cardboard, plastics, organic waste, and electronics
- Laptop
For this first prototype, I created a bin using Lego blocks. I also made three different objects: a bottle to represent glass, a brown block to represent cardboard, and a yellow block to represent plastic containers.
Software used
MakeCode (https://makecode.microbit.org/) This is used to program the micro:bit. I used the Nezha extension in order to control the servo motor.
Teachable Machine (https://teachablemachine.withgoogle.com/) This is a Google tool for creating simple machine-learning models in the browser. You collect examples for different classes, train the model, test it, and then export it. It supports image, audio, and pose classification.
MAKE:AI ROBOTS (https://makeairobots.com/) This site allows the micro:bit to use the computer’s webcam to recognise images. It can recognise facial expressions, poses, and objects. First, the starting code is created for the micro:bit, and then the image-recognition model is built using Teachable Machine. MAKE: AI ROBOTS makes it possible to link the Teachable Machine model with the micro:bit.
MakeCode Program
The MakeCode program works by receiving the classification result sent from the laptop to the micro:bit through the USB serial connection.
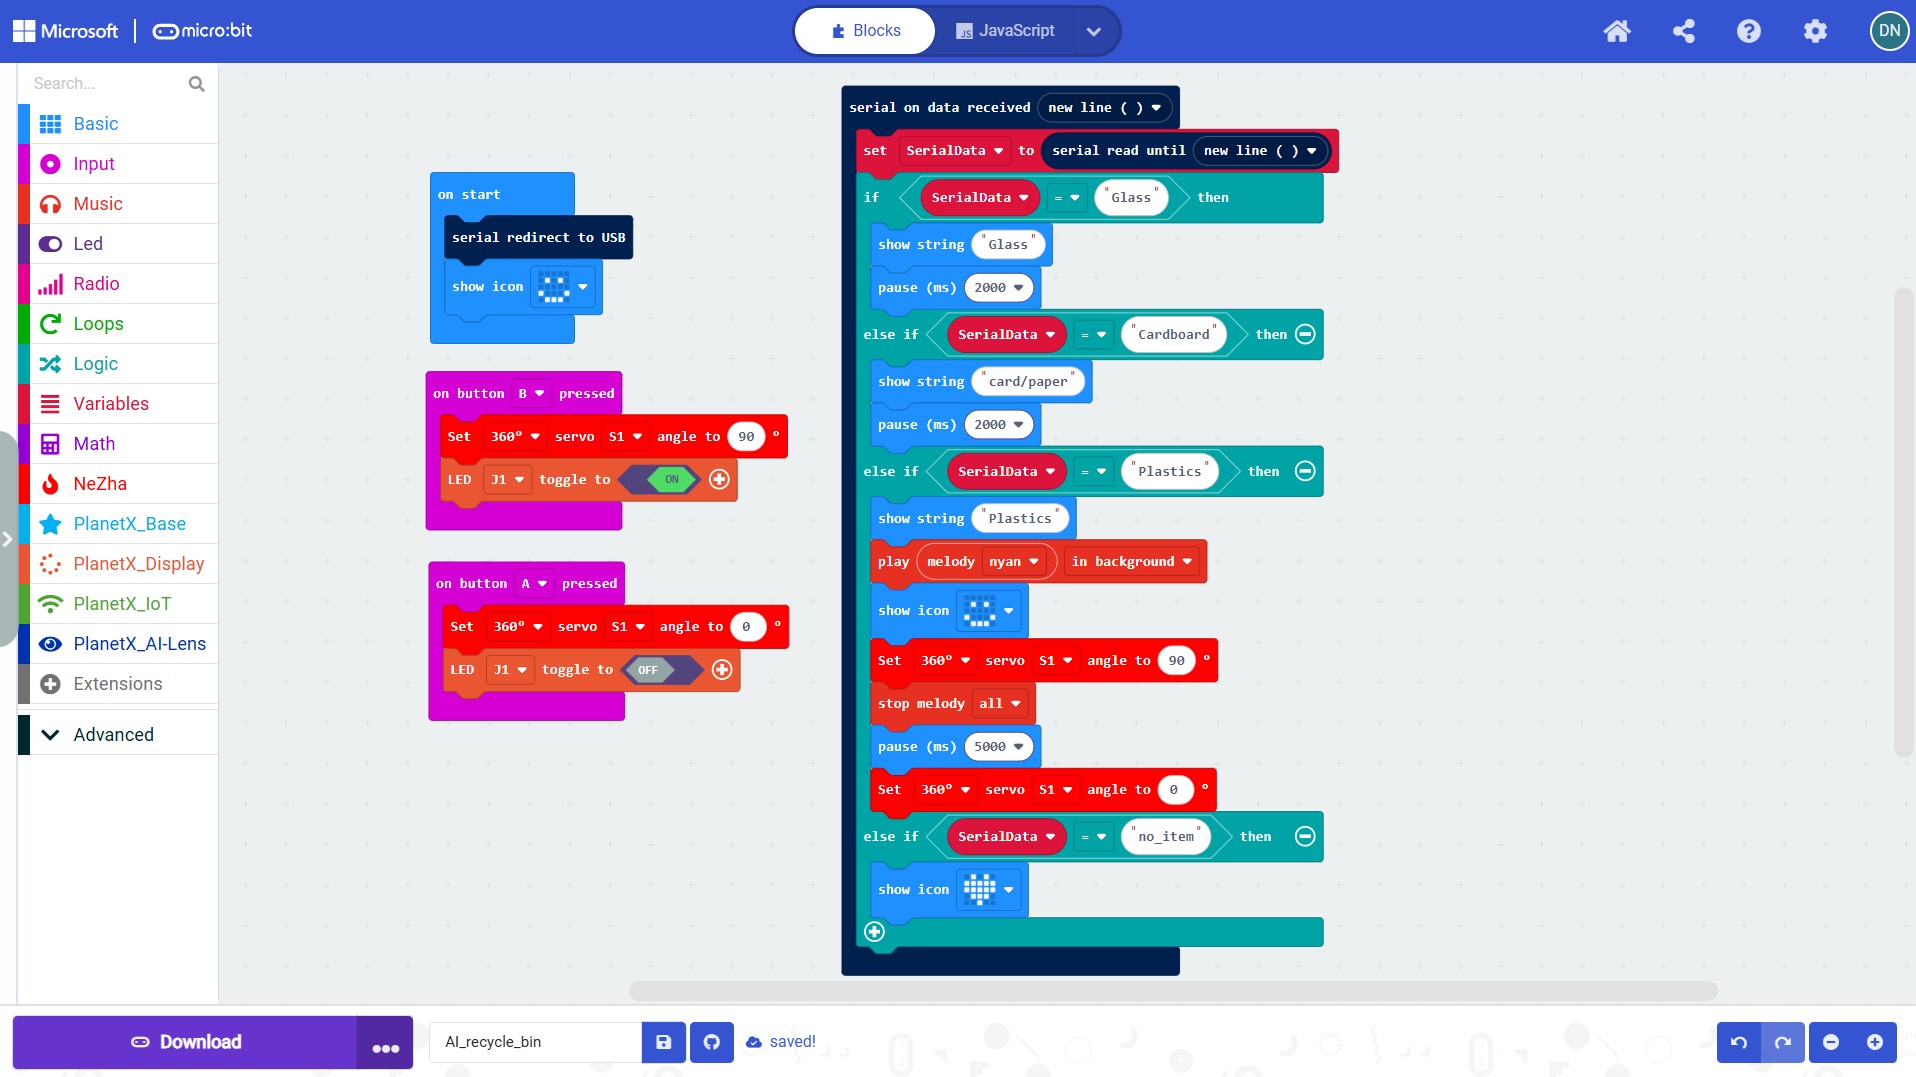
At the start, the code uses “serial redirect to USB” so that the micro:bit can listen to the label coming from MAKE: AI ROBOTS.
The main part of the code is the block “on data received new line”. Each time the AI model recognises an object, the text label is sent to the micro:bit and stored in the variable SerialData. The program then checks that label using a series of if / else if conditions:
- If the label is “Glass”, the micro:bit displays Glass.
- If the label is “Cardboard”, it displays card/paper.
- If the label is “Plastics”, this is treated as the correct item for the bin, so the micro:bit:
- displays Plastics
- plays a melody
- shows an icon
- moves the servo on S1 to 90° to open the lid
- waits 5 seconds
- moves the servo back to 0° to close the lid
- If the label is “no_item”, it only shows an icon, meaning that no object is being detected.
The A and B buttons on the micro:bit are used to open and close the lid manually, independently of the learning model.
Training the Learning Model
Teachable Machine is designed to let you build simple machine-learning (ML) models in the browser without coding.
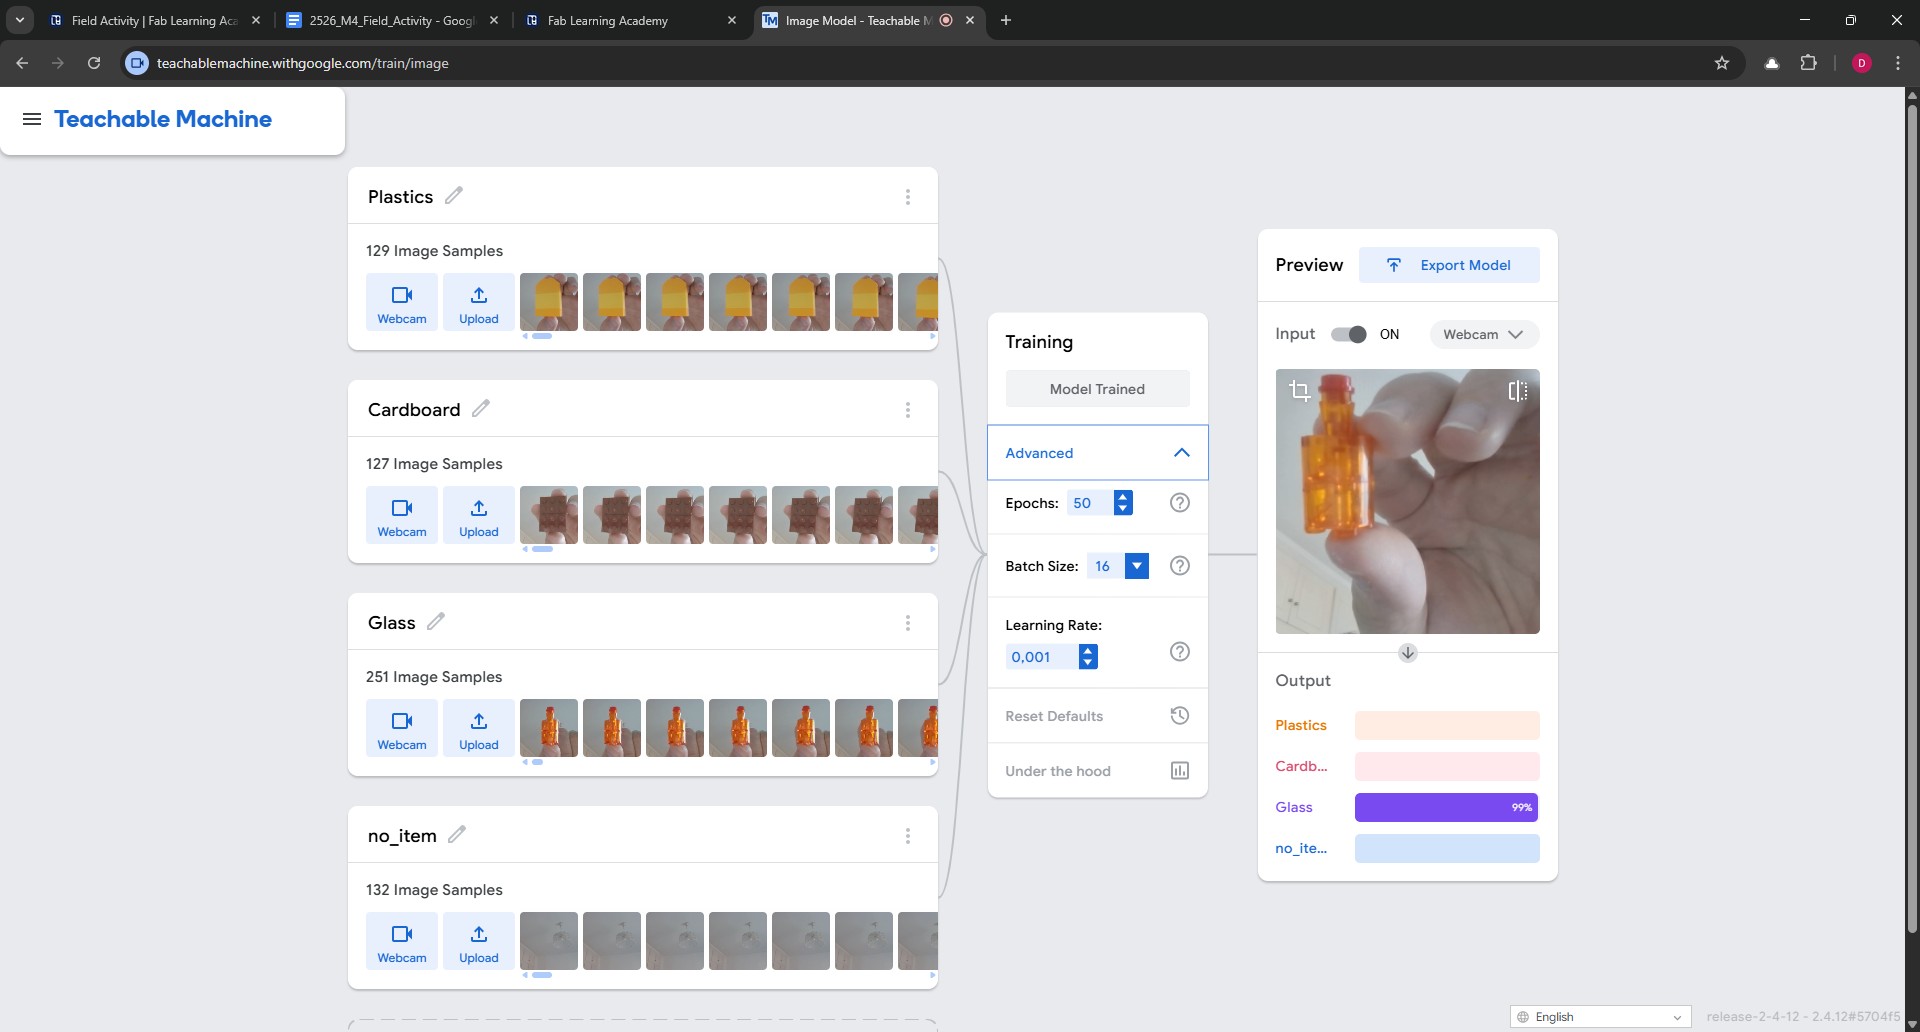
I created four classes. A class is each category I want the model to recognise, such as Plastics, Cardboard, Glass, and no_item.
I then added examples for each class using the webcam. The model learns from the examples that are provided.
After collecting the samples, I clicked Train Model. Teachable Machine splits the samples into training and test sets, and it also allows the user to adjust advanced settings such as epochs, batch size, and learning rate if needed. For most beginner projects, the default settings are enough to get started.
Once the training was completed, I tested the model and it identified each item accurately in my test setup.
If predictions are weak or inconsistent, it is necessary to improve the model by collecting better examples. It is important to use similar lighting to the final setup, include different angles and distances, and make sure the background is not influencing the model too much.
Teachable Machine makes it clear that the model is learning from examples rather than understanding the object in a human way, so the quality of the samples is very important.
Linking the Learning Model to the micro:bit
Within Teachable Machine, I exported the model to the cloud. A shareable link was then generated, which I copied.
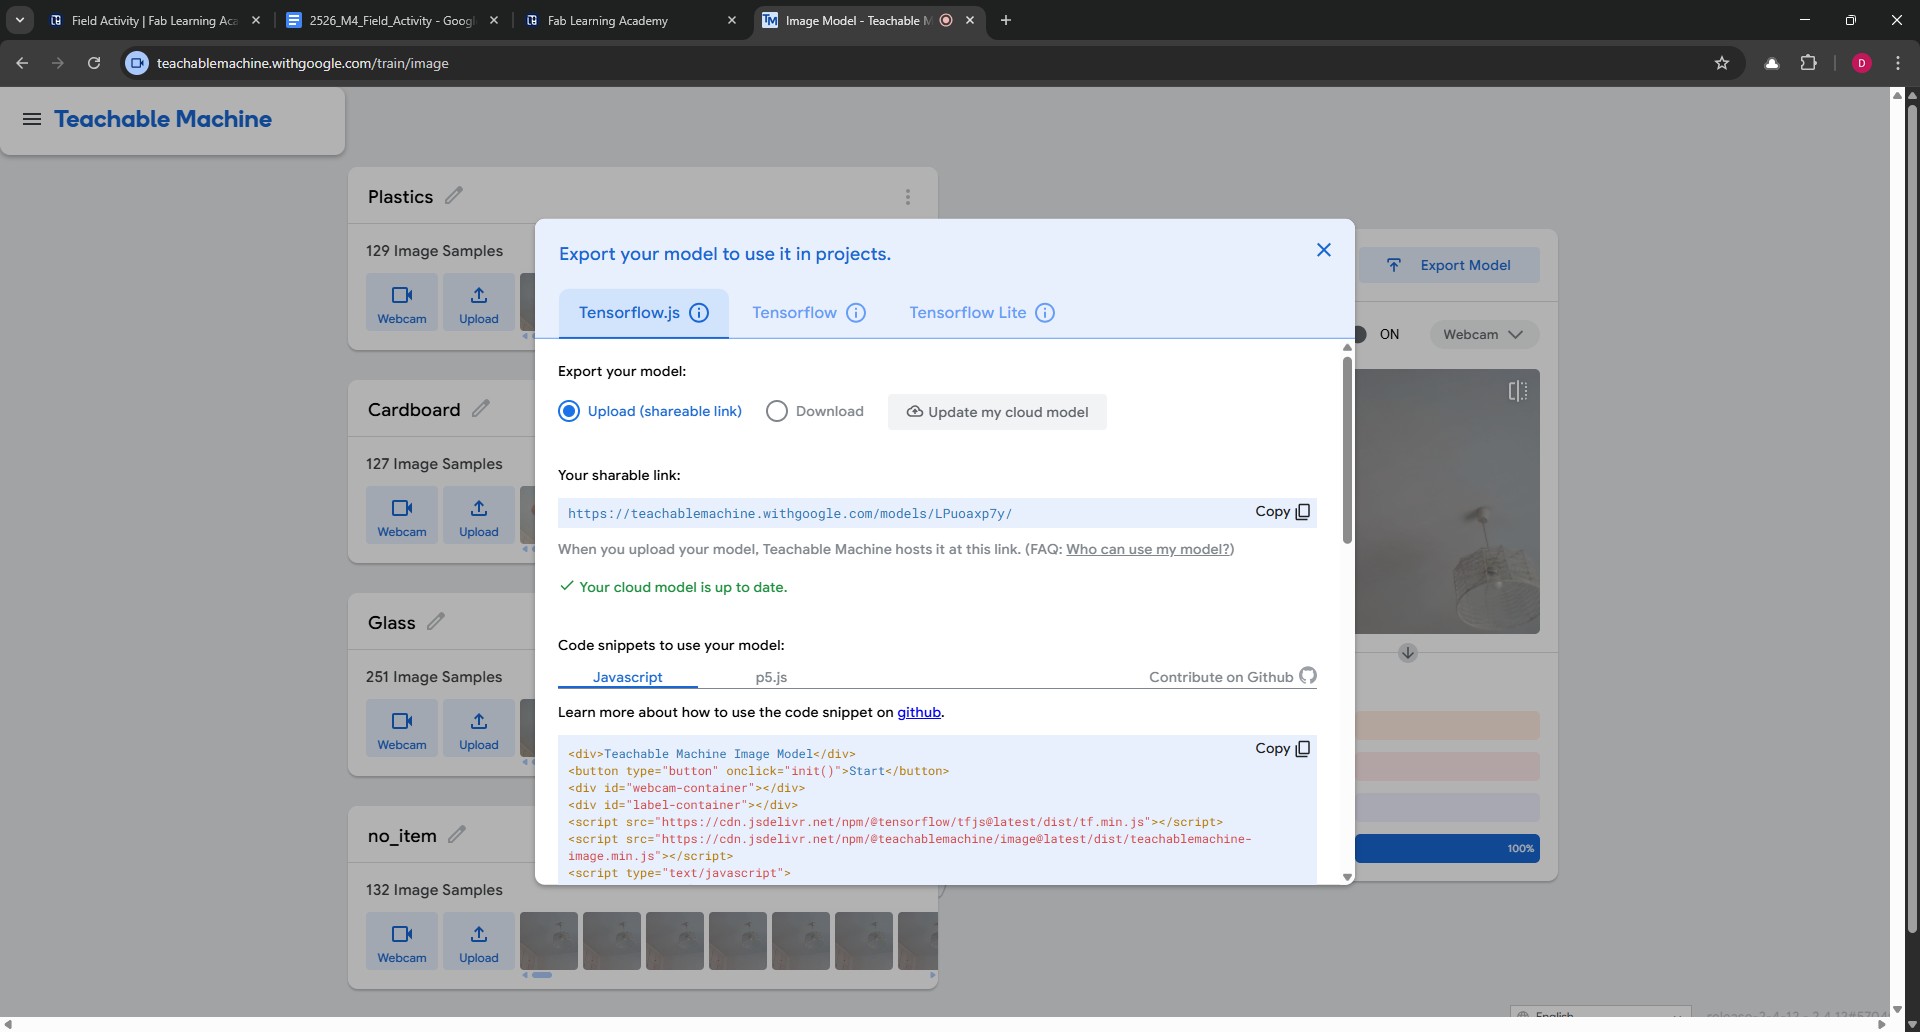
Next, I opened MAKE: AI ROBOTS and selected the option: “3. Connect your micro:bit to your AI!”
I then selected the correct serial port.
In the next window, I was asked to paste the Google Teachable Machine model link and select the camera and audio sources.
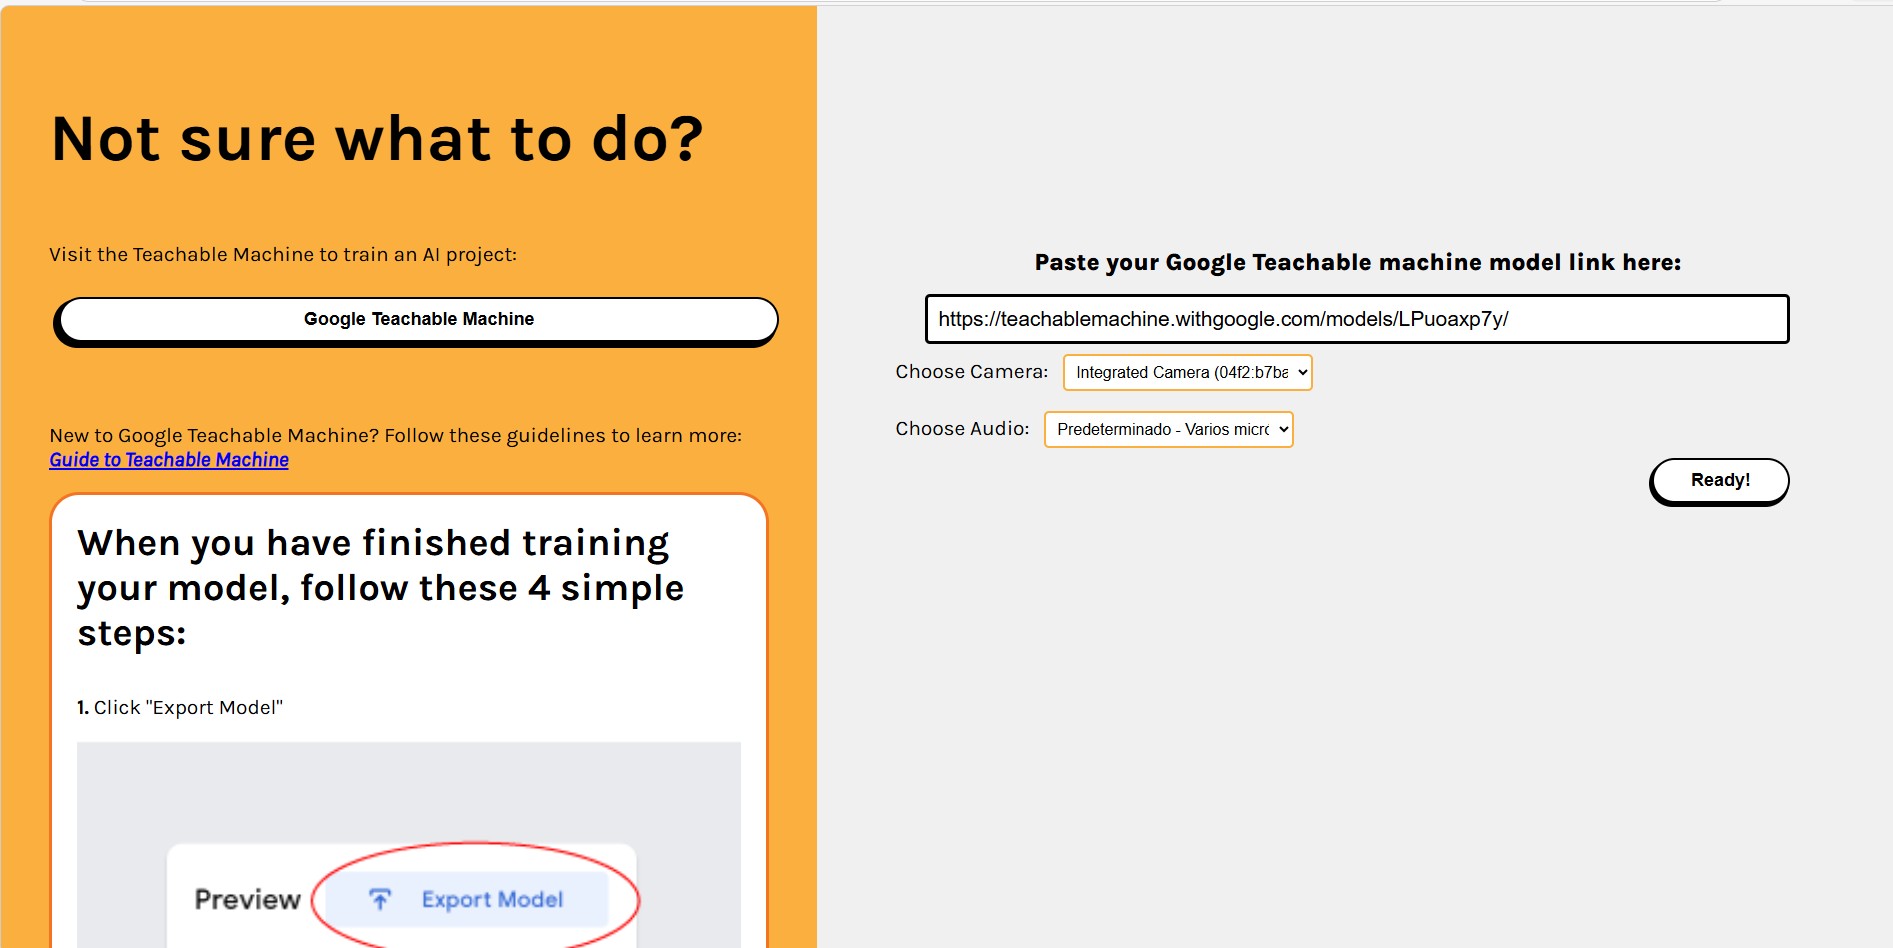
The following window then displayed the image-recognition model together with the live camera view.
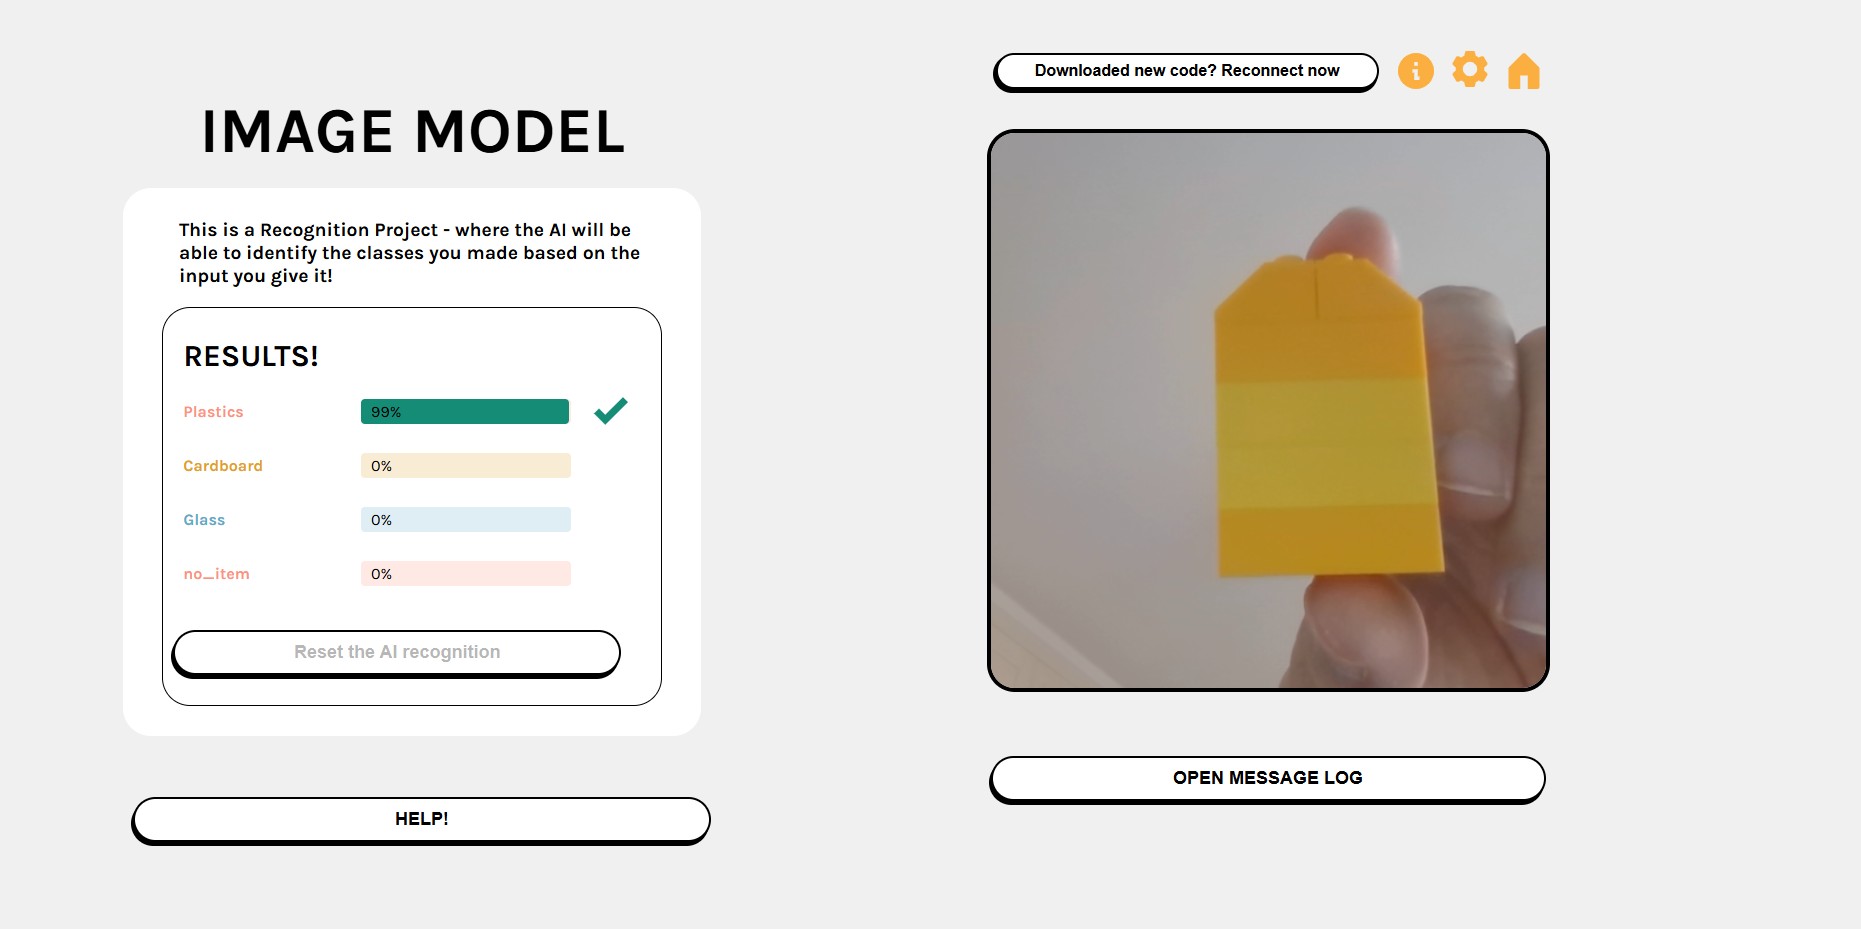
Now the learning model and the micro:bit are linked so, when we show the correct item (in this case the yellow block , plastics) the lid of the bin show open.
The following video shows the prototype and learning model working.
So far, this prototype works well, but for the lesson I would like to further develop the hardware and explore whether it can work with mini servos, which are very popular and more widely available than the one included in the Nezha kit.
We considered giving students the opportunity to build their own bins, allowing them to choose from a range of materials such as Lego bricks, cardboard, reused containers, plywood, or similar materials.
After building a variety of containers with different materials to replicate recycling bins, we concluded that this would be a suitable option for a longer project developed over several sessions, in which learners could sketch design ideas, select and justify materials, and build their own prototypes.
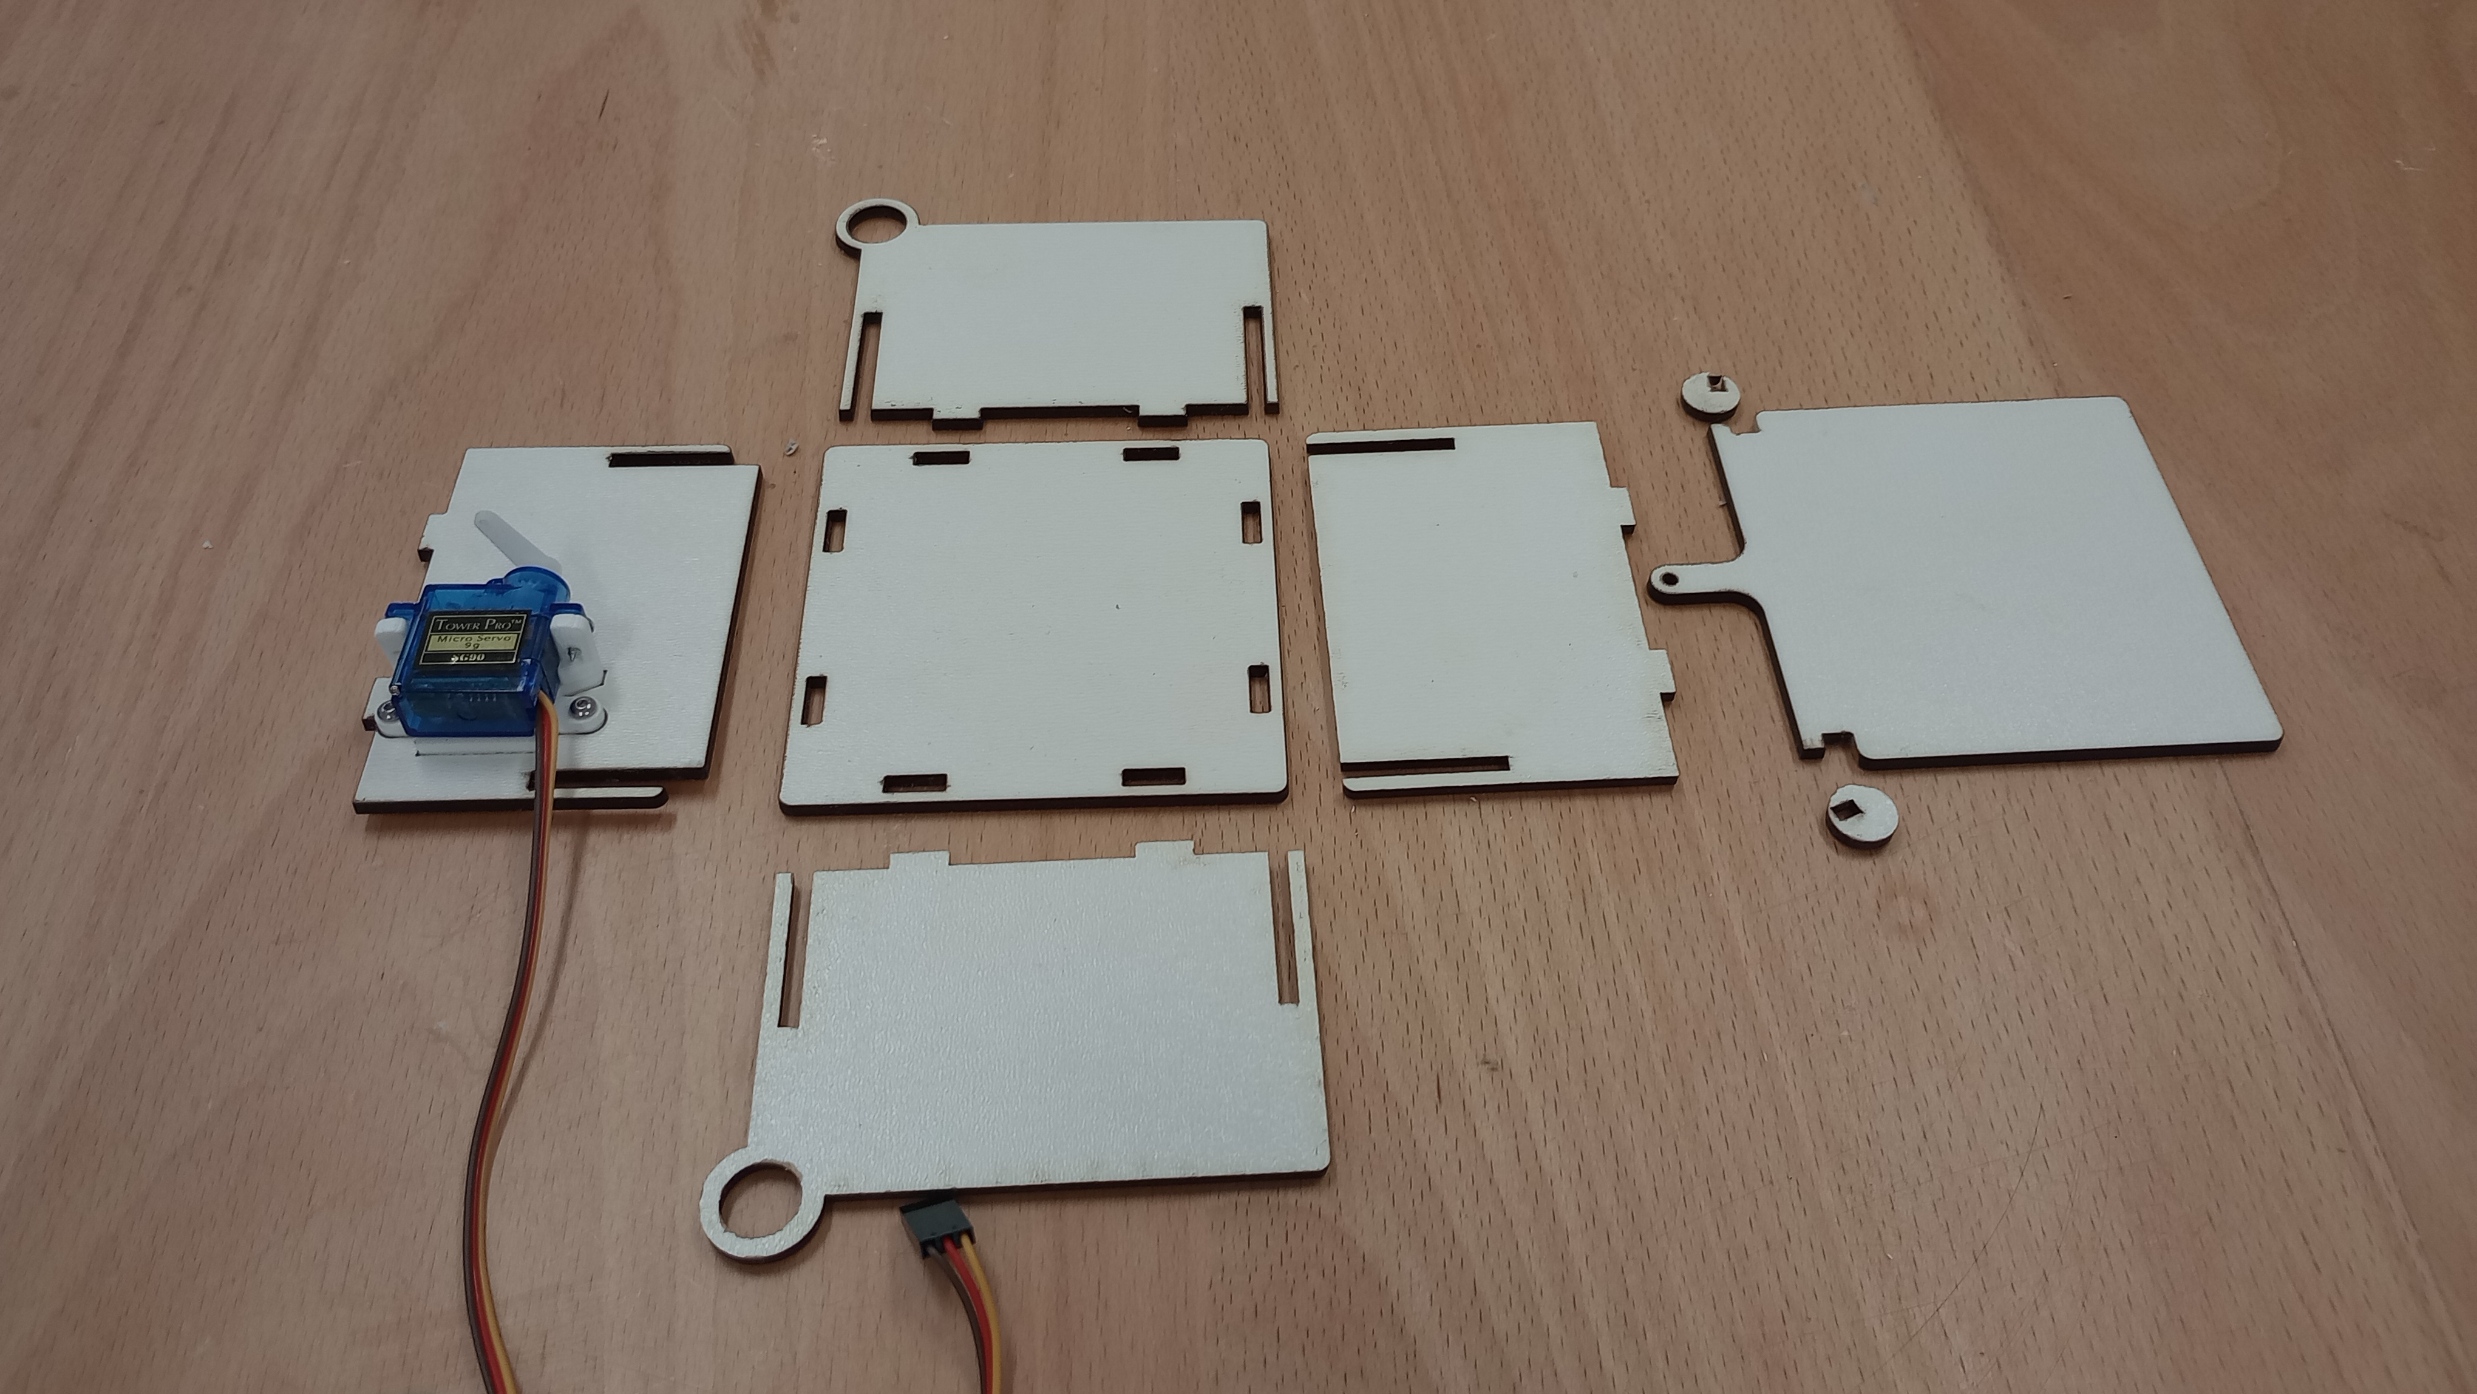
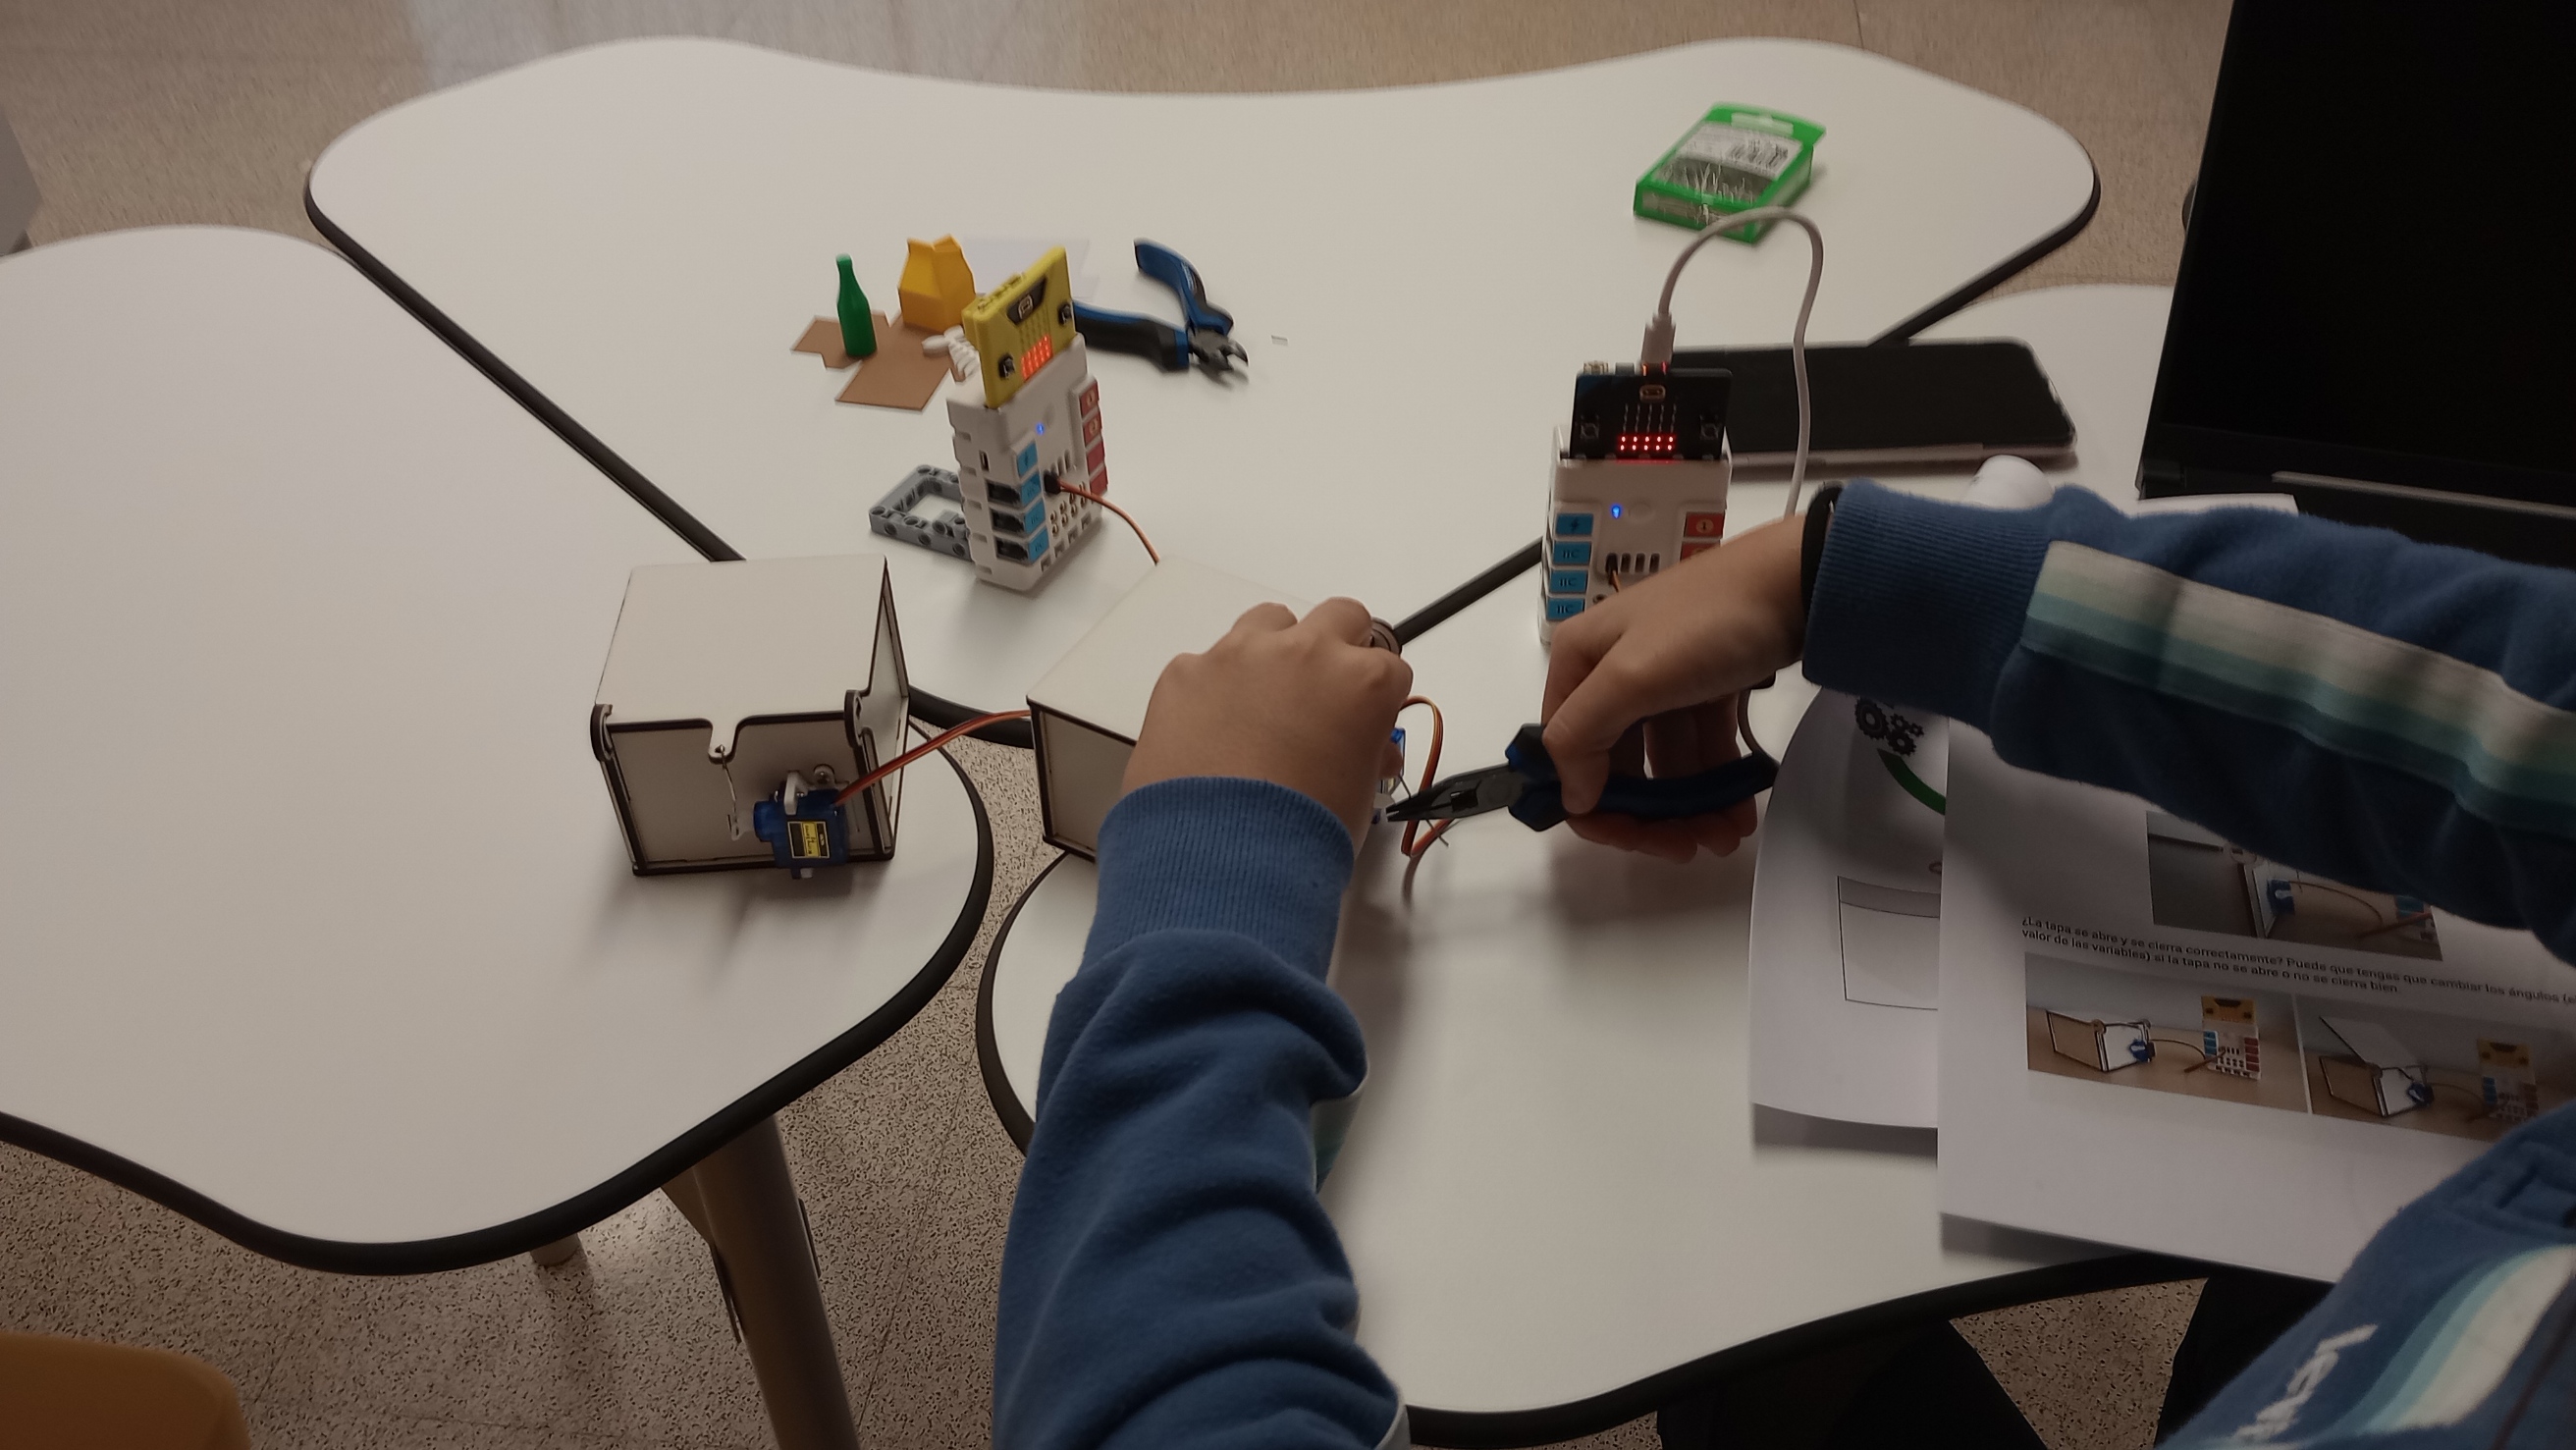
However, as we do not usually have the opportunity to work with groups of learners over extended periods, we decided to develop a kit incorporating a mini servo that can be assembled in just a few minutes and reused for other lessons or STEAM workshops.
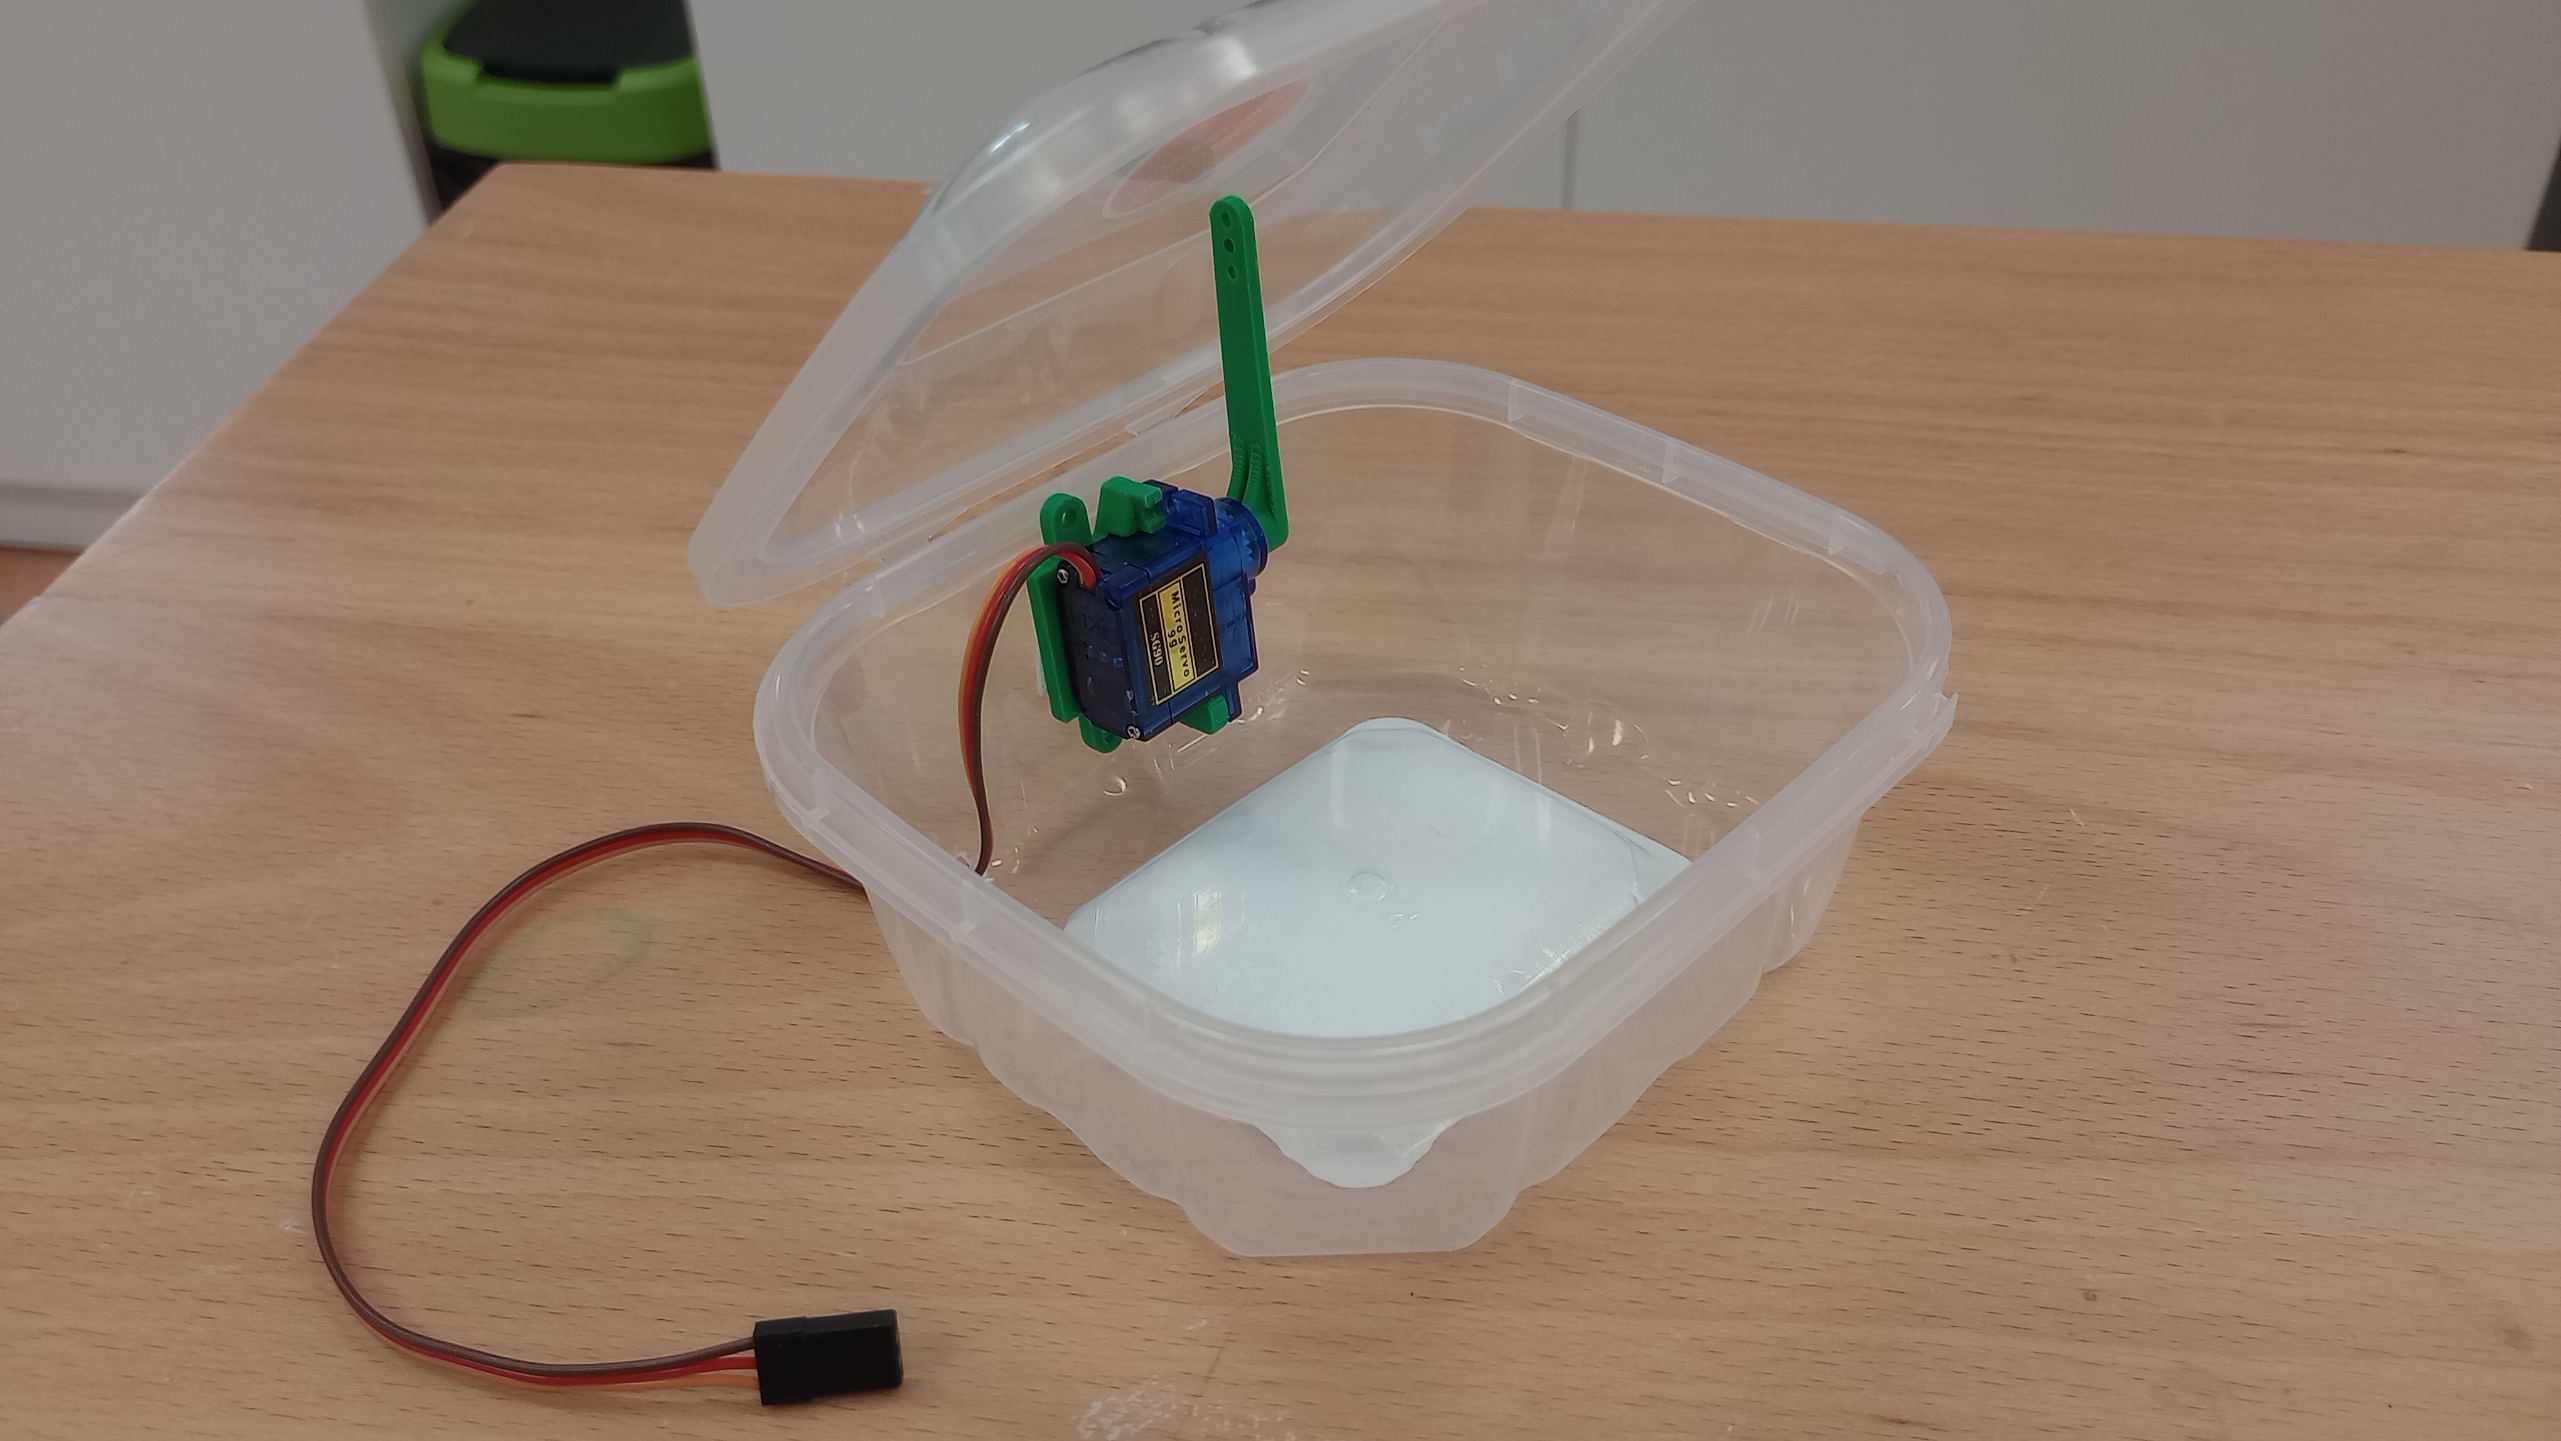
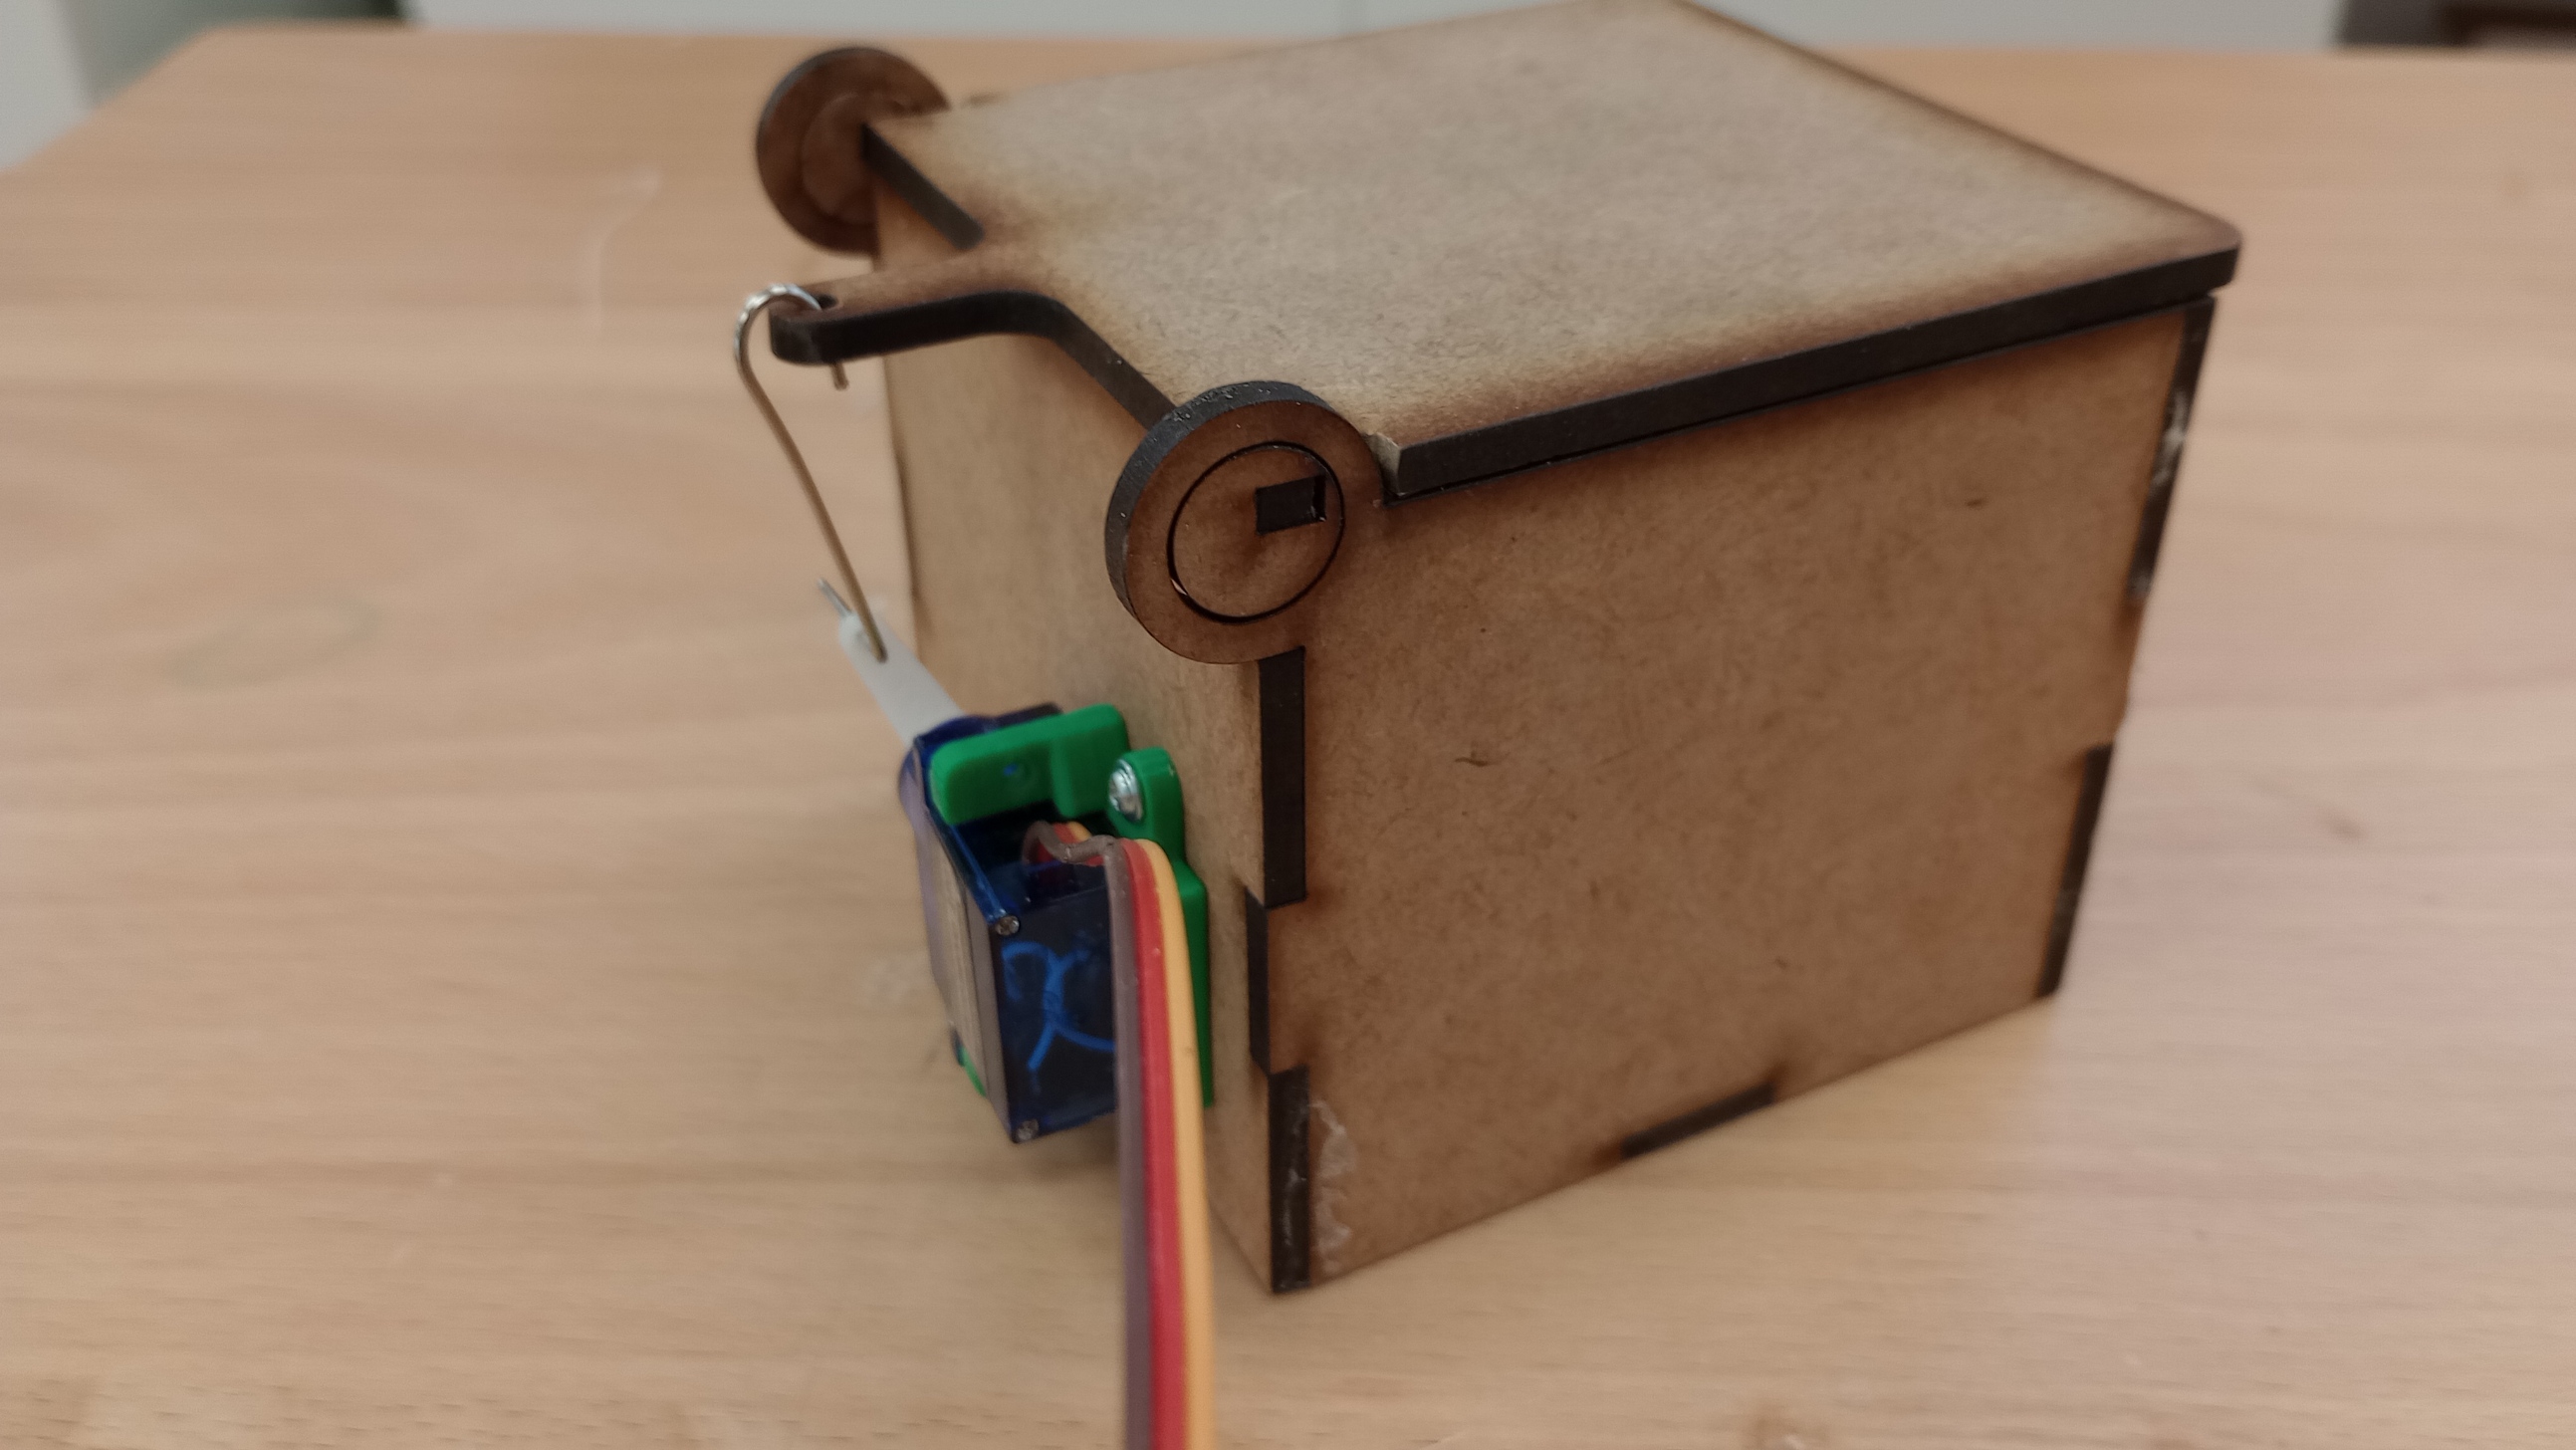
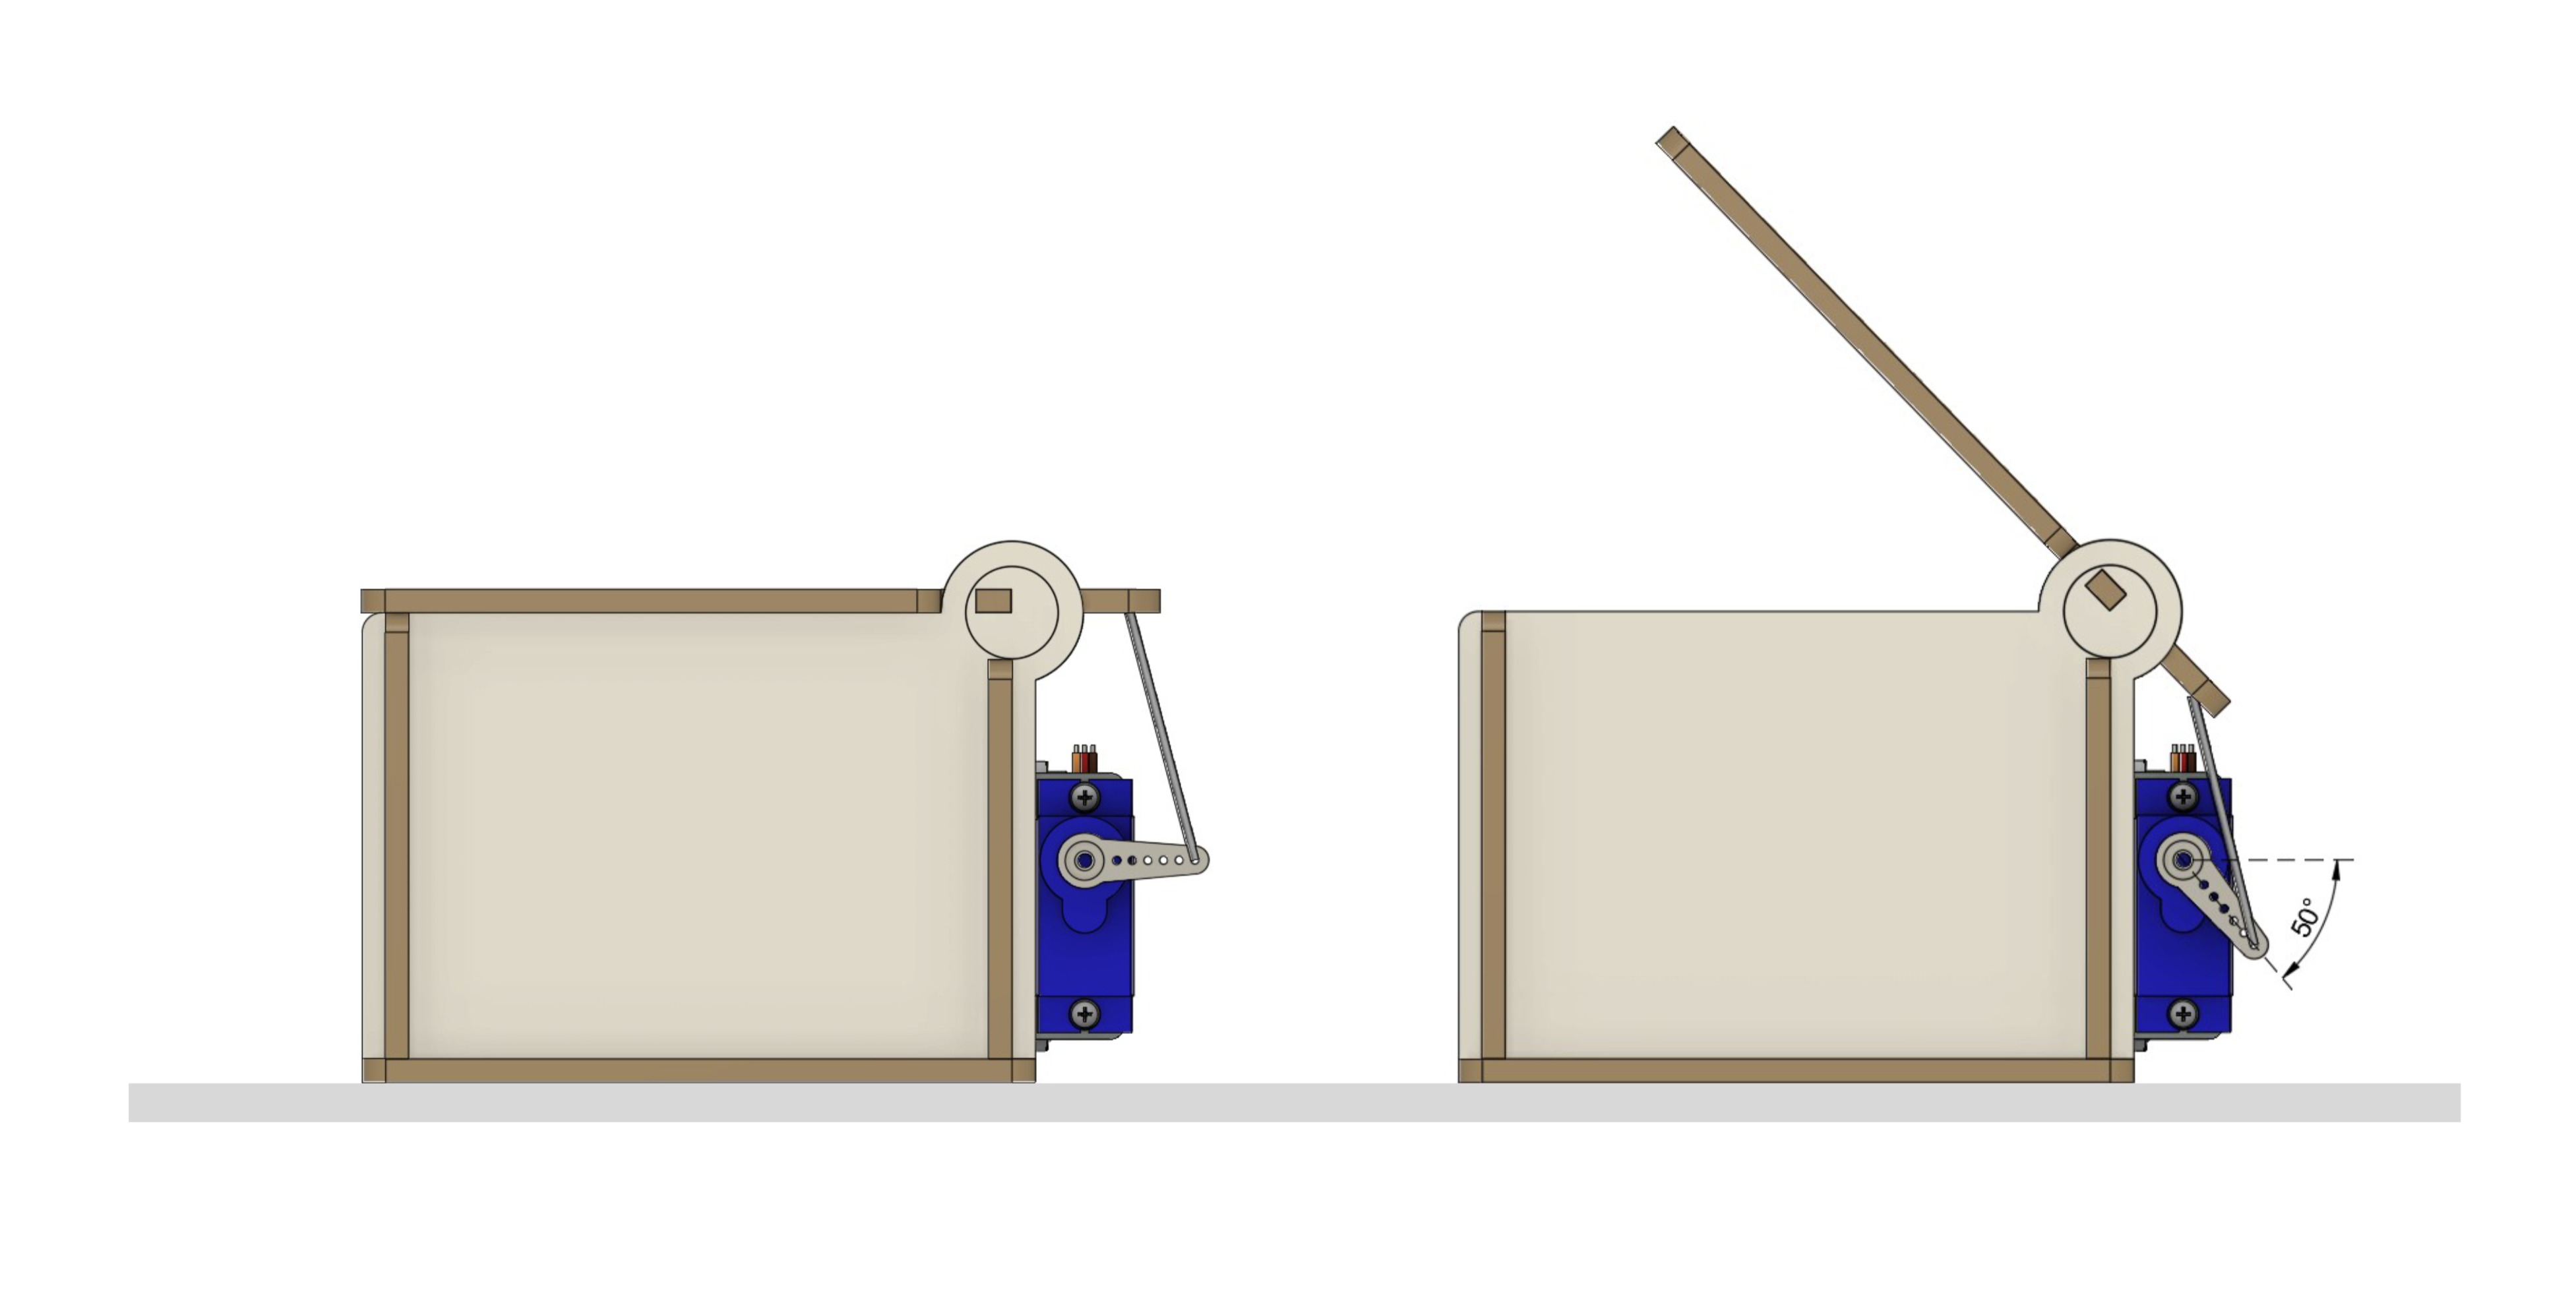
To build the kit, my colleague designed a press fit box that includes a support for a mini servo.
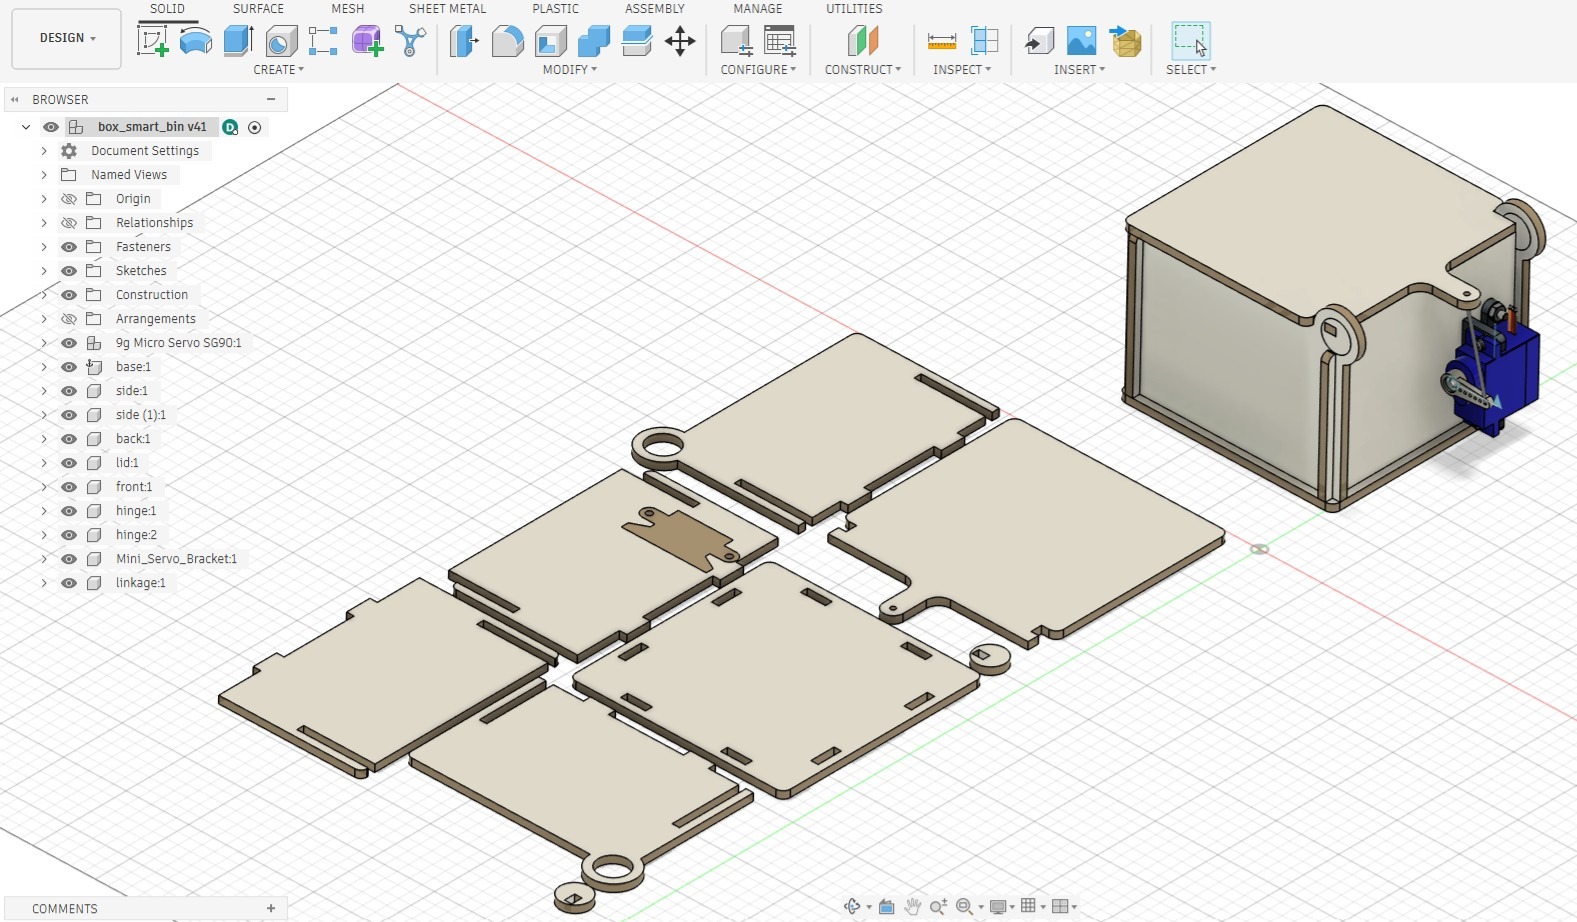
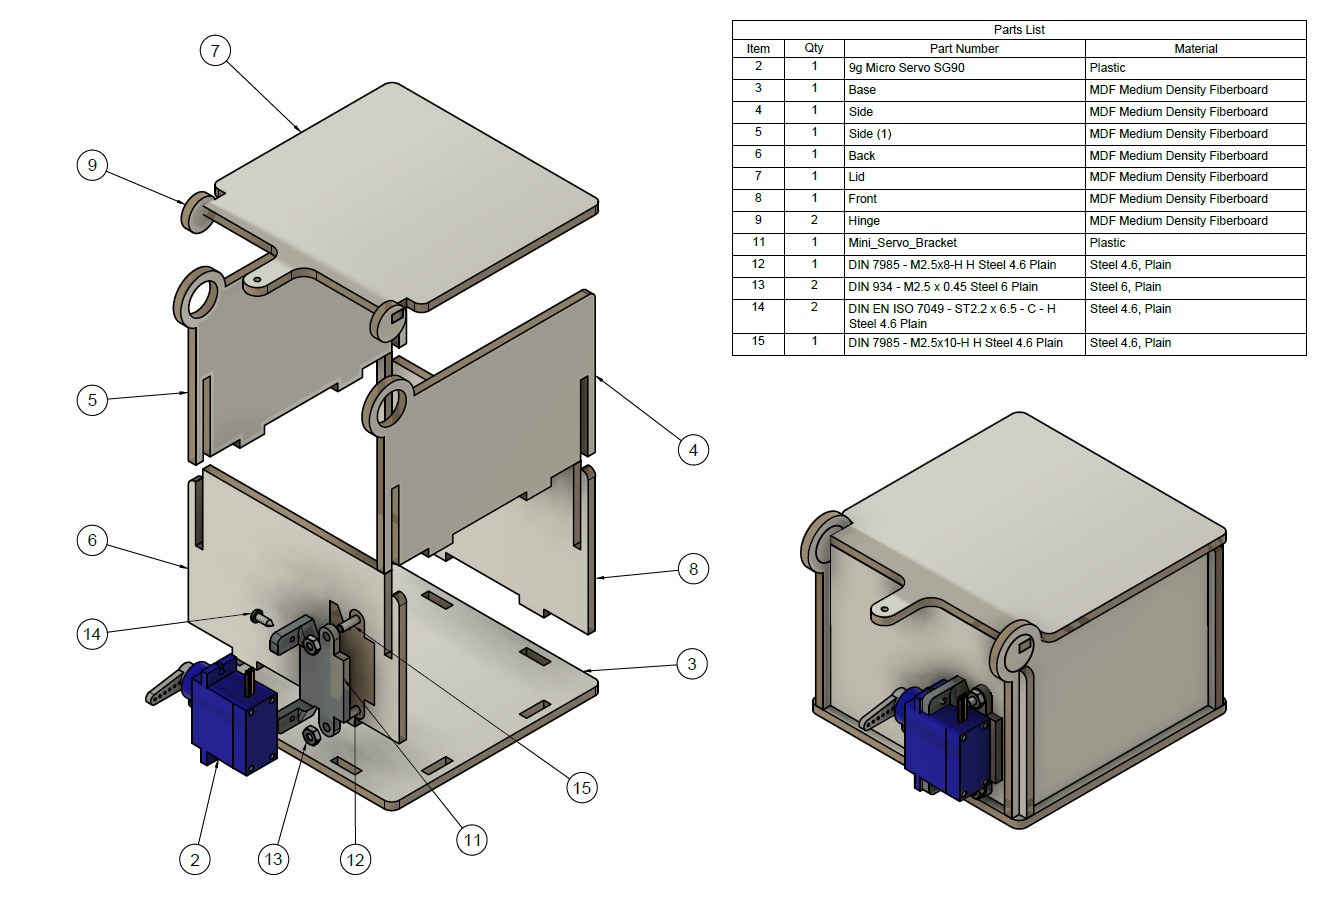
Based on this design, I created an exploded view that students could use to assemble the kit and to set the initial position of the servo arm (lid closed) and its final position (lid open).
4. Develop the Assessment protocol for the lesson plan
Assessment Rubric
| Criterion | Learning Objective | 4 - Excellent | 3 - Good | 2 - Developing | 1 - Beginning |
|---|---|---|---|---|---|
| Assembly and construction of the electromechanical prototype | LO1 | Assembles the prototype accurately and independently. Connects the mechanical and electronic components safely and correctly. The system is stable, functional, and ready for testing. | Assembles the prototype mostly correctly, with only minor mistakes or limited support. Most components are connected properly and the system works. | Completes the assembly only partially, or needs significant support to connect components correctly. The system works only partly or unreliably. | Is unable to assemble the prototype or connect the components so that it functions. |
| Programming the microcontroller using variables, conditionals, and event-based logic | LO2 | Writes and applies code correctly using variables, conditionals, and event-based logic. The program is clear, accurate, and controls the system reliably in both manual and automated actions. | Uses variables, conditionals, and event-based logic with mostly correct code. The program works with minor errors or some support. | Uses some programming structures correctly, but the code is incomplete, contains major errors, or only part of the system works. | Is unable to use variables, conditionals, and event-based logic to create a working program. |
| Training and evaluation of the image classification model | LO3 | Trains a well-organised model using suitable classes and sufficient data. Tests the model carefully, evaluates its performance accurately, and makes improvements based on results. | Trains and tests a working model with appropriate classes and data. Shows a reasonable evaluation of performance, though improvements may be limited. | Trains a model with limited success. Testing or evaluation is incomplete, unclear, or shows only partial understanding of model performance. | Is unable to train or evaluate the model effectively. |
| Integration of the machine learning model with the physical computing system | LO4 | Integrates the model successfully with the microcontroller and prototype. The system responds correctly and consistently when the correct item is recognised. | Integrates the model and physical system successfully most of the time. The system usually responds correctly, with only minor inconsistencies. | Achieves only partial integration. The system responds inconsistently, or only some parts of the interaction work. | Is unable to connect the model and the physical system so that they work together. |
| Reflection on technology and sustainable practices | LO5 | Reflects thoughtfully on how the project supports sustainable practices. Explains clearly how technology can help improve waste sorting or recycling, while also recognising limitations or wider sustainability issues. | Explains clearly how the project connects to sustainable practices and gives a relevant example of how technology can support them. | Shows partial understanding of how the project relates to sustainability, but the explanation is basic, unclear, or incomplete. | Shows very limited understanding of how technology in the project connects to sustainable practices. |
5. Develop the lesson plan using the SCOPES template
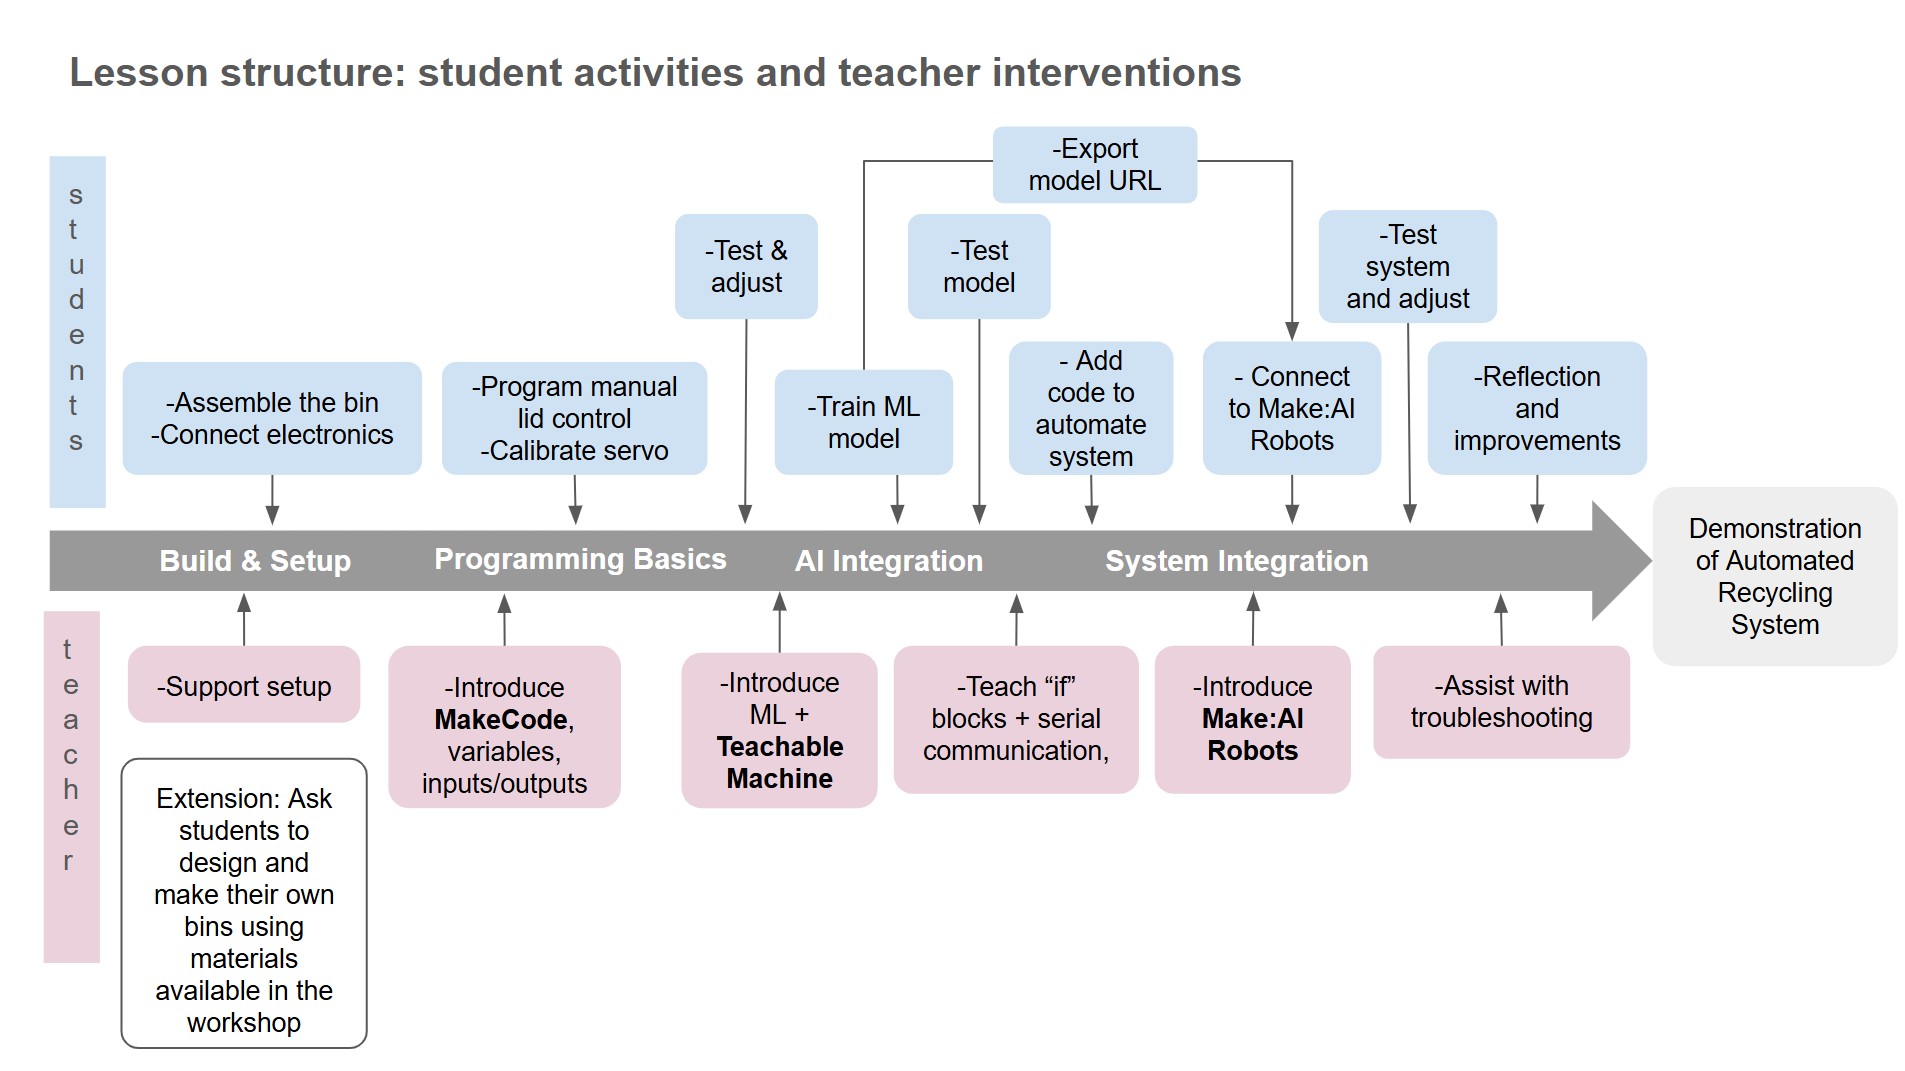
After testing the prototype, developing the kit, and establishing clear learning objectives and an assessment plan, I completed the SCOPES DF lesson fields.
The following diagram illustrates the structure of the lesson. It helped me visualize the different stages of the lesson and the teacher’s role at each stage.
LINK to Lesson in SCOPES DF
6. Test the lesson plan with learners.
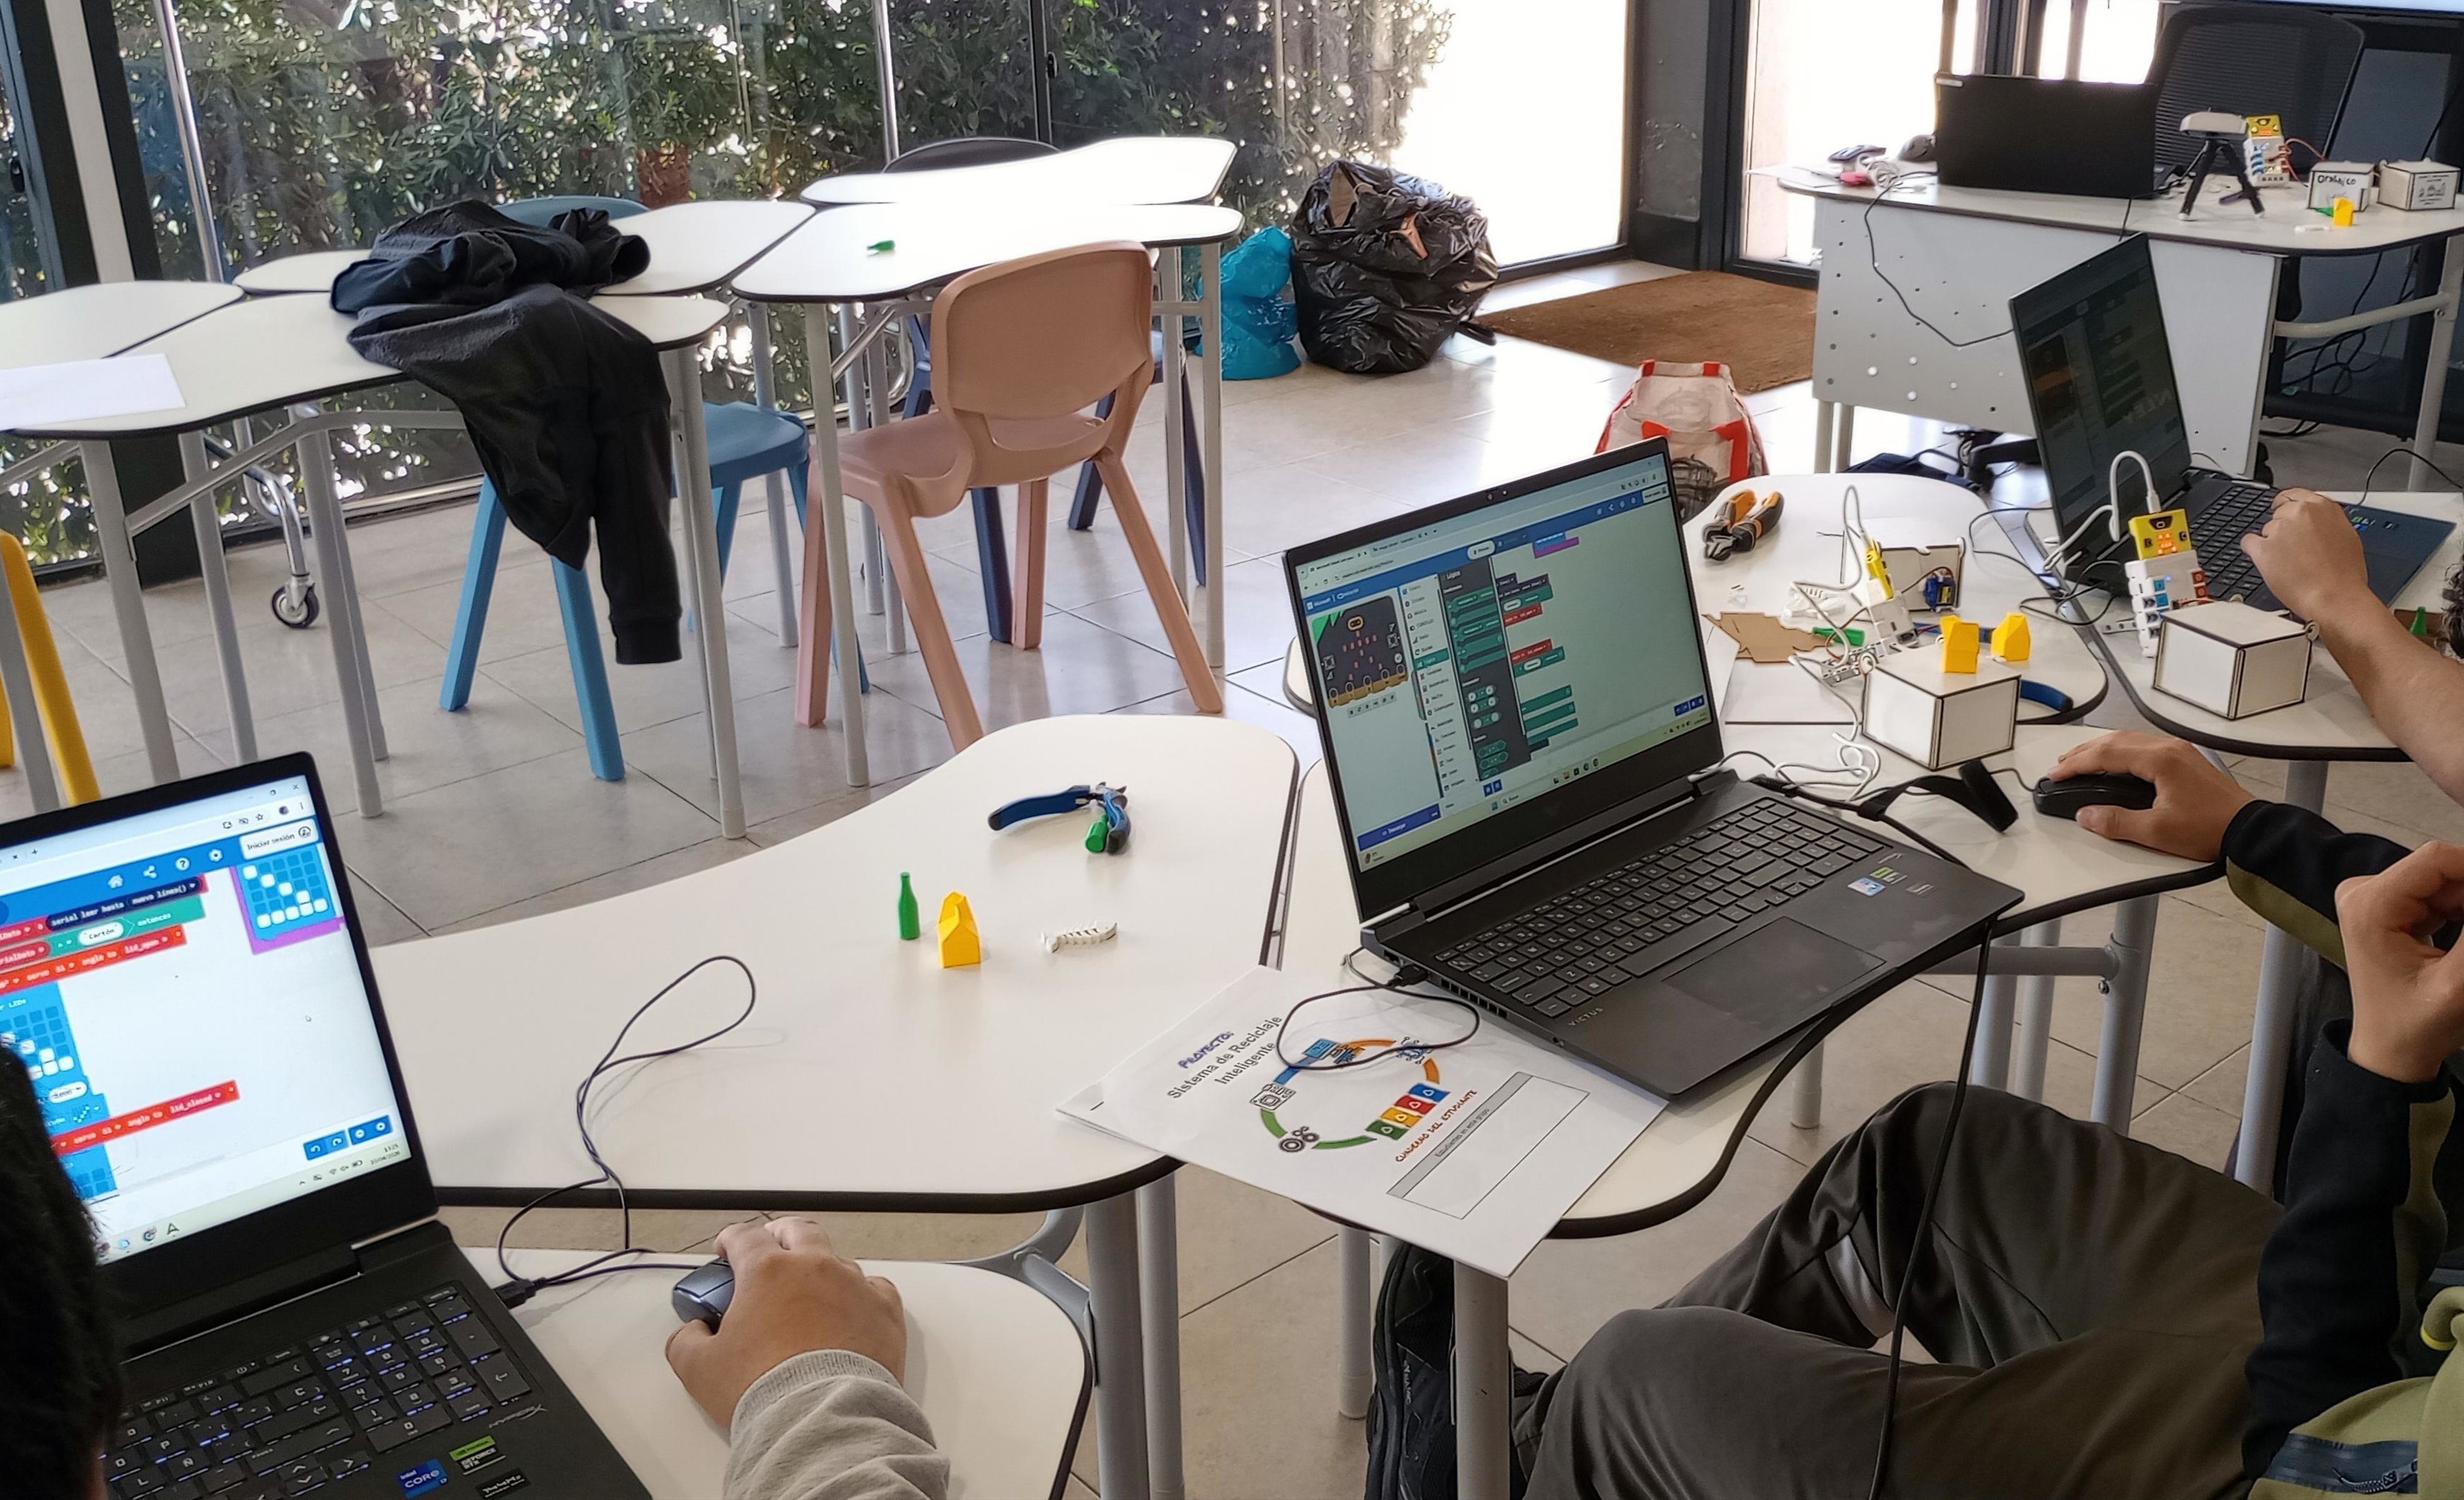
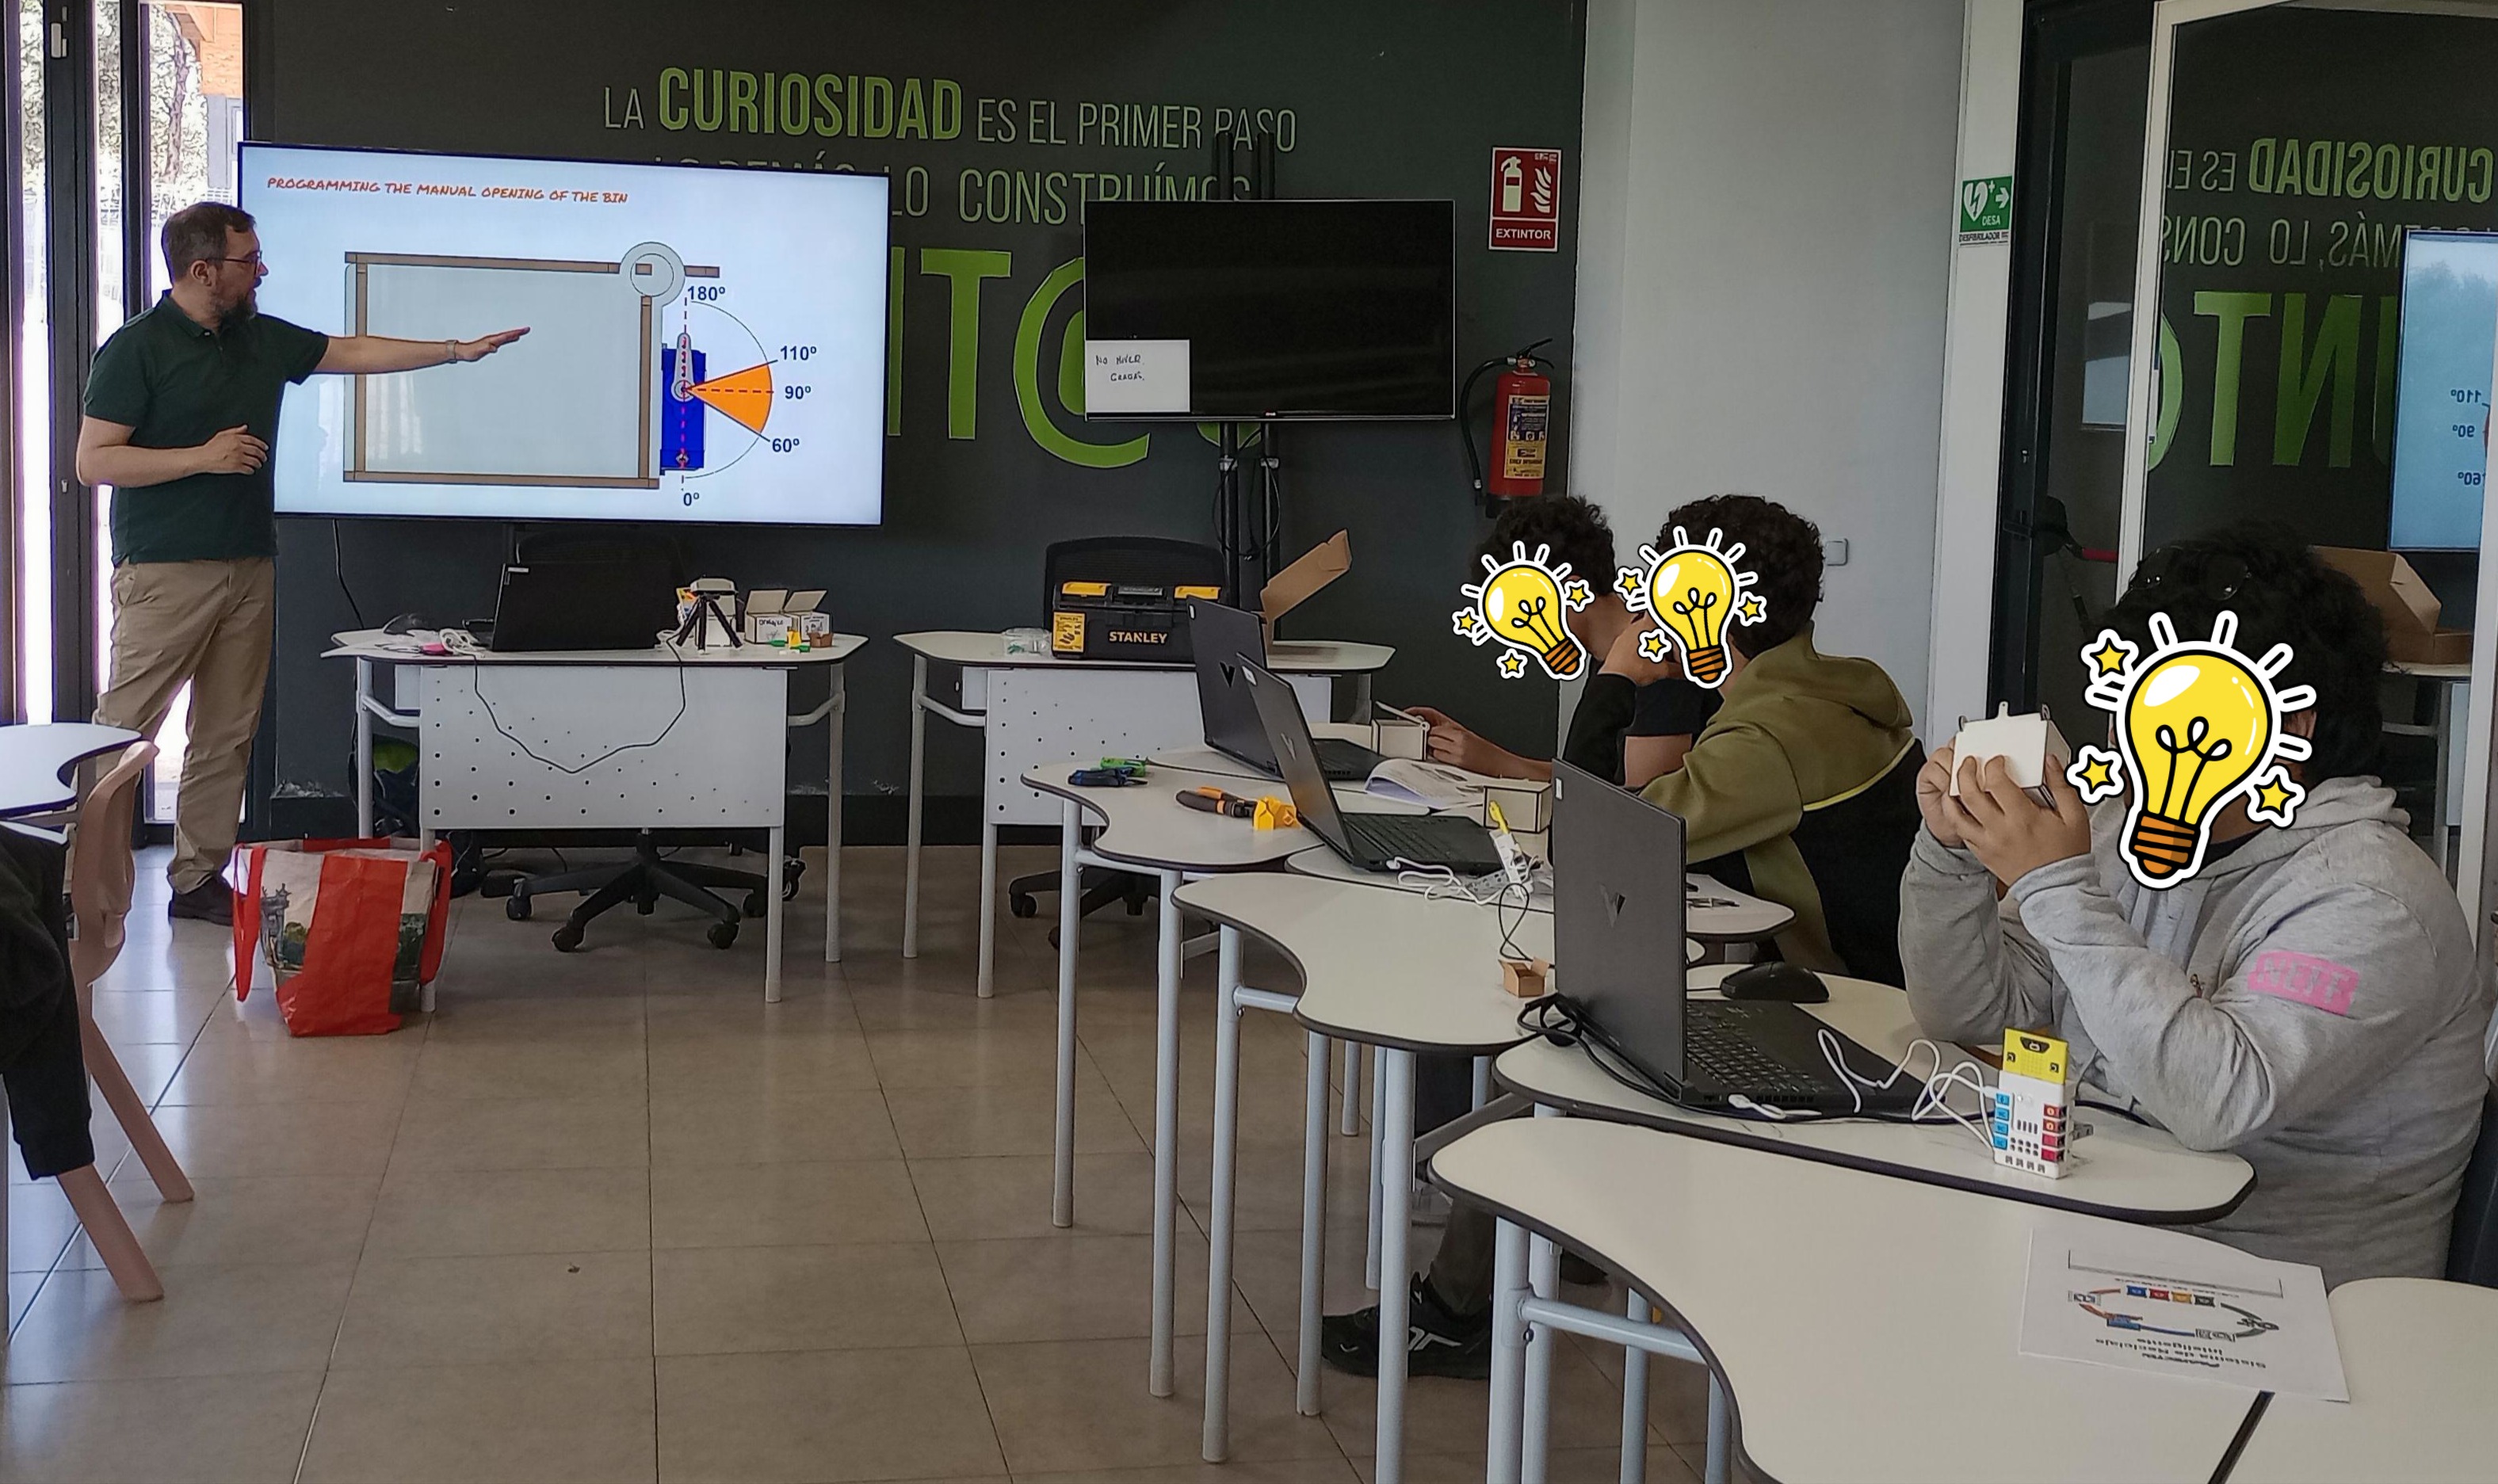
I tested the lesson with a small group of secondary students who attend a maker club in our makerspace. The students already had some previous experience with Scratch, Arduino, and computing as a school subject.
The lesson lasted 1.5 hours. I prepared all the resources and materials in advance so that each student had everything ready to use from the beginning. This helped the lesson run more smoothly and allowed students to focus on the activity.


7. Reflection Questions
1. Collaboration: Reflect on how you worked with colleagues or FLA participants during the Field Activity. At what stages of development and testing did the collaborator contribute? Please be detailed in your description. How did your collaborator’s perspective change the way you developed the lesson?
I collaborated with Kris, a colleague from the lab, during the design and prototyping stages of the field activity. While I focused mainly on the educational design of the lesson, Kris contributed his experience in digital fabrication and practical making. His main role was supporting the development of the physical kit for the activity and suggesting practical ways to build the different parts.
His contribution became especially important when we moved from the first prototype toward a classroom-ready version. We explored different ways students could build their own recycling bins using materials such as Lego, cardboard, reused containers, or plywood. This helped us realise that, although this would be valuable for a longer project, it was not the most practical option for the shorter teaching time we usually have. Because of this, we decided to create a reusable kit that could be assembled quickly. My colleague designed a press-fit box with support for a mini servo, and I then created an exploded view to help students assemble it.
His perspective helped me make the lesson more realistic and easier to implement and it made me think more carefully about timing, reliability, and ease of assembly.
2. Instructional Challenges: What challenges did you encounter while teaching this lesson? How did you address or plan to address them? How are diverse learners’ needs being met in the lesson plan facilitation?
In terms of timing, I found that the final stages of the lesson needed to be shortened. To make sure students could complete the activity within the available time, I asked them to train the model with only two waste items instead of the four originally planned. Despite this adjustment, the students were able to complete and test their systems successfully.
One challenge was that the machine learning model was not always accurate. This was probably because students did not collect enough training samples for each class. We discussed this issue together, and it helped reinforce the idea that AI systems depend on the quality and quantity of the training data. However, there was not enough time left in the session to retrain the model with more samples.
There were also some coding issues which took time to troubleshoot. The problem was caused by spaces in the variable names. Once these were removed, the code worked as expected.
During the testing, I also observed that students need support when training the image recognition model. It is important to ensure that the background is neutral and contrasts clearly with the different waste items so that the model can distinguish them more reliably.
Another important point is that the class names used in Teachable Machine must exactly match the names used in the code. Students also need reminders about the correct workflow when connecting the micro:bit to MAKE:AI ROBOTS: first disconnect it from MakeCode, and also disconnect the webcam from Teachable Machine so that MAKE:AI ROBOTS can access it.
Overall, the lesson ran quite smoothly and the students were engaged throughout the activity. The lesson supported the learning objectives well, as students were able to build and program a working prototype and understand some of the practical challenges of training an AI model.
This lesson supports differentiation by combining visual, practical, and coding-based learning, so students can engage in different ways rather than relying on a single skill. The workbook provides clear step-by-step scaffolds such as diagrams, flowcharts, screenshots, vocabulary explanations, troubleshooting prompts, and sentence starters, which help students with different levels of prior knowledge, confidence, language ability, and technical skill to access the tasks and work more independently.
In future, I would like to test the lesson with a larger group so that students can work collaboratively in teams. I would also improve the timing by either extending the lesson, providing the container fully assembled, or reducing the number of waste categories from the start. I would also add clearer troubleshooting guidance for both the coding and model-training stages.
3. Integrating Disciplines: Where does your lesson plan fall on the continuum and why? How might you move the lesson plan along the continuum to the next level? - Multidisciplinary - Interdisciplinary - Transdisciplinary
I would place this lesson at the interdisciplinary level as it combines content and skills from Technology and Civic Values and Ethics through one shared project: designing and programming a smart recycling system. Students do not only learn about electronics, programming, and AI, but also connect their work to sustainability and waste prevention.
To move the lesson toward the transdisciplinary level, I could connect it more directly to a real problem in the school or local community. For example, students could investigate how recycling works in the school, identify actual challenges, collect data, and design a smart recycling solution for a real context and real users.
4. AI Usage: If you used AI, describe how it was used and in which steps of the Field Activity.
I used AI as a support tool mainly during the planning and documentation stages of the Field Activity. It helped me improve the clarity and quality of the documentation by revising text, correcting language, and making descriptions more concise and structured. I also used it to help align the learning objectives with the lesson activities and assessment criteria, which made the lesson plan more coherent. In addition, I used AI to translate the student workbook into Spanish, which helped me adapt the materials for my learners. I did not use AI to generate the lesson itself or to replace the design and testing process, but rather as a tool to refine and communicate my own work more effectively.
5. Reflect on the course in general: - How has your teaching changed as a result of this course? - What are some concepts that you would like to learn more about? - How can you support other teachers in your practice to use digital fabrication with their students?
This course has helped me better understand how to design and implement digital fabrication learning experiences at different educational levels. It has made me reflect more deeply on how students learn and how to connect hands-on making with clear learning objectives, assessment, and documentation. As a result, my teaching has become better structured.
I found the course very complete, as it combined digital fabrication techniques, Fab Lab and makerspace philosophy, STEAM learning, and educational approaches such as project-based learning. It also introduced me to new areas such as biomaterials and IoT, which I would like to continue exploring in more depth.
One area that could be strengthened in the course is health and safety in workshops and makerspaces. Although it is mentioned throughout the course, I think it would benefit from a dedicated section focused on regulations, risk assessments, maintenance, accident reporting, training, and how to build a culture of H&S with staff and students.
Sharing the course with participants, instructors, and teachers from around the world was also very enriching. It encouraged me to document my process thoroughly, and I hope this documentation can continue to improve and become useful for other teachers as well.
In my practice, I believe I can support other teachers by helping them design meaningful and structured digital fabrication activities for their students. Since I work in a makerspace and often support schools, I can help teachers connect fabrication processes with learning goals and make these experiences more accessible and effective in educational settings.
Tools or software used.
- MakeCode — block-based microcontroller programming
- Teachable Machine — train simple AI models
- MAKE:AI ROBOTS — link the Learning Model to the Micro:bit via serial
- Boxes.py — generate parametric box designs
- Templatemaker.nl — create printable paper templates
- Teachable Micro:Bit — connect AI with micro:bit via Bluetooth
- Cardboard Robots — cardboard robotics learning platform
- Sustainable Development Goals - Student resources — UN resources for teachers and students about SDG