Week 9: Microcontrollers
Assignments
Use one development board (arduino, microbit …) and use it to sense something in your class (noise / light / movement) and produce some kind of response (audio, light, movement)
In your documentation, describe briefly your project; name the board you are using, as well as the sensor and actuator; Explain what you are measuring and how you are using the actuators; if you are using external components, draw a simple diagram on how they are connected and finally provide your code (or link to your code). Include several pictures of your project. If possible you can include a video.
Process
For this week’s assignment, I designed and developed a classroom noise monitoring system using the BBC micro:bit. The goal of this project was to address classroom management challenges by providing real-time auditory and visual feedback when ambient noise levels exceed an acceptable threshold.
One particular class has demonstrated consistently high noise levels, which disrupts instruction and reduces overall learning efficiency. This project aims to create a responsive, automated solution to promote self-regulation among students.
Step 1: System Familiarization and Baseline Development I began by completing the Micro:bit Sound Meter tutorial available on the official Micro:bit website: https://microbit.org/projects/make-it-code-it/sound-meter/
This activity introduced the fundamentals of:
- Sound level detection using the Micro:bit’s onboard microphone
- Real-time data monitoring
- Basic input/output programming
This step established a foundation for building a customized noise detection system.
Step 2: Threshold-Based Audio Alert System
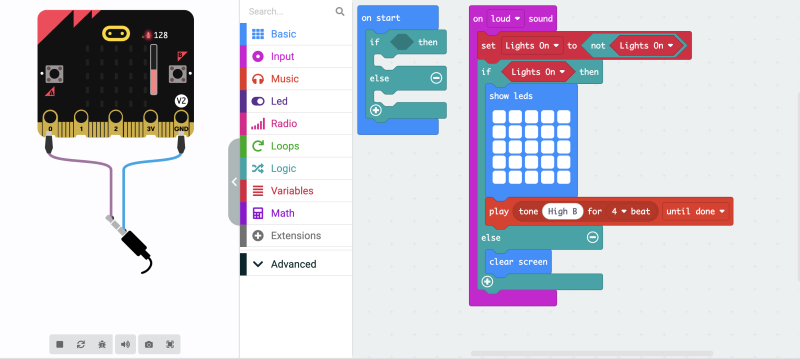
Building on the tutorial, I developed a modified program that continuously monitors ambient sound levels.
A threshold value of 128 (on the Micro:bit sound scale) was selected as the maximum acceptable noise level. When this threshold is exceeded, the device triggers an auditory alert, producing a beeping sound for four beats.
This feature functions as an immediate feedback mechanism, alerting students when noise levels become excessive.
Step 3: Visual Feedback Integration
To enhance the effectiveness of the system, I incorporated a visual output component:
When the sound threshold is exceeded, the Micro:bit displays a solid LED block on its matrix display. This visual signal complements the audio alert, ensuring accessibility and reinforcing the feedback loop.
The combination of auditory and visual cues is intended to:
- Increase student awareness
- Encourage behavioral self-regulation
- Introduce an element of gamification, where students are motivated to maintain acceptable noise levels
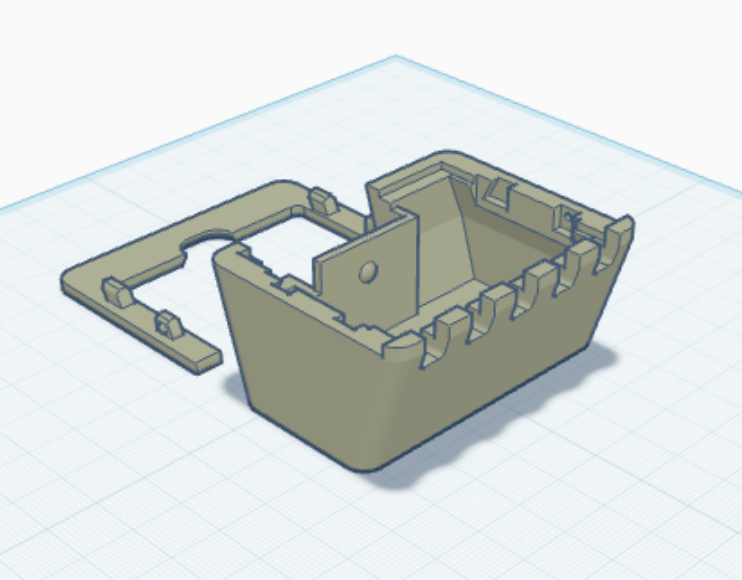
Step 4: Physical Enclosure and Classroom Implementation
To ensure durability and visibility, I designed the system for physical deployment:
- I sourced a 3D-printable enclosure (STL file) for the Micro:bit
- The case was printed and assembled to securely house the device
- The final unit was positioned at the front of the classroom for maximum visibility and effectiveness
This project demonstrates how embedded systems and simple programming can be applied to solve real-world classroom challenges. By integrating sensor input, conditional logic, and multimodal feedback, the noise monitoring system supports a more focused and productive learning environment while promoting student accountability.
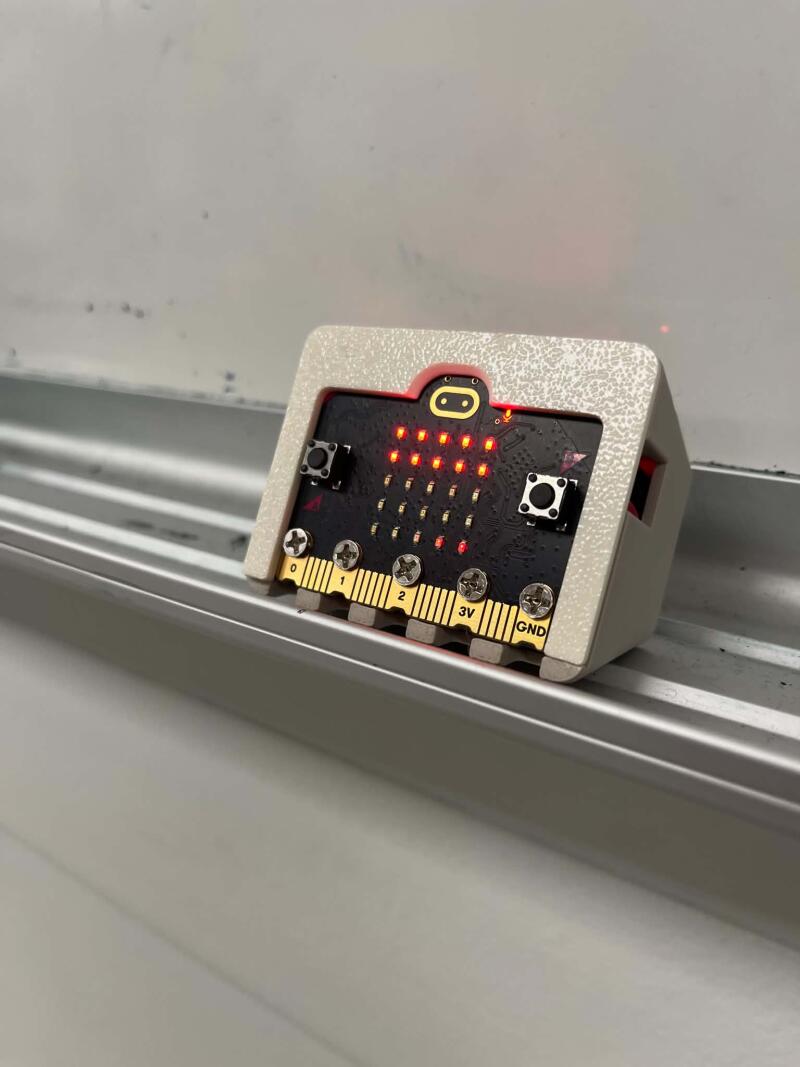
Finished Product
Reflection
Classroom Observations I introduced my design to the class by clearly outlining the objectives and explaining the reasoning behind it. Initially, some students tested the system by intentionally being loud. However, this quickly shifted, and they became noticeably quieter to avoid triggering the micro:bit’s disruptive sound. Overall, the design proved to be successful. That said, I would like to refine the system by making the sensor slightly less sensitive, as it was also triggered when I was speaking at the front of the class. Moving forward, I am interested in exploring how students might incorporate sound sensors into their own projects. I also plan to integrate a wider range of sensors into future classroom activities to further support hands-on, design-based learning.
Did you bring several disciplines together in your own teaching? Do you collaborate with teachers in other disciplines? What are the opportunities and challenges.
Yes, I actively bring multiple disciplines together in my teaching and collaborate with colleagues across Design, Social Studies, English, and Advisory. I value interdisciplinary learning because it helps students make meaningful connections and see how skills transfer across subject areas. One of the main challenges is logistical. Class groupings do not always align—for example, the students I teach in Design are not always the same as those in English—which can make coordination more complex. Additionally, differing teacher schedules can make it difficult to find common planning time. Another challenge is identifying a clear and authentic common thread that connects different subject areas in a meaningful way. However, when these challenges are overcome, the benefits are significant. Interdisciplinary collaboration enhances student learning by reinforcing transferable skills and deepening understanding. Students are better able to see the relevance of what they are learning and apply their knowledge across contexts, which ultimately leads to a more cohesive and engaging educational experience.
How do you envision a makerspace in your school? How does it look like? If you have one already, how would you modify it.
At LCC, we are fortunate to have an exceptional makerspace, supported by our Fab Master, Alec Mathewson. The makerspace is composed of several dedicated classrooms and fabrication areas, each equipped with specialized tools. Two classrooms are outfitted with vinyl cutters, computers, and repurposing stations, while a separate 3D printing room houses five printers. We also have a digital media lab and a fully equipped woodworking shop featuring a laser cutter alongside a range of manual tools. This diverse environment fosters creativity and innovation, encouraging students to integrate multiple fabrication tools and techniques into their design work.
After the definiton of computational thinking? Are you somehow using computational thinking in your teaching? How? Do you think you can take advantage of computational thinking? How?
Absolutely, I already incorporate computational thinking into my teaching, particularly through the micro:bit activities I design. When students build and program projects, they naturally engage in decomposition by breaking down a task (e.g., creating a sensor system), pattern recognition through testing and iteration, and algorithmic thinking as they write and refine their code. Debugging also plays a key role, as students must identify issues and systematically work toward solutions.
I can further take advantage of computational thinking by making these processes more explicit across different subjects. For example, in design projects, students can plan and prototype using step-by-step logic, while in social studies or English, they can break down complex problems or texts into manageable components and identify patterns or themes. By intentionally highlighting these strategies, students can transfer computational thinking skills beyond coding and apply them more broadly to problem-solving in various contexts.
Tools
- Microbit
- 3D Printer
- Micro:bit Case STL