Field activity 2
Assignments
- [ ] Task 1:For this Field Activity, you will design (or adapt) test and reflect on a lesson plan for a subject you teach. Your lesson plan must include electronics components and/or basic programming elements.
- [ ] Task 2:This time you can adapt or reuse one of the lesson plans available (see below). It is important that you adapt the lesson plan to your own context, modifying if needed the learning goals.
Process
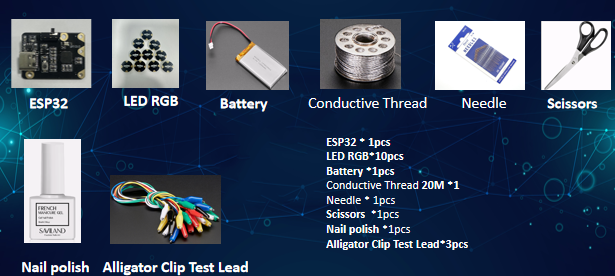
Steps: * What is Printed Circuit Board? * How does it work? Explain what is post https://phet.colorado.edu/en/simulations/circuit-construction-kit-dc/about Explain how positive and negative electrodes work, so that students can understand simple circuit diagrams. * Five steps of stitching circuit Let’s start stitching. 1. Place a hoop 2. Trace around 3.Start stitching 4. Trace the perimeter 5. Plug in the USB cable * Test your connection Test your new components’ connections to GEMMA with a multimeter. If everything checks out, plug in your battery and pat yourself on the back! * Circuit Diagram NeoPixels are chained together with data input coming from GEMMA GPI0, all + to Vout and all - to +.All positive connect with positive , and the same time negative connect with negative. * Make it shine Students sew the PCB boards onto different parts of the T-shirt following the schematic diagram. After connecting the battery, if the circuit powers up normally, the lights on the PCB board will glow in different colors. During the sewing process, some students find that due to the material of the conductive thread, the thread cannot lie flat against the PCB board or leaves excess loose length. Nail polish is used to secure the conductive thread in place to keep the T-shirt looking neat and tidy.
-
Review the lesson from Circuit Diagram
-
Challenges and solutions When explaining the entire course, many details are not clear enough. The students’ scientific and technological innovation skills vary greatly. Therefore, while introducing the course framework, it is also necessary to carefully explain the uses of materials and the working principles of circuits. Only in this way can students successfully operate their own sensors and make correct connections when they come into contact with them for the first time. If students do not clarify the connection of the positive and negative poles on the fabric at the beginning, it is easy to find a short circuit after sewing for a long time, and then everyone will be very frustrated and unwilling to start over.
Reflection
- In what ways did students’ ZPD guide your decisions about pacing, scaffolding, or complexity of the activity?
- The gap between what students can do independently and what they can achieve with guided support — directly shaped every part of the lesson design. • Pacing: I slowed the pace for foundational skills (identifying circuit symbols, connecting batteries and wires) since most students could recognize basic components independently, but needed time to practice safe, correct physical wiring. I accelerated slightly once students mastered series circuits, as parallel circuits and switch integration fell firmly within their ZPD. • Scaffolding: I used targeted scaffolds only within the ZPD, not for skills students already mastered. For example, I provided pre-drawn circuit templates and step-by-step connection cards for building series circuits, but removed these supports once students could assemble them independently. I also used think-aloud demonstrations and peer questioning to support troubleshooting, which was just beyond independent ability.
• Complexity: I increased task complexity incrementally to stay within the ZPD. The activity moved from:
-
Independent: Identify circuit symbols
-
Supported: Build a basic series circuit
-
Challenged (ZPD): Design a parallel circuit with a switch I avoided overly complex multi-loop circuits, as this would have moved outside students’ current ZPD and caused frustration. *What supports did you provide in the lesson plan to support diverse student needs? How did these supports work in the overall lesson?
I designed multiple flexible supports to address varied learning speeds, learning styles, and ability levels in the circuit lesson:
• Visual & tactile supports: Printed circuit symbol posters, color-coded wiring guides, and physical component kits for hands-on learners (critical for FabLearn’s maker focus).
• Tiered tasks: Three levels of circuit challenges — basic (series bulb circuit), intermediate (series with switch), advanced (parallel circuit) — so students could work at their own level.
• Collaborative support: Mixed-ability small groups, where stronger students helped peers troubleshoot wiring errors.
• Simplified language & vocabulary cards: Defined key terms (current, circuit, parallel, series) in plain language to support multilingual learners or students new to electronics.
• Teacher check-ins: Short, one-on-one guidance for students struggling with physical assembly or diagram reading.
Overall effectiveness: These supports kept all students engaged in the maker activity. Struggling learners stayed on task with visual and guided help, while advanced students were challenged without boredom. The supports also kept the lesson focused on understanding circuit logic, not just following directions, and maintained a safe, inclusive hands-on environment.
*After testing the lesson, what changes would you make to better meet diverse learner needs or to better maintain the learning objectives? - Based on student performance and engagement during the lesson, I would make these targeted revisions:
-
More flexible scaffolding removal: Add optional “help cards” that students can choose to use or put away, instead of removing supports for the whole class at once. This better supports students with wider ZPD ranges.
-
Extended hands-on trial time: Some students needed more time to physically connect components without rushing. I would shorten whole-class instruction to add 5–7 minutes of independent building time.
-
Clearer troubleshooting guides: Create a simple “circuit fix checklist” (e.g., loose wire, reversed battery, broken connection) to help students solve problems independently, reducing teacher reliance.
-
Differentiated exit tickets: Replace a single assessment with three quick checks (basic, intermediate, advanced) to accurately measure growth for all levels while keeping the core objective (understanding how circuit diagrams represent real circuits) consistent.
-
Culturally responsive & relatable examples: Add simple real-world connections (e.g., phone flashlights, string lights) to help students who struggle with abstract schematics connect the activity to daily life.
These changes will better honor diverse needs while keeping the lesson focused on FabLearn’s goals: building, problem-solving, and understanding circuit design.
-
Key learnings Through this course, students will learn the complete process of circuit board design and fabrication, and realize simple wearable functions by sewing the circuit boards onto clothing.
-
How it applies to your teaching / context First, there is the concept of a wearable T-shirt, followed by the development of a course plan. The plan ranges from using an app to design a simple circuit diagram and programming to realize the color and pause time of LED lights, to incorporating the idea of enabling up to 8 sensors to work together. In class, students are guided to practice hands-on: they thread needles and sew small modules onto the fabric, ensuring the positive electrodes align with positive electrodes and negative electrodes with negative electrodes.
-
Next steps or improvements Short circuits are likely to occur during the sewing process, so some tools are needed to assist students in completing the project. Since the process is also relatively time-consuming, students can start by implementing the wearable function with 3 sensors. Those who have extra capacity can increase the number of sensors to finish their works within the limited class time.Make sure the course is both flexible and challenging.
Tools
- Cross-stitch auxiliary tools
- Mainboard
- Battery
- Needles and threads
- Fabric
- Control panel
- Conductor wire
- Nail polish
- Scissors
- Sensors(3-8 pieces)
- Pencials
 - References or tutorials followed
https://beckystern.com/
- References or tutorials followed
https://beckystern.com/
https://www.youtube.com/watch?v=LvBcBgcWukM&list=PLxW5bBHPfdBym3unJeJLAZC31a69eM7dl&index=9 https://phet.colorado.edu/sims/cheerpj/battery-resistor-circuit/latest/battery-resistor-circuit.html?simulation=battery-resistor-circuit
-Lesson plan https://www.scopesdf.org/scopesdf_lesson/light-activated-pixel-heart/