Field activity 4
Assignments
Task 1: For this Field Activity, need to create a lesson plan involving robotics, physical computing or programming and test it in real educational environment. The lesson plan should include certain aspect of interdisciplinarity, multidisciplinarity or transdisciplinarity. Hence, this time, you need to collaborate with a teacher from another subject at some point (either during design or implementation phase or both). The teacher can be from the same school, from other school, or even another FLA participant, but the important aspect is that you must collaborate with someone from a different discipline.
Take into account that the learning objectives and the assessment criteria covers different subjects / knowledge areas.
Process
Prepare the tools we need. - micro:bit V1 Main Control Board: The core control unit of the experiment, used to receive data from the humidity sensor, run programs, and display or record data. - Extended Board: Assists in connecting the micro:bit and the humidity sensor, providing stable interfaces and avoiding loose connections; it also helps distinguish positive and negative poles for easier operation by students. - Moisture Sensor V2: Used to measure the humidity of plant soil, convert the humidity signal into an electrical signal, and transmit it to the micro:bit main control board. - Wood Block: Can be used as a fixed base for the micro:bit, extended board, or sensor to prevent the components from falling and ensure stable operation during the experiment. - PC: Used to log in to the MakeCode website, edit and download programs to the micro:bit, and assist in data sorting (if needed). - Data Cable: Connects the micro:bit to the PC (for program downloading) and can also be used to supply power to the micro:bit (or use a power bank). - Power Bank: Provides mobile power supply for the micro:bit and sensor, so that the experiment can be carried out near plants without being restricted by the PC’s power socket. - Plant: The object of the inquiry experiment; it is recommended to choose potted plants with visible soil (such as succulents, green radishes) to facilitate the insertion of the humidity sensor.
Electronic Component Guidance (Student Observation & Operation)
Guide students to observe and operate electronic components step by step, helping them understand the structure and connection method of each component, and cultivate their hands-on ability.
Step 2.1 Observe the micro:bit V1 Main Control Board
1. Let students hold the micro:bit V1 main control board with both hands (pay attention to keeping hands dry to avoid short circuits) and observe its appearance carefully.
2. Guide students to identify key components on the board:
- Pads: The metal contact points on the edge of the board (usually copper-colored), which are used to connect the extended board or sensors.
- Chip: The black rectangular or square component in the center of the board, which is the “brain” of the micro:bit, responsible for running programs and processing data.
- Switch: The small button on the back or side of the board, used to turn the micro:bit on or off.
3. Let students observe the front of the board: find the 5×5 LED dot matrix (the small light dots that can light up) and the two buttons (A and B). Ask students to press the switch to turn on the micro:bit, observe the LED lights lighting up, and experience the physical operation of the board.
Step 2.2 Understand the Extended Board & Moisture Sensor V2
1. Show students the extended board, explain its function: it is a “bridge” between the micro:bit and the sensor, with clear interface labels (such as GND, VCC, signal pins) to help connect the sensor correctly.
2. Introduce the Moisture Sensor V2: Show the sensor’s probe (the metal part at the bottom, used to insert into the soil) and the connecting wire (with three or two pins). Explain that the sensor can detect the moisture content in the soil and send the data to the micro:bit.
3. Teach students to distinguish positive and negative poles:
- The extended board is usually marked with “VCC” (positive pole, usually red) and “GND” (negative pole, usually black or blue).
- The connecting wire of the moisture sensor also has corresponding color marks (e.g., red for positive, black for negative); guide students to align the positive and negative poles of the sensor with the corresponding interfaces on the extended board.
4. Let students try to connect the components by themselves under the teacher’s guidance: first insert the micro:bit into the extended board (align the pins correctly), then connect the moisture sensor’s wires to the corresponding interfaces of the extended board. After connection, check whether the connection is firm (avoid loose wires affecting data collection).
3. Inquiry Experiment Steps (Core of the Lesson)
The focus of this lesson is to guide students to conduct a complete humidity inquiry experiment, not just to learn how to use micro:bit and sensors. The specific steps are as follows, and a worksheet is provided to help students record data.
Step 3.1 Log in to the MakeCode Website & Edit Programs
1. Ask students to turn on the PC, open the browser, and log in to the website: https://makecode.microbit.org/.
2. Guide students to create a new project: Click “New Project” on the homepage, name the project (e.g., “Plant Humidity Inquiry”), and enter the programming interface.
3. Teach students to edit the basic program (using block programming, suitable for primary and secondary school students):
- Add a “start” block (triggered when the micro:bit is turned on).
- Add a “read humidity” block (find the sensor-related blocks, select “Moisture Sensor V2”, and set the correct pin corresponding to the extended board).
- Add a “display data” block: Let the micro:bit’s LED dot matrix display the measured humidity value (so students can directly read the data).
- Add a “delay” block (e.g., 1000 milliseconds = 1 second) to ensure that the data is displayed stably and is easy to record.
- After editing the program, guide students to connect the micro:bit to the PC with a data cable, click the “download” button on the website, and import the program into the micro:bit. After the import is successful, disconnect the data cable (or keep it connected, or use a power bank to supply power). Step 3.2 Conduct the Humidity Inquiry Experiment (Key Supplement)
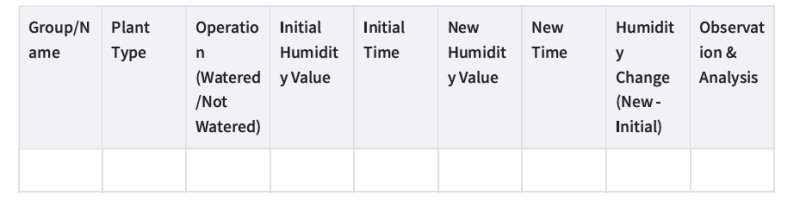
- Prepare the worksheet for students (see the end of this guide for a simple template), and explain the purpose of the worksheet: to record the humidity data of the plant soil at different times, so as to analyze the impact of watering on soil humidity.
- First measurement (initial humidity): Insert the probe of the moisture sensor into the soil of the plant (insert it 2-3 cm deep, avoid touching the pot bottom), wait for 2-3 seconds until the micro:bit displays a stable value. Ask students to write down this initial humidity value on the worksheet, and record the time (e.g., 10:00 AM).
-
Group operation: Divide students into two groups (or let each student complete both operations sequentially):
-
Group 1: Water the plant (water an appropriate amount, not too much to avoid waterlogging), mark “watered” on the worksheet.
- Group 2: Do not water the plant, mark “not watered” on the worksheet.
- Second measurement (after treatment): Wait for 5-10 minutes (let the water penetrate the soil if watered), insert the moisture sensor into the same position of the plant soil again, wait for the data to stabilize, and ask students to write down the new humidity value and the current time on the worksheet.
 -Use 3D printer to design your own plant care container.
Upload the assessment form
-Use 3D printer to design your own plant care container.
Upload the assessment form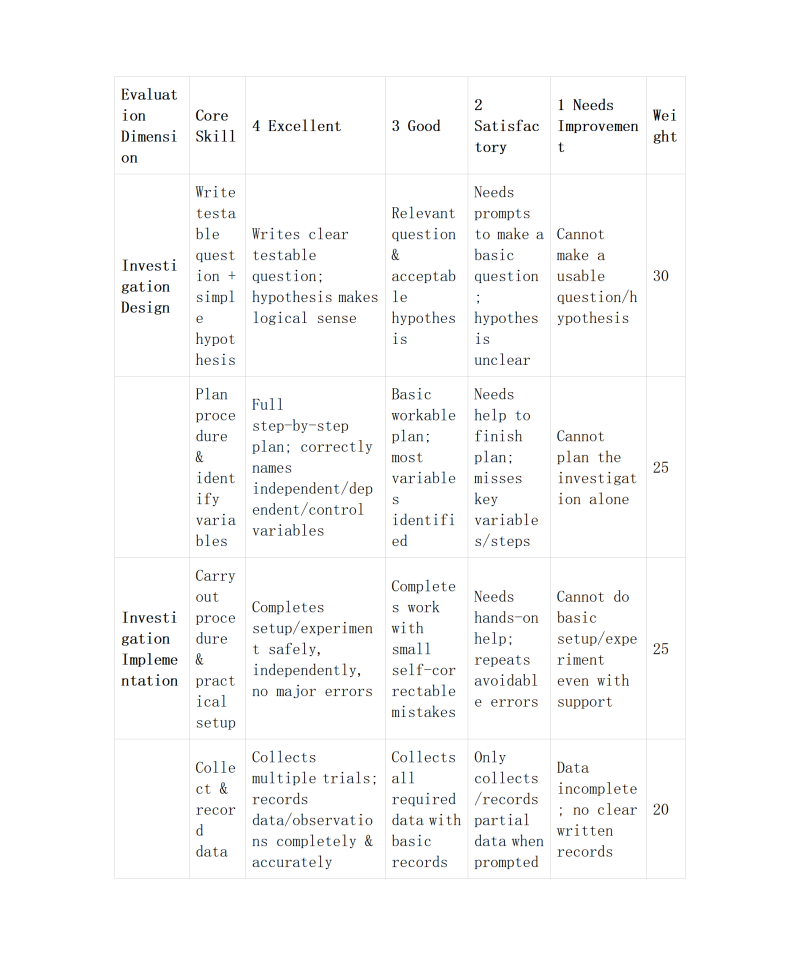
Reflection
- Collaboration: Reflect on how you worked with colleagues or FLA participants during the Field Activity. At what stages of development and testing did the collaborator contribute? Please be detailed in your description. How did your collaborator’s perspective change the way you developed the lesson?
- During the Field Activity focused on Micro:bit-based sensor programming, I collaborated closely with Ms. Lit, and her participation and perspectives played a crucial role in the smooth development and successful testing of our project- air humidity sensor programming. Our collaboration was not fragmented but ran through the entire process of project development and testing, with each stage witnessing clear division of labor and mutual complementarity, which not only improved our work efficiency but also helped me optimize my lesson development ideas in a more comprehensive way. In the preparation and planning stage of the project, before we started editing code or connecting sensors, Ms. Lit and I held a detailed discussion to clarify the core objectives and the potential difficulties we might encounter. I initially focused more on the technical implementation of the code, but I paid less attention to the rationality of sensor connection and the operability of the programming process for beginners.Ms. Lit put forward a key perspective: since the Field Activity also aimed to help us master practical operation skills, we should first confirm the connection mode of the Micro:bit V1 main control board, expansion board, and Moisture Sensor V2, and test whether the pins were correctly connected to avoid code failure caused by hardware problems. They suggested that we first draw a simple connection diagram, mark the corresponding pins (such as which pin of the expansion board the humidity sensor should be connected to), and verify the connection stability in advance. This suggestion made me realize that “hardware connection is the foundation of programming”, and I adjusted my planning sequence—first completing the hardware connection and testing, then starting code editing, which avoided the situation of reworking due to connection errors later. In the code development and initial testing stage, our collaboration became more detailed and targeted.For air humidity sensor project, I initially connected the humidity sensor to the expansion board but failed to get the correct data feedback after writing the code. Ms.Lit reminded me to check the logic of the code—whether the “set…to…” command correctly associated the sensor with the corresponding pin, and whether the “if…then…else” conditional statement was set reasonably (such as setting the threshold of humidity and the corresponding prompt action). They also suggested that we use the real-time monitoring function of the web-based programming platform to check the data transmitted by the sensor, which helped us find that the pin number in the code was inconsistent with the actual connection, and the problem was solved after modifying the pin parameter. In the final testing and optimization stage, Ms. Lit put forward valuable suggestions from the perspective of “practical application” and “lesson promotion”. I originally thought that as long as the project could run normally, the task was completed, but they pointed out that if this lesson was to be promoted to more participants, we needed to consider the operability of beginners. The perspectives of my collaborator have significantly changed the way I developed the lesson. Initially, my lesson development was more “technology-oriented”, focusing on how to realize the functions of the project and master the relevant programming skills, but ignoring the “learner-oriented” perspective—whether the content is easy to understand, whether the operation steps are clear, and whether the practical application scenarios are considered. Through collaboration, I realized that a good lesson not only needs to let learners master technical knowledge (such as pins, logic, computational thinking, and programming commands) but also needs to be operable and practical. This adjustment made the lesson more systematic and suitable for the learning needs of FLA participants, and also deepened my understanding of “computational thinking”—it is not only about code logic but also about thinking comprehensively, considering potential problems, and solving problems collaboratively. In summary, the collaboration with FLA participants during the Field Activity was a valuable learning experience. She contributed professional suggestions and practical perspectives in the preparation, code development, testing, and optimization stages, helping me avoid many detours and improve the quality of the project and the lesson. More importantly, her perspectives made me change from a “technical implementer” to a “comprehensive lesson designer”, realizing the importance of considering the needs of learners and practical application scenarios in lesson development. This collaborative experience not only improved my programming and practical operation skills but also enhanced my communication and collaborative abilities, which will be of great help to my future study and work. -Instructional Challenges: What challenges did you encounter while teaching this lesson? How did you address or plan to address them? How are diverse learners’ needs being met in the lesson plan facilitation?
- During the facilitation of this Micro:bit sensor programming lesson, I encountered several key challenges that affected the learning experience of participants and the smooth progress of the lesson. These challenges mainly centered on technical barriers, diverse learning paces, and the connection between theoretical knowledge and practical operation, and I adopted targeted strategies to address them, while also incorporating considerations for diverse learners’ needs into the lesson plan.
- In terms of meeting diverse learners’ needs, I incorporated multiple strategies into the lesson plan facilitation to ensure that every participant could benefit from the lesson. For visual learners, I prepared detailed diagrams, demonstration videos, and code commentaries to present information in a visual and intuitive way. For auditory learners, I explained key concepts verbally, conducted group discussions, and invited participants to share their ideas and problems aloud. For kinesthetic learners, I designed plenty of hands-on activities, allowing them to connect sensors, edit code, and test projects repeatedly to reinforce their learning through practice. For participants with slower learning paces, I provided additional resources (such as simplified guides and one-on-one support) and extended the time for practical exercises to ensure they could keep up. For advanced learners, I designed challenging extension tasks (such as combining the two projects to create a music-controlled humidity alarm) to stimulate their creativity and deepen their understanding of programming logic. Additionally, I created an inclusive learning environment where participants were encouraged to ask questions, share their mistakes, and help each other, ensuring that no one felt left behind. -Integrating Disciplines: Where does your lesson plan fall on the continuum and why? How might you move the lesson plan along the continuum to the next level? Multidisciplinary Interdisciplinary Transdisciplinary
- My lesson plan using Micro:bit, digital fabrication, and STEM is multidisciplinary.It combines skills from science, technology, math, and design, but each subject remains distinct rather than fully merged.To move it to interdisciplinary, I will have students intentionally combine coding, measurement, design, and problem-solving to complete one unified project, where skills from each area depend on one another.To reach transdisciplinary, I would center the project on a real-world student-led challenge that transcends subject labels, letting learners apply whatever knowledge is needed to solve an authentic problem. -AI Usage: If you used AI, describe how it was used and in which steps of the Field Activity.
- AI was used to help design project ideas, generate simple Micro:bit code snippets, and create student instruction guides during the planning and activity setup stages of the fieldwork. -Reflect on the course in general: How has your teaching changed as a result of this course? What are some concepts that you would like to learn more about?
- This course shifted my teaching toward more hands-on, student-centered STEM and digital fabrication learning instead of lecture-based lessons. I now design projects that let students create, test, and problem-solve using tools like the Micro:bit. I want to learn more about advanced transdisciplinary project design and assessing creative/technical work fairly. -How can you support other teachers in your practice to use digital fabrication with their students?
- I can share simple, ready-to-use Micro:bit and digital fabrication activities, model lessons, offer quick tutorials, and collaborate on adapting projects to fit different subjects and grade levels. Steps
- How it applies to your teaching / context
- Next steps or improvements
Tools
- Micro:bit V1 main control board -Extended board -Moisture Sensor V2 -Wood / plastic block -PC -Data cable -Power bank
- Plant
- https://www.youtube.com/watch?v=hiERNxxfxJQ
- https://www.youtube.com/shorts/Lg1–20PxAw
- https://makecode.microbit.org/
- https://www.scopesdf.org/scopesdf_lesson/plant-care-assistant/