M4 Week 2
Assignment Connect your microcontroller board with other device: it can be another microcontroller, application in cloud, a mobile phone… They should be able to communicate data generated/sensed using the board to the other end (E.g. of use case: monitoring system for school). You can also use your board to receive instructions from the other device (use case: robotics).
As an extra work, each device might belong to other FLA student from other lab / your own lab.
In your documentation, name the devices you’re using, along with the platform or technology used for communication between them. Clearly explain what you’re measuring and describe how data is communicated between the two endpoints. If you’re using external components, include a simple diagram illustrating how they’re connected. Provide your code (or a link to your code) for both ends, and include screenshots of the online system’s configuration, if applicable. Add several pictures showcasing your project. If possible, include a video demonstration.
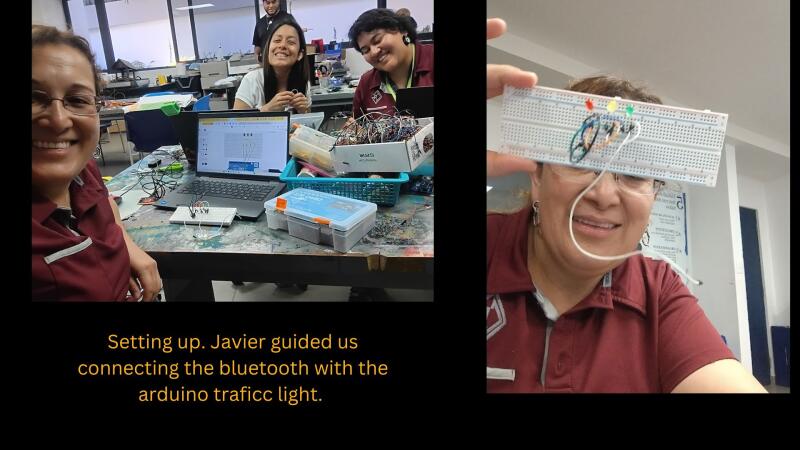
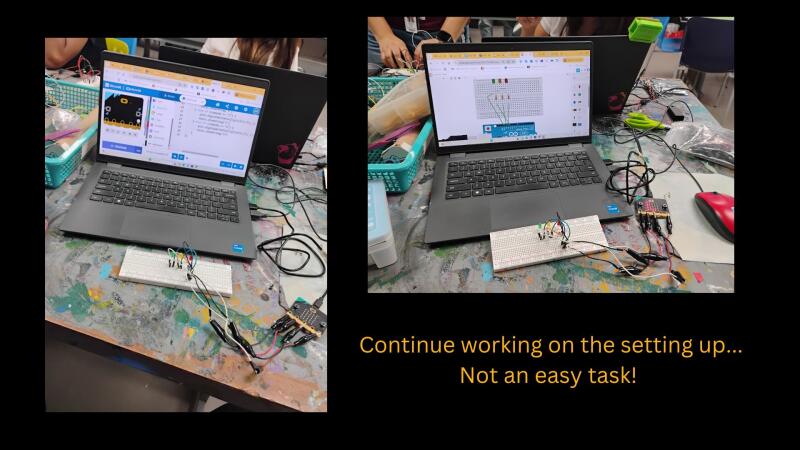
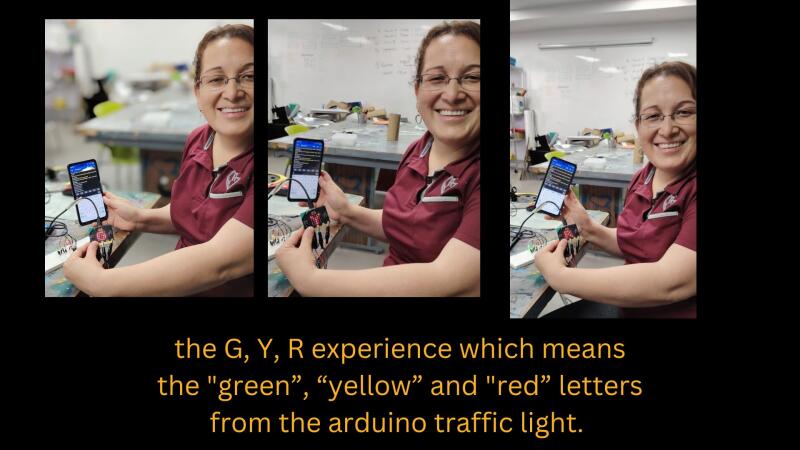
For this experiment we transferred information from Makecode to a mobile phone through a bluetooth application called “Serial Bluetooth Terminal”. We started recreating a circuit we had previously practiced about turning on the lights of a traffic light using the protoboard and arduino model in a microbit. Then we installed the bluetooth app in order to transfer the information to the light leds. We faced some difficulties with the bluetooth but finally we could turn on each light as shown in the pictures. Bea reset some information and the magic happened between the communication of the two points. Again I just have the pictures of the activity but it vanished from my Microbit account because of the need of erasing “memory cache”. Javier guided us a lot. This was my first time going through this experience and I would need more practice to feel that I master this knowledge and skills.
In addition, please, answer following reflection questions:
What are some opportunities in your context to work within your local community? Who you could collaborate with? How? What should happen to succeed in the collaboration
Our collaborative efforts are primarily internal, necessitated by the specific socioeconomic context and a lack of external opportunities. Due to limited regional infrastructure and security concerns, expanding our partnerships beyond the school remains a significant challenge. While I hope to eventually foster broader connections, our current focus is on strengthening our internal platform for innovation. We are dedicated to providing a secure and enriched learning environment for our students despite these external limitations.
What are the next steps in development further a makerspace in your school? How do you envision the maker space?
Although I provided extensive evidence and information regarding this goal in my previous assignment, the path forward remains challenging. It requires consistently convincing the board, the leadership team, and my colleagues—many of whom already recognize the need for this space but may be hesitant about the implementation. Despite the difficulty, I feel motivated. I often compare this journey to climbing a volcano: it is an arduous task, but I know the view from the top will be worth the effort.
What is the potential of physical computing and IoT for your teaching? Do you have any ideas on how you are planning to integrate those techniques in your context?
We’re definitely moving toward a world of automation and the “Internet of Things,” where everything is connected through online platforms. In my current context, however, that reality still feels a long way off. Since I still consider myself a beginner, I’d really like to see how other schools are managing this already. Observing their process would give me a better perspective on how we might eventually bring those ideas into our own space.
Tasks in the Fab Lab Connect two different development boards. There are some tutorials in Technical Guides and tutoring sessions
In addition, we recommend also to use one online platform for the IoT which you can use to connect your board to the internet and to an online service for IoT
Answer to Maxime’s feedback
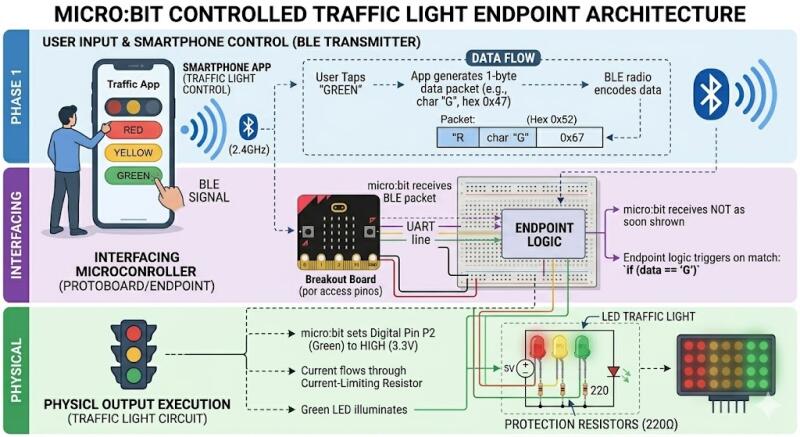
Here is the explanation that Gemini helped me to understand and to wrap up the process which was very challenging for me. I am including the written explanation and the diagram AI created for me using my prompt first in Spanish to make sure I included every single detail of the process and then translated in English to communicate the result.
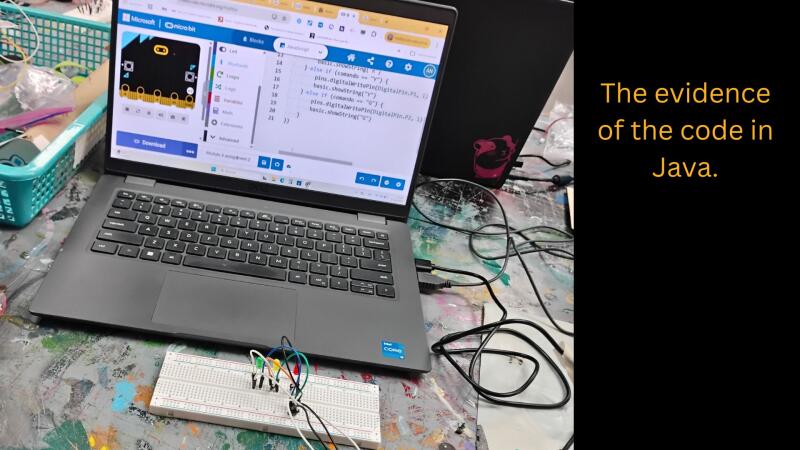
The process of turning on a light via Bluetooth is divided into three distinct phases: Transmission, Interpretation, and Execution.
- Phase 1: User Input (cellphone) Everything starts with the User Interface (UI) on the phone.
The Command: When you tap the “Red” button in the app, the phone doesn’t just send “light up”; it sends a specific 1-byte data packet (usually a character like ‘R’).
The Medium: This data is encoded into a Bluetooth Low Energy (BLE) radio signal and broadcasted at 2.4 GHz.
- Phase 2: Interfacing (The micro:bit Endpoint) The micro:bit acts as the communication Endpoint.
Receiving: The micro:bit’s internal antenna catches the BLE signal.
Logic: The code you wrote (which we saw on your laptop screen) is constantly listening. It uses a logic gate:
if (receivedData == “R”) { … }
Trigger: Once the “R” character is matched, the micro:bit converts that software command into a physical change in voltage.
- Phase 3: Physical Output (The Protoboard) This is where the electricity flows to create light.
Digital Out: The micro:bit sets a specific pin (like P0) to HIGH (3.3V).
The Circuit: Current flows from the pin, through the jumper wire (or alligator clip), and into the protoboard.
Protection: The current passes through a 220Ω resistor. This is critical because it limits the electricity so the LED doesn’t burn out.
Illumination: Finally, the electrons pass through the LED, and the traffic light turns Red.
Tools
- Tools or software used
- References or tutorials followed