Week 4: Circuits
Assignments
Design a simple electronic circuit using a simulator: put in a battery, an LED, and a sensor or switch. Use TinkerCAD (or other). Take a screenshot of your circuit for your Learning Diary.
Build simple circuits using battery, LED and different conductors: copper film, pencil… Post a photo on your Learning Diary.
(Optional) Use a Makey Makey board (or similar) to interact with a computer game/program. Explain in your learning diary briefly what you have done. Not recommended use yet microncontrollers board such as Arduino, Microbit or similar, unless you have already experience.
Answer the following reflection questions:
- Imagine an educational activity using simple electronics components (preferably without microcontrollers) that is suitable for the age group that you are teaching. Describe it (provide goals of activity and methodologies). Consider also the role of the kids: would you classify it as Digital Fabrication for kids or with kids? Why? It is preferable that you integrate any of the circuits you have created in step 1 or 2.
- What are the challenges of using electronics in your space? How can this support your students in learning classroom content?
- What has been your experience using Project Based Learning / Problem based learning in the past? What were the main challenges?
Process
For my circuit, I used a base that is commonly used in early Physics education: a ticker timer. These setups are used to measure distance travelled by an object and compare to the time interval between ticks, in order to find the object’s speed and acceleration.
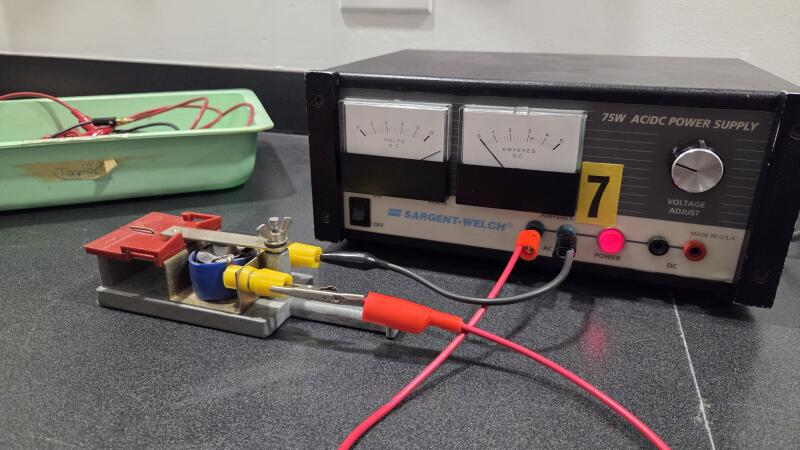
The basic circuit only really has two main components: the ticker, and a 60Hz AC power supply. The frequency of 60Hz is important, as the ticker should have a consistent tap rate of six times every tenth of a second, to provide accurate results that are easy to convert to a measurement of movement speed (measuring every sixth tick gives a consistent time interval of 0.1 seconds, and ten times the distance between those six ticks is equivalent to the average velocity over the course of that tenth of a second).
To make the circuit a little more interesting, I added a switch in series with the ticker, and a light bulb across the switch and ticker in parallel. As this is an alternating current, the bulb should, in theory, blink sixty times every second, at the same rate of the ticker’s tapping. While this is mostly invisible to the naked eye, it can be heard, and was caught on slow motion video.

When the switch is opened, the only component receiving power is the light bulb.
When the switch closes, both the bulb and the ticker receive 12V of AC power at the 600Hz frequency.
Here’s the ticker timer in action:
And here’s the bulb blinking:
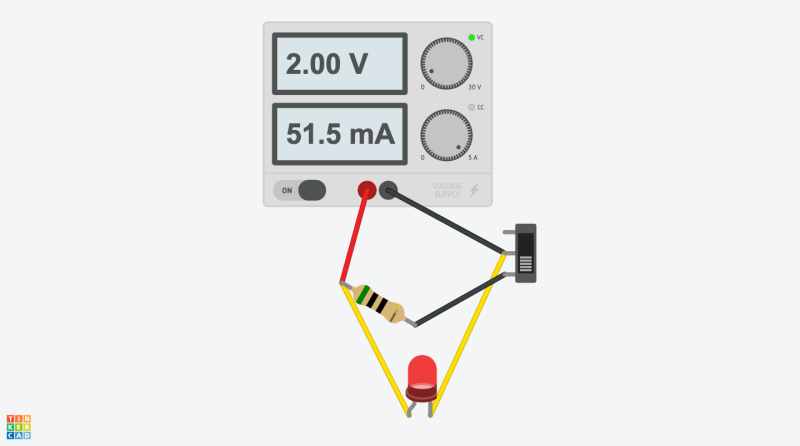
I also attempted my best to replicate this circuit in programs like TinkerCAD:
and CircuitLab:
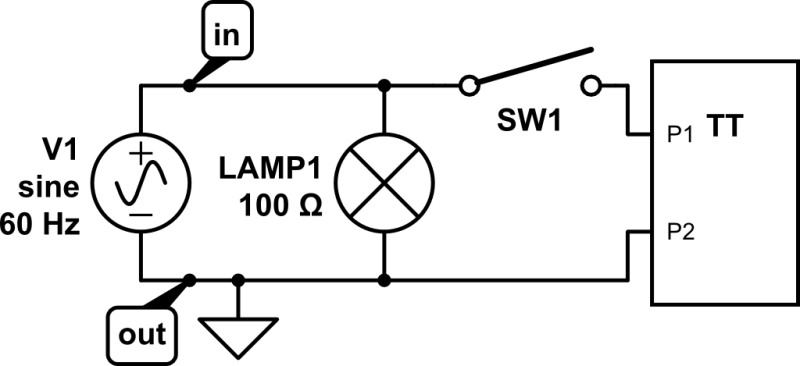
Obviously, these programs don’t have the exact components that I used, but I made do.
Reflection
- As mentioned, this circuit is a key element in early kinematics, as it can provide students with a context for instantaneous and average velocity and acceleration. I certainly would not consider this digital fabrication, though it could absolutely be argued to be analogue fabrication! More advanced circuits using transistors to act as logic gates would certainly be digital, but that is not really a topic appropriate for the high school level. While I generally tend to prefer physical demonstrations rather than electrical, there are certainly opportunities where circuits or even electronics can be useful tools for demonstrating essential concepts for Physics.
- While I do not teach Grade 10 myself, electricity and circuits play a fundamental role in the curriculum for Secondary IV Science. As a result, having students learn to construct and understand the function of circuits is essential. They need to understand the flow of electrons and how the interaction between resistance and electric potential allows energy to be transformed in order to understand energy itself—one of the key concepts of physics.
- PBL is something that I consistently try to use in the classroom at the smaller scale in Physics. After students have grasped the basics of a topic, I try to get them to think of the ways that these concepts can be stretched to new contexts. For example, in our recent unit on Circular Motion, I presented students with two separate problems to work together to try to figure out. Knowing the law of universal gravitation, how centripetal force is always the resulting net force in circular motion, and that they need to determine what forces are acting towards the centre of the circle, I tasked them with determining how to achieve stable geosynchronous orbit. Many students were able to solve the problem, which was not easy! After a period of time, I switched to direct instruction, explaining explicitly how the problem can be decomposed with the aid of the students in the class who had solved for certain parts of the puzzle. While it makes for a great lesson on small scales, I find that it mainly benefits students who are already actively engaged, at the expense of those who weren’t. It functions much like practice problems after the fact, but for some students means a much greater rate of retention from the experience. I just wish they all learned like that!
Tools
- Sargent-Welch 75W AC/DC Power Supply
- IEC 5-12V Recording Timer
- SPST (Single-Pole, Single-Throw) Switch
- 75W Light Bulb
- TinkerCAD Circuit Creator
- CircuitLab