Week 9: Microcontrollers
Assignments
Use one development board (arduino, microbit …) and use it to sense something in your class (noise / light / movement) and produce some kind of response (audio, light, movement)
In your documentation, describe briefly your project; name the board you are using, as well as the sensor and actuator; Explain what you are measuring and how you are using the actuators; if you are using external components, draw a simple diagram on how they are connected and finally provide your code (or link to your code). Include several pictures of your project. If possible you can include a video.
In addition, please, answer following reflection questions:
- Did you bring several disciplines together in your own teaching? Do you collaborate with teachers in other disciplines? What are the opportunities and challenges.
- How do you envision a makerspace in your school? How does it look like? If you have one already, how would you modify it.
- After the definiton of computational thinking? Are you somehow using computational thinking in your teaching? How? Do you think you can take advantage of computational thinking? How?
Process
This week, I decided to focus on potential ideas for FA4. One idea that I had was an interdisciplinary lesson about the effects of salinity on water’s ability to refract and reflect light, which ties into the Physics topic of Optics as well as Environmental Systems Sciences topics relating to ocean life. To accomplish this, I set out to design a simple light sensor for measuring how the amplitude of a light wave changes as it is refracted through salt water as compared to its initial brightness value. micro:bits are equipped with a simple LED screen which can be reversed to detect incoming light, so they seemed to be an ideal candidate for this task. Additionally, micro:bits’ radio functionality and ease of connection to a computer to transmit data would allow the sensor to be simple and handheld while another micro:bit records the data in the computer terminal.
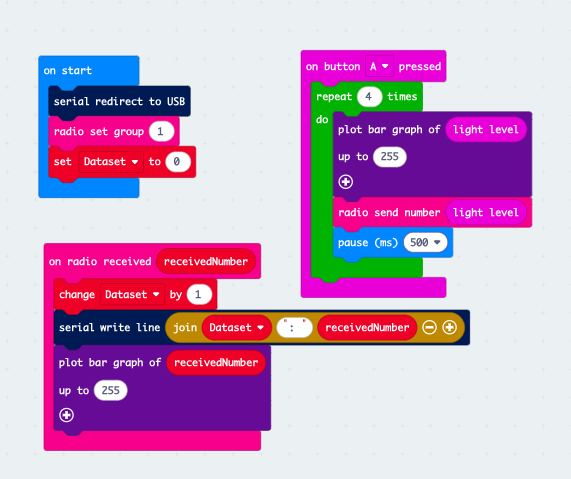
I used a simple block code for this function. The start code initialises the radio control, serial bus, and counter variable, then the system idles until one of two things occur. This allows the same code to be used for either the transmitter or the receiver micro:bit.
For the transmitter, it reacts to a press of the ‘A’ button, which the user presses when ready to collect data. It then collects four data points over the next two seconds, in order to account for random fluctuation. These points are displayed on the micro:bit LED screen and sent to the receiver.
For the receiver, it reacts to values being transmitted. Whenever it receives a data point it assigns it a number, displays it in the terminal, and adds a line break.
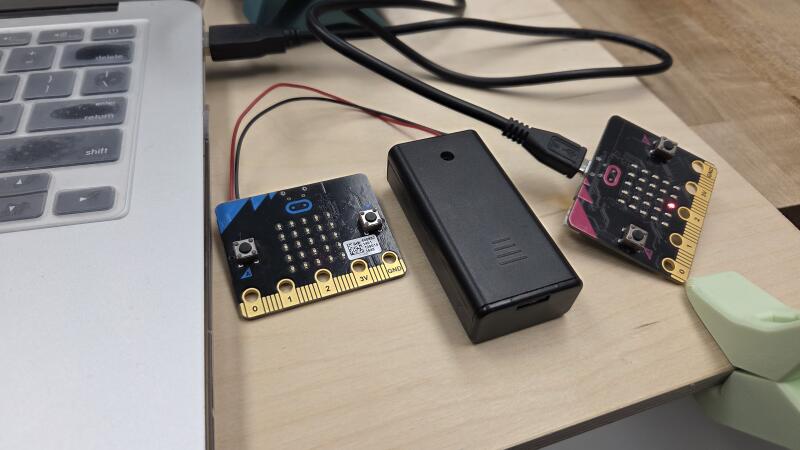
When the code was complete, I downloaded it onto a pair of micro:bits and tested the light sensor. It worked, and was fairly sensitive to changes in light levels.
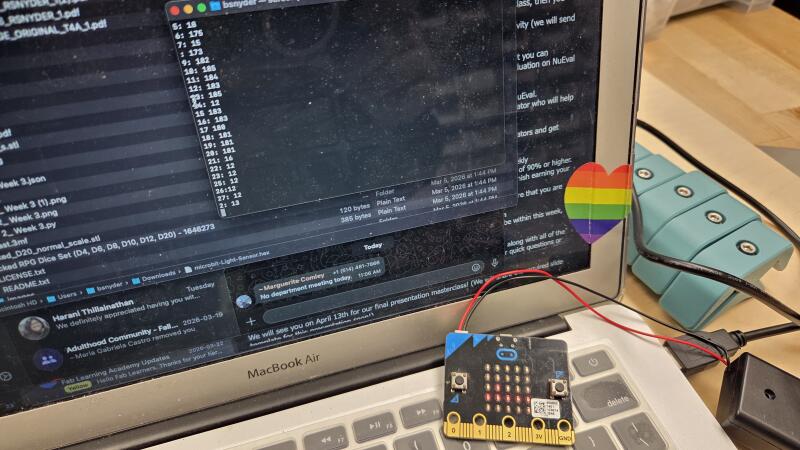
To view the results in terminal, it required locating the port connection between the USB cable and the computer using ls /dev/cu and calling that port to the terminal screen using screen /dev/cu.usbmodem##### 115200.
Reflection
- As a Science and Design teacher, I try to bring these disciplines together in my teaching, but it is often difficult to do so within the confines of the curriculum. In general Science in Grade 9, there are opportunities to discuss a wide range of topics, but that narrows in more specific classes like Physics 11. While I work very closely with many other Science and Design teachers in the school and occasionally work in tandem with Math teachers, it is difficult to get out of the ‘bubble’ and talk to teachers in entirely different disciplines.
- The makerspace at LCC is very well equipped, but could obviously use improvements. Many have been or are being implemented now, particularly new methods of organising materials or upgrades to old equipment. I would love to see new equipment like a multi-axis CNC mill, but primarily what I want to see in the makerspace is more students! I want it to be a place where students feel welcome and able to try new things, even if they don’t know what they are doing. So often, digital fabrication can feel daunting or inaccessible, even when the school makes it as accessible as we can. Ideally, the makerspace should feel like a playground where students can make things, make mistakes, and learn as they do.
- Computational thinking comes naturally to me. Turning any problem into a workflow or an algorithm is a great way to break things down to make them easier to manage. I use this especially in Physics, whether in my Grade 11 class or the physics unit in Grade 9. Decomposing a problem into its base elements, taking stock of what information is provided and required, and determining what steps are needed to get from A to B are essential to problem-solving. I often introduce new types of problems to students and provide the algorithm for success with similar problems. I find that this helps students to understand problems and to feel less intimidated by having to think about too many steps at once.
Tools
- micro:bit
- Microsoft MakeCode for micro:bit